Kuih Makmur Sabah , Peanut Cookies

When directly translated it means prosperous cake. Don’t know much about it being prosperous but it certainly is a hit during festivities in Malaysia. It’s also not a cake, but a delicate peanut cookie made with ghee or clarified butter that melts in your mouth.
I was inspired to make this from a long forgotten Morale studies teacher in the primary school I attended. She used to bake and sell these festive cookies during our annual school bazaar with the help of some students.
This recipe is fantastic and it produces such tasty and delicate cookies. (A bit self praising here…sometimes you just have to!)
Ingredients
- 4 cups All-Purpose Flour
- 1 cup Ghee or Clarified Butter
- 1½ cups Roasted Peanuts, salted or unsalted
- 1 cup Sugar
- 1/8 teaspoon Salt (if using unsalted peanuts)
For Coating
- ½ cup Milk Powder
- 1 cup Icing Sugar
Directions:
- Coating
- In a plate, combine powdered milk and powdered sugar. Set aside.
- Cookies
- Pre-heat oven to 160°C. And prepare at least 2 baking trays with parchment paper.
- Dry fry (without oil) flour in a pan on medium heat for a few 4 minutes – not till its brown. This is done to make the flour fluffy. Set aside and cool.
- In a food processor, blend peanuts and sugar till fine grain consistency.
- Add ghee and flour and mix till it starts forming a dough.
- Take dough out and knead a little on a clean and lightly dusted with flour surface. If the dough feels dry, add more ghee. Do not over knead.
- Use a melon spoon to form balls for uniformed shape and size. Place balls on baking tray – it does not have to be spaced out much like normal cookies as these do not expand in size.
- Bake for 20 minutes.
- Allow balls to cool for about 10 minutes but still warm.
- Roll each ball gently in milk and powdered sugar coating.
- Cool completely.
Tips:
Enjoy!

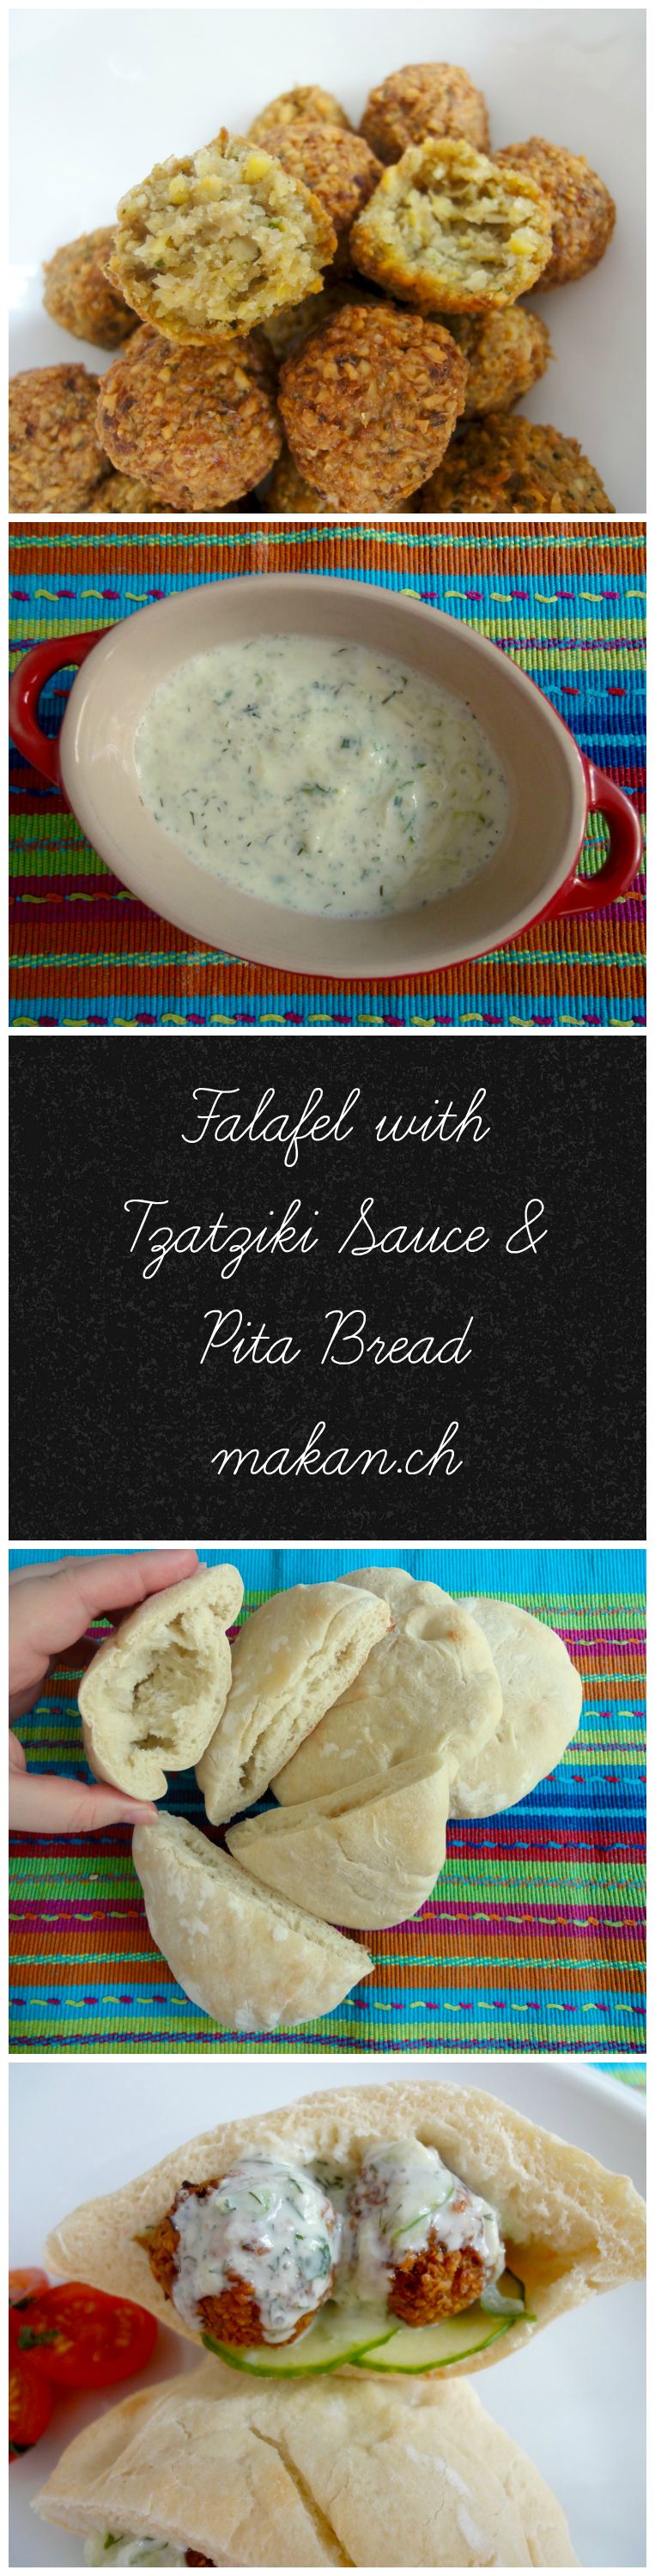
Pita Bread
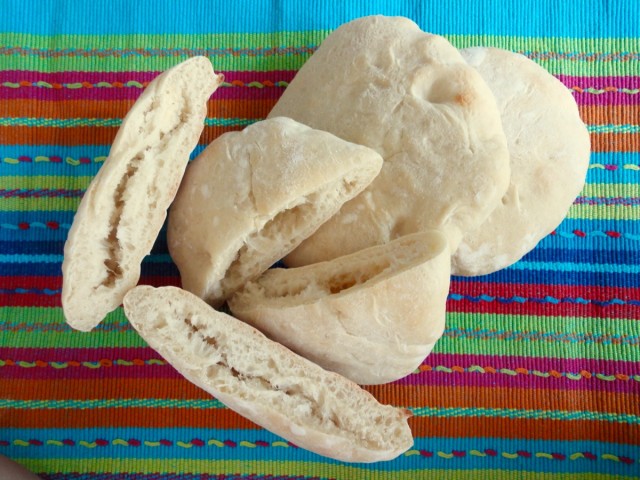
Making pita bread at home is not that difficult, but it is a little time consuming unless you have a bread maker. Well, what bread isn’t really time consuming anyways? I use my stand mixer for this recipe.
The results are absolutely lovely! It beats the ones sold at the grocery store here. Unless of course you fancy dry, hard, and commercial tasting pita bread…
Pita’s may be used to dip in sauces or dips such as hummus and curries, or to stuff sandwich fillings in such as Falafel, egg salad, tuna and chicken salad. For those that did not puff up (pocket-less), it can be cut and baked to make pita chips.
The ones I made here rose a little too much. We are currently experiencing an absolutely hot summer and I accidentally left it out to rise too long. It was still yummy…just a wee bit fluffy.

Ingredients
- 3 cups All-Purpose Flour
- 1¼ cups Warm Water (45°C)
- 1½ teaspoons Dry Yeast
- 1 teaspoon Sugar
- 1½ teaspoons Salt
- 1 tablespoon Olive Oil
Directions:
- Combine yeast, sugar and 1 cup of water. Let proof for 5 minutes or until frothy.
- Using a stand mixer, mix all ingredients together using a dough hook.
- Knead for 5 minutes on medium high . If dough looks very dry, add water bit by bit.
- Transfer to counter top and hand knead till dough is soft.
- Place dough in an oiled bowl and cover with a damp towel.
- Let rise for an hour or till doubled in size in a warm place.
- Place dough on counter top. Divide into 8 equal pieces.
- Gently roll the dough into a balls.
- Flour counter top well.
- Use a rolling pin to roll dough into a 6-inch circle.
- Cover with a damp towel for 15 minutes, till slightly risen.
- Meanwhile, pre-heat oven to 260°C (500°F).
- Place pita’s on rack, about 4 at a time and bake for 5 minutes till puffed and slightly browned.
- Remove from oven and place pita’s in a paper bag. Seal.
- Once pita’s have cooled down and soften in paper bag, it’s ready to be served.
Tips:
- Step 10: Ensure there is enough flour on the counter top so that when pita’s rise, it will not stick to countertop.
- If you do not have a paper bag, you can cover pita’s with a clean damp towel.
- Paper bags should not be scented. I once used a Lush paper bag because that was all I had on hand…I had Lush scented pita’s.
- Cups to Grams conversions
Happy Baking!
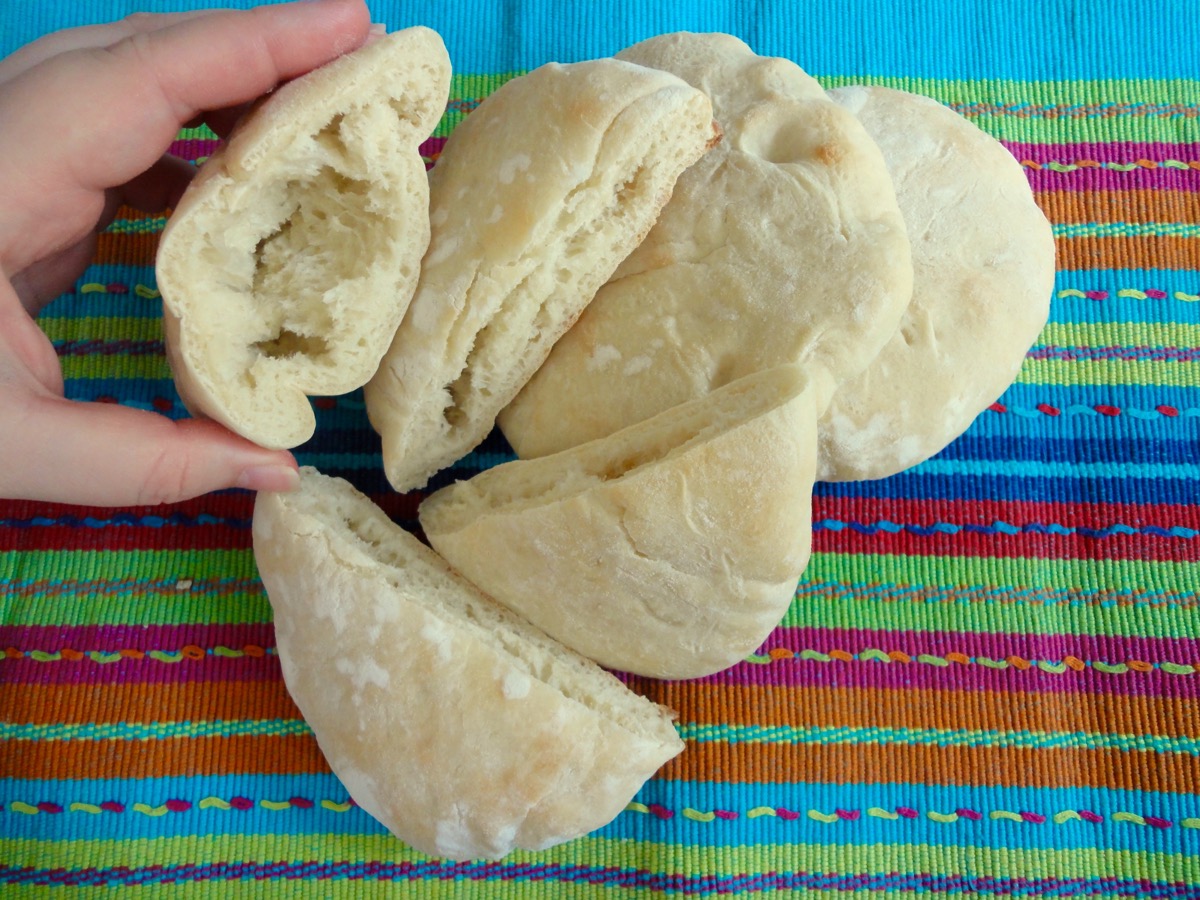
Pita Bread Pocket
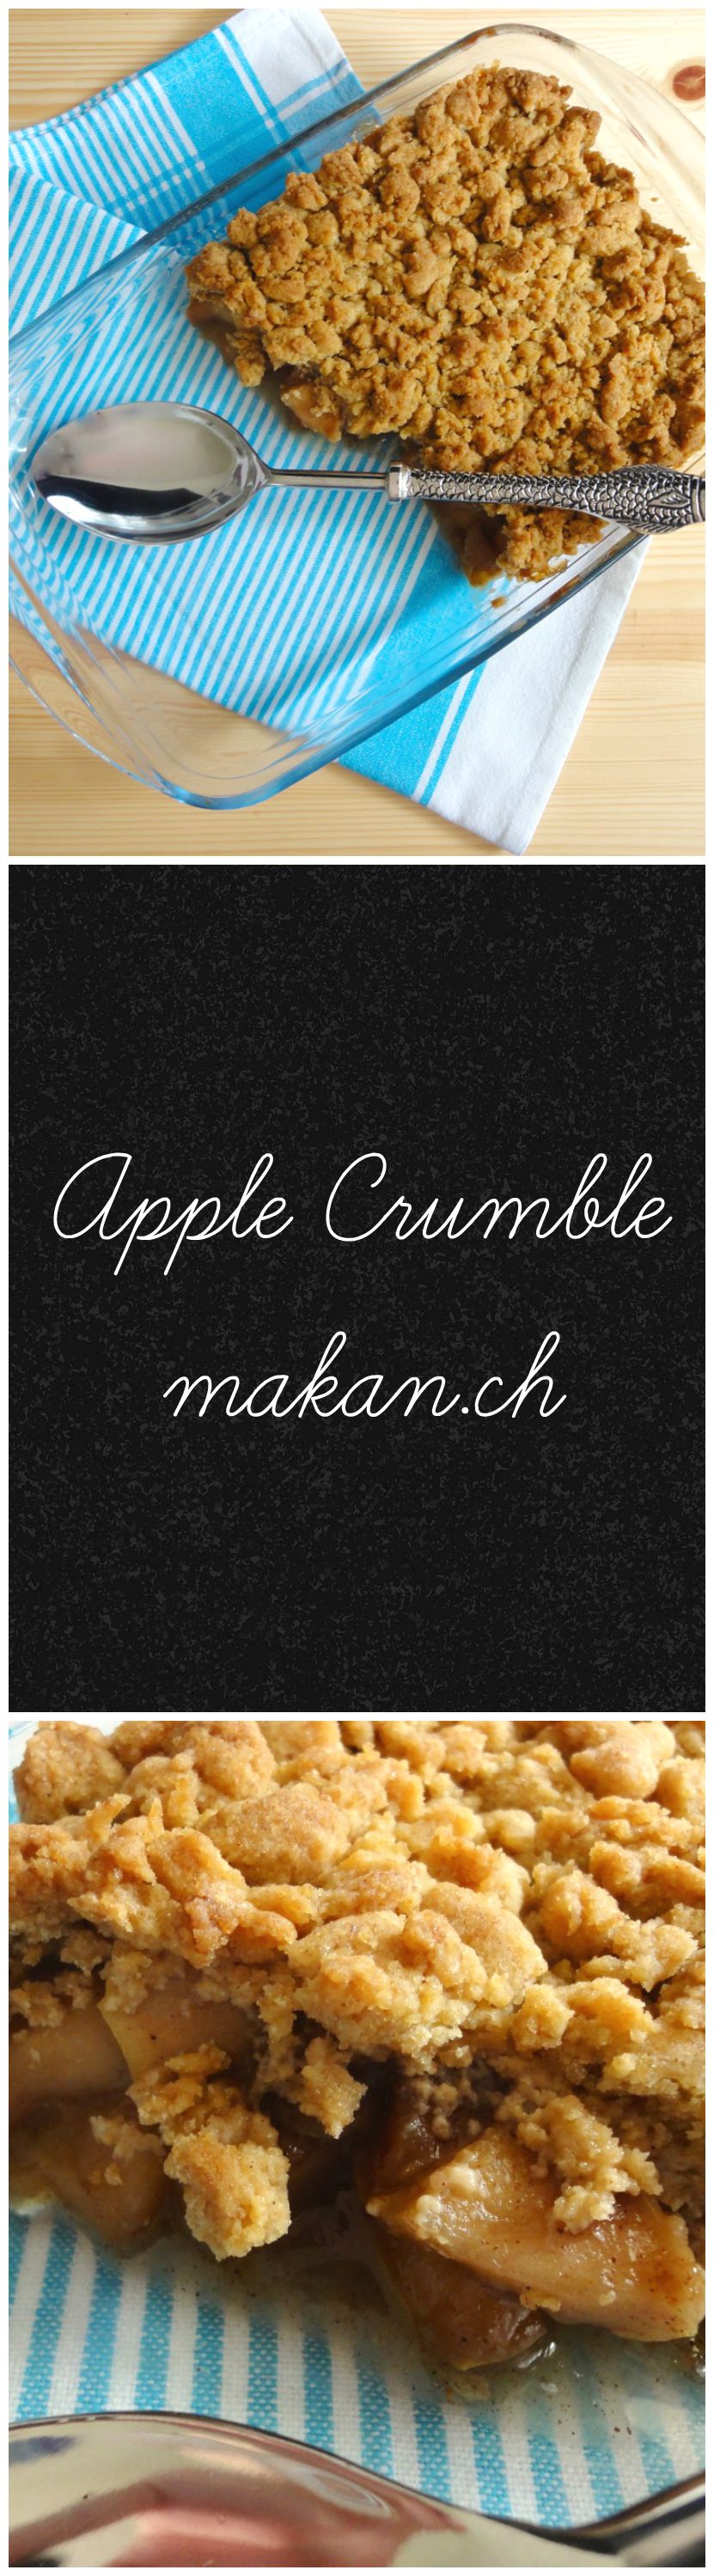
Apple Crumble
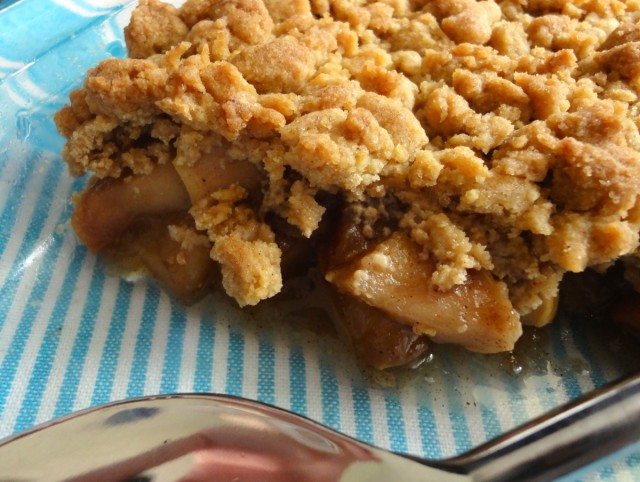
Apple crumble is one of my comfort food go-to’s. I enjoy eating it throughout the year with whatever apples I can get. This time though, I made this particular one because I mistakenly ordered a large bag (2.5 kilos) of cooking red apples. There was no name on the apple bag other than Grade 2 cooking apples. It was not too sweet, a little tart and crispy.
I was shuffling between making apple jam, apple butter or apple crumble…obviously went with the crumble because I have 4 types of jams in the fridge and that’s gonna take me some time to finish it off. Most recipes don’t require the apples to be cooked prior to baking, but I personally like cooking the apples prior so that it really gets infused with the spices but not too long that it gets too soft.
This recipe keeps for up to a week in the fridge and is great eaten hot or cold!

Apple Crumble
Apple Filling
- 6 large Cooking Apples
- ¼ - ½ cup (depending on sweetness) Brown Sugar
- 6 sticks / 1 tablespoon (powder) Cinnamon
- 4 pieces Star Anise
- 4 pieces Clove
- 2 pods Cardamon
- 1½ teaspoons Nutmeg
- 2 tablespoons Water
- 2 teaspoons Cornflour
- To taste Salt
Crumble
- 1 cup Flour
- 1 teaspoon Baking Powder
- ½ cup Butter, cubed
- ½ cup Packed Brown Sugar
- ¼ teaspoon Cinnamon Powder
- ¼ teaspoon Salt
Directions:
- Apple Filling
- Set aside apple filling aside.
- Take 1 teaspoon of water and mix it with the cornflour. Add to apple filling and mix well.
- Cook on medium high for 15 minutes.
- Add to a saucepan or pot. Except for the cornflour, mix in all the apple filling ingredients.
- Core and cut apples into 1 inch chunks.
- Crumble
- Remove and combine more by hand.
- In a food processor, add all the ingredients and pulse until large crumbs are formed.
- Assembly & baking
- Pre-heat oven to 190°C.
- In a 9 x 9-inch glass or ceramic baking dish, add the apple filling.
- Pour crumble evenly over the filling.
- Bake for 30 minutes.
- Serve immediately with vanilla ice cream, cream, or even custard.
Tips:
Happy baking & enjoy!
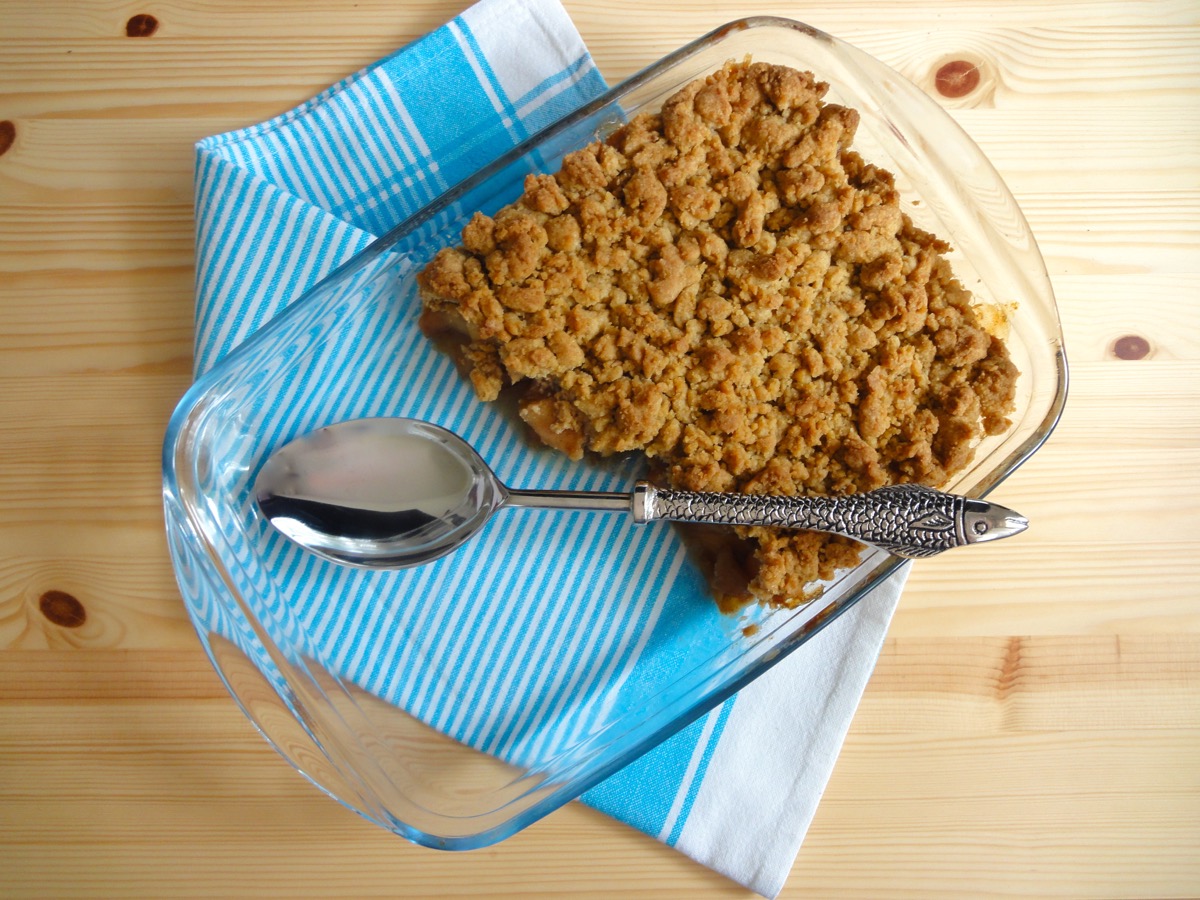
Apple Crumble with my new fishy serving spoon!
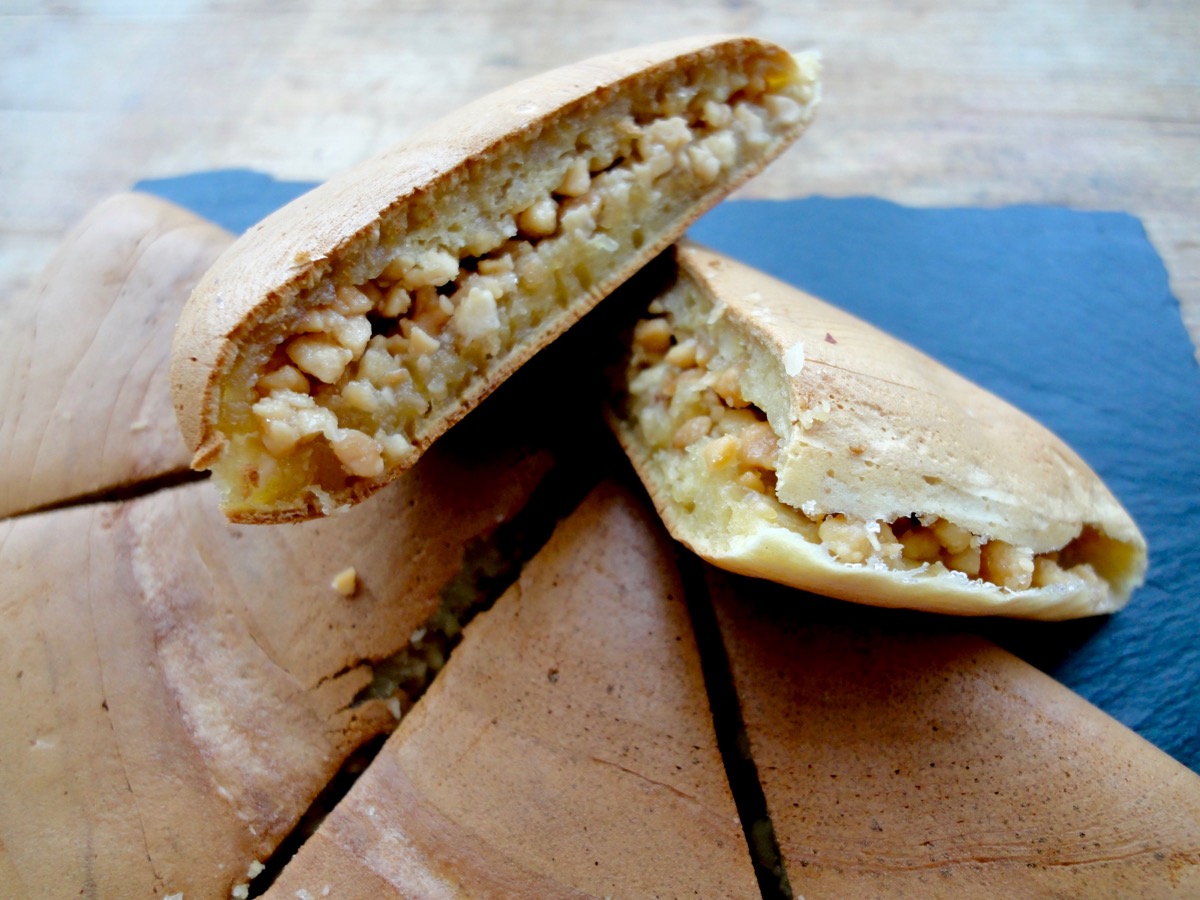
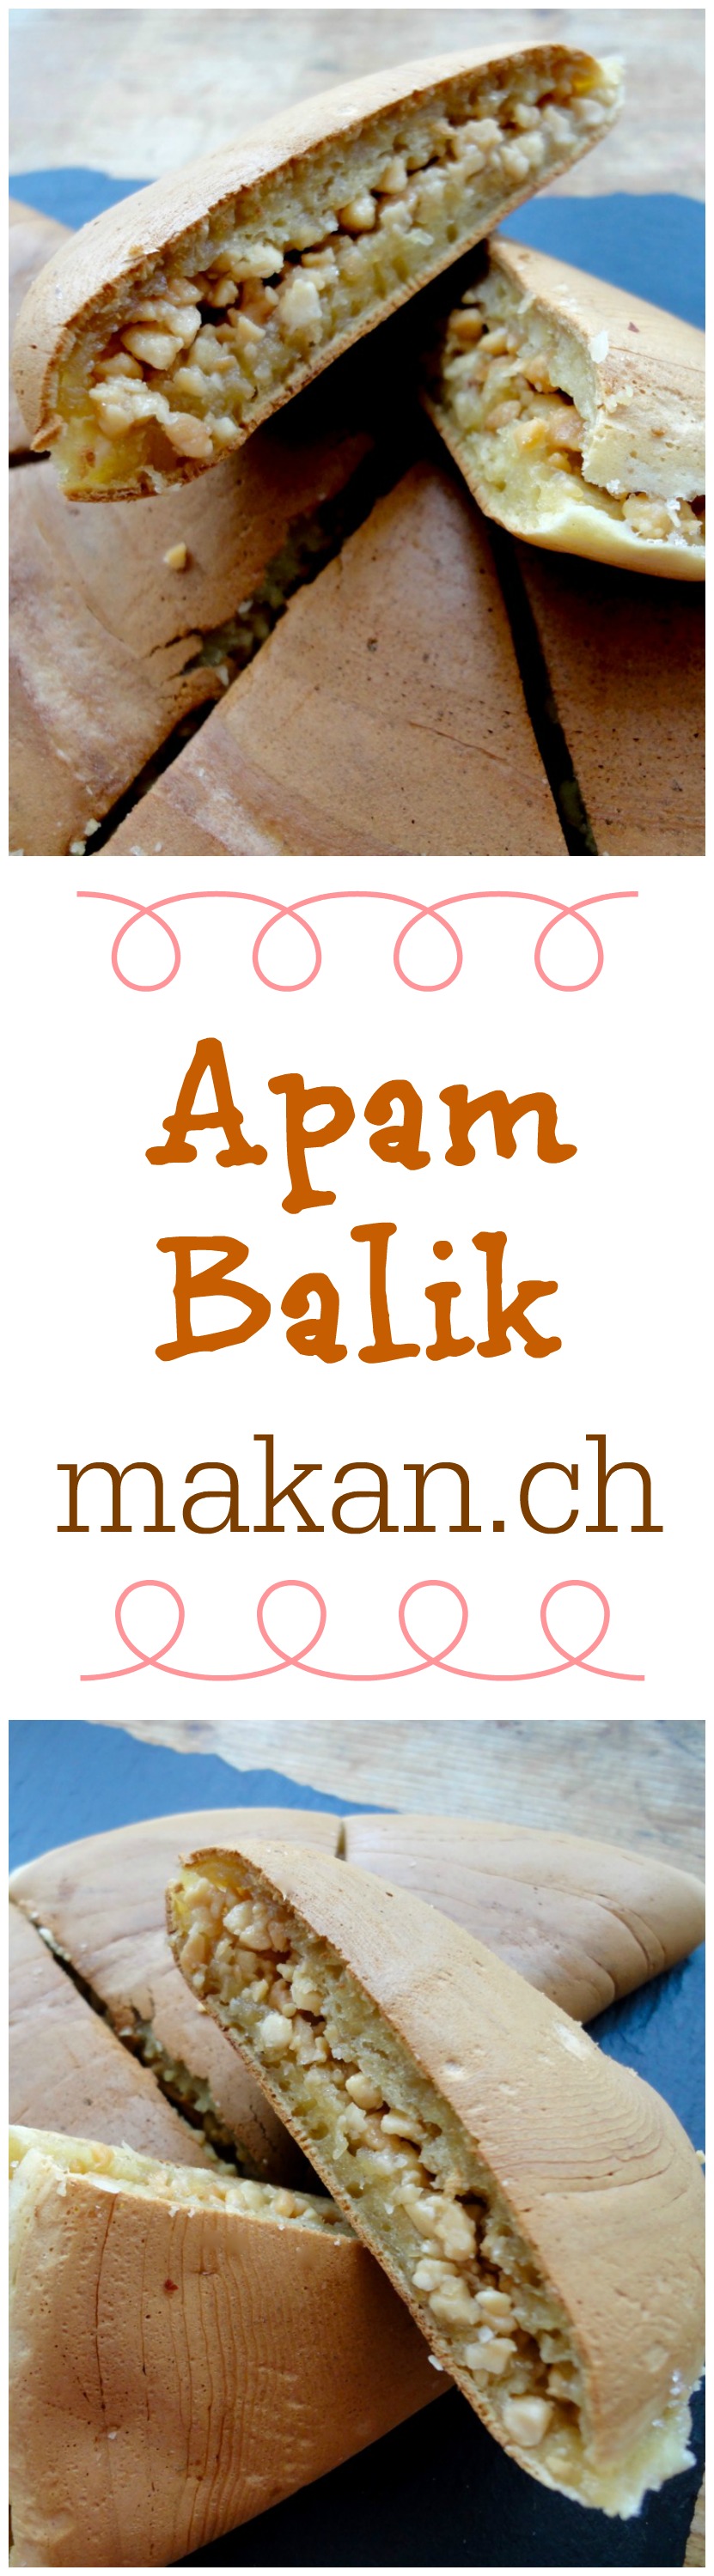
Apam Balik
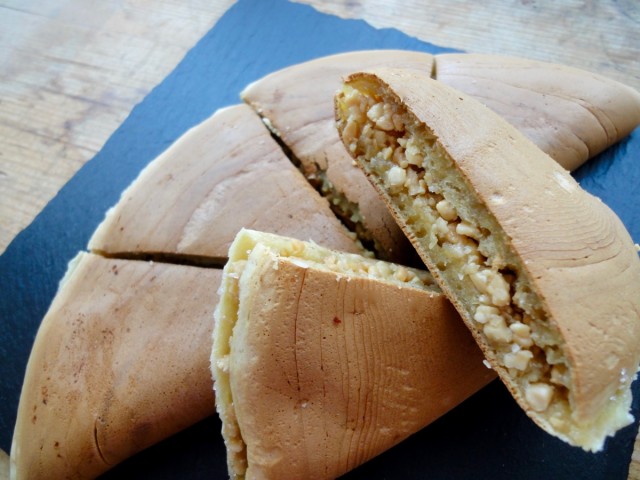
Sometimes, it’s the most simplest thing you miss when you are away. Like, the way the wifi automatically connects and is super fast when you come home from a holiday, or those soft toys that have always been your sleeping companion, or the smell of freshly made pancakes. This week, I was missing this, Apam Balik. It’s a simple yeast pancake filled with peanuts and sugar. I remember waiting at the Saturday night market for these hot peanut pancakes and taking small bites in the car while no one is looking… which you can get away with when eating the thicker version of the pancake. Yes, there’s a thick and thin version. Both are equally good.
Apam Balik has many names. In English it would called a Pancake Turnover. It’s also called Martabak Manis, Terang Bulan, Apam Pulau Pinang, Kue Bandung, Kuih Haji, Min Chiang Kueh, Hok Lo Pan, Ban Jian Kuih or Chin Loong Pau. I honestly never knew there were so many names for it! It’s a typical street food which can be found in Malaysia, Singapore, Brunei and Indonesia.
Though I was missing this, I could not just whip it up like I normally would do. This one was made specially for a gathering with my lady friends here. In these potluck gatherings, we have Malaysian home cooked food. It’s a time where we reminisce eating family style with food we all grew up with. A time to chit chat in our mother-tongue and a time for the little kids to get together and play while the mommies enjoy their food. My contribution this time is Apam Balik and Batik Cake.
This recipe is adapted from one of my favourite Malaysian bloggers, Sea Salt with Food – Apam Balik
Pancake Batter
- 1¼ cups All-Purpose Flour
- ½ teaspoon Baking Soda
- ½ teaspoon Instant Yeast
- 1 Egg, large
- 3 Tablespoons Sugar
- A Pinch Salt
- 1 cup Water
Peanut Filling
- 1½ - 2 cups Roasted Peanuts, coarsely grounded
- ½ cup Sugar
- 4 thin slices ( 5-10 grams each) Butter/Margarine *
Directions:
- In a bowl, mix all pancake batter ingredients together till smooth.
- Cover bowl with cling wrap and refrigerate for 5 hours or overnight.
- Lightly oil a small non-stick pan on medium heat. (I did not need to oil mine, as my pan is fairly new).
- Once pan is hot, add ½ cup of pancake batter and evenly coat the pan. Cook till the batter starts forming little bubbles on top.
- Sprinkle some sugar and a generous amount of grounded peanuts. Cover with a lid and cook till the batter has set or has turned golden brown at the bottom.
- Add sliced butter or margarine onto one half of the apam balik.
- Loosen the edges and fold the apam balik into half. Transfer onto a cooling wrack and cook the rest.
- Slice into quarters. Best when served warm.
Tips:
- Conversion chart
- *I do not like using margarine as I’m a butter person, but with these, margarine is the way to go for an authentic taste.
- *Instead of adding butter or margarine in the apam balik, you can either oil the pan with it or brush it on once the apam balik is cooked.
- If you are using MyFitnessPal app to count calories DON’T FOR THIS RECIPE! (I’m kiddin’), first copy the recipe URL then go to MyFitnessPal app to Recipes, select Create a New Recipe, then Add from the Web. Paste the URL, match ingredients and that’s it!
- Always match ingredients to the ones you use. Ingredient nutritional facts differ depending on brand.
- Nutrition Facts (based on my ingredients) : Per serving (1 apam balik/4) 369 kcal, Total Fat – 9 g, Total Carbs – 64 g, Protein – 9 g.
Selamat Menjamu Selera!
Croutons
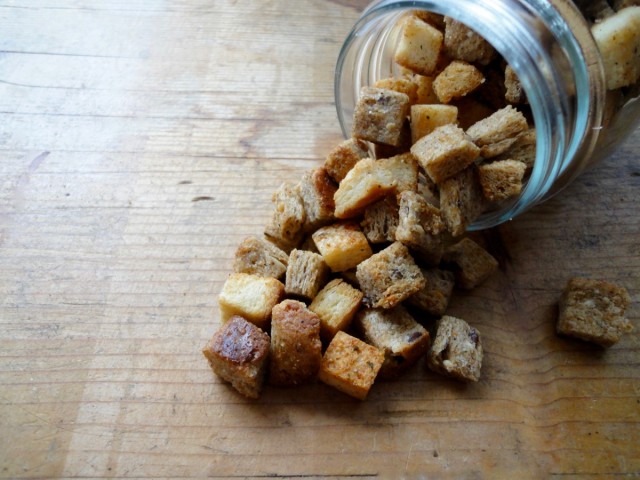
Little gems on salad! Tastes 100% better than store bought croutons.
I love croutons and I love making them. Back when I was working, I used to eat croutons with sour cream everyday. I was addicted to it. Then in my other job, I had to make croutons twice a week using lovely brioche toast which made the croutons taste even better! I could not keep my hands off those too, that’s why I had to make it twice a week!
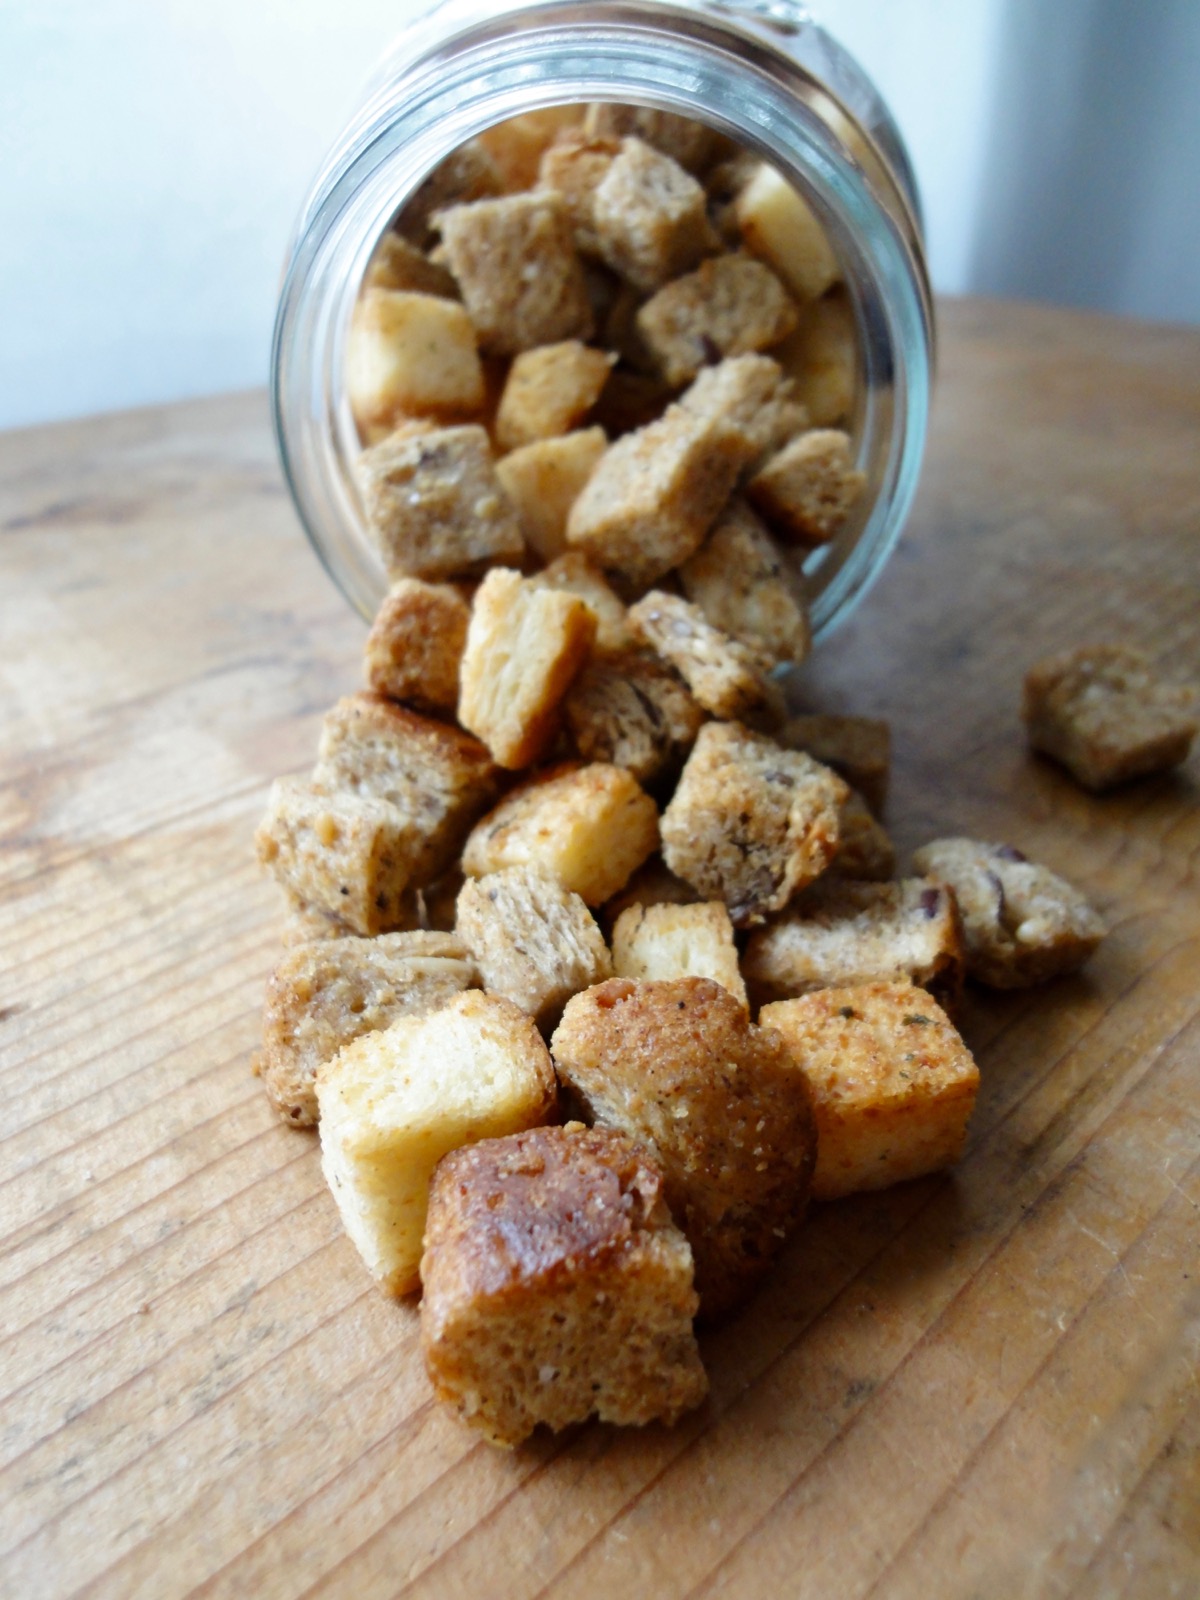
Now I’m on a very strict low carb diet. So croutons are out of the picture. I’m only on day 4 and I miss bread so much! Anyways, I made this batch here with half white bread and half wholemeal bread – just to make myself think it’s better than just going full white. I gladly sprinkled it over my salads while it lasted. So for all those who are not on a strict diet, please eat some on my behalf.
This post is dedicated to my sister. After she got married, she started to cook at home. See, she’s not that domesticated when it comes to the kitchen. She’s better in the cleaning department and keeping the place tidy. I remember one day she made salad and then posted on Facebook that she did not have croutons. So I told her just toast up some bread and you’d have croutons. Her reply was, why would I make a condiment! HAHAHA I’m sure her cooking has improved a lot over the few years plus she knows how to cook rice well. I’ve not eaten her cooking yet. Though, there was a close call when we were younger. Our mother was out and we were playing outside the kitchen. She proceeds to cut grass and brings some water to boil. She then boiled the grass and added salt and pepper. The next thing I knew was she was trying to force me to drink her grass soup!!!! Mother came back in time to save the day. So dear sister, you are a year older today and I hope you do not attempt to cook grass soup anymore. 😛 Happy Birthday and cook more!
Ingredients
- 8 slices Sandwich Bread
- 2 Tablespoons Olive Oil
- 2 teaspoons Garlic Powder
- 2 teaspoons Onion Powder
- 1 teaspoon Oregano
- To taste Salt
- To taste Black Pepper Powder
Directions:
- Pre-heat oven to 150°C (300°F) and line a baking tray with parchment paper.
- Cut sandwich bread into small cubes. Put bread cubes in a medium sized bowl.
- Drizzle oil over bread and toss or mix by hand. Make sure bread cubes are evenly coated.
- Sprinkle seasoning and herbs. Toss or mix by hand again till coated.
- Spread croutons out onto baking tray.
- Bake for 20 -30 minutes or till it’s lightly brown. Pay attention to the croutons once it starts browning as it can go south very quickly.
- Remove from oven and allow to cool completely before storing in an air-tight container.
Tips:
- Conversion Table
- Use any type of bread of choice
- Feel free to use your own choice of oil such as peanut oil, vegetable oil, canola oil, sunflower oil, rapeseed, or even butter.
- Add parmesan for extra yumminess!
- For nutritional information, please visit my Yummly page and scroll to the bottom of the recipe.
- If you are using MyFitnessPal app to count calories, first copy the recipe URL then go to MyFitnessPal app to Recipes, select Create a New Recipe, then Add from the Web. Paste the URL, match ingredients and that’s it!
- Always match ingredients to the ones you use. Ingredient nutritional facts differ depending on brand.
Enjoy!
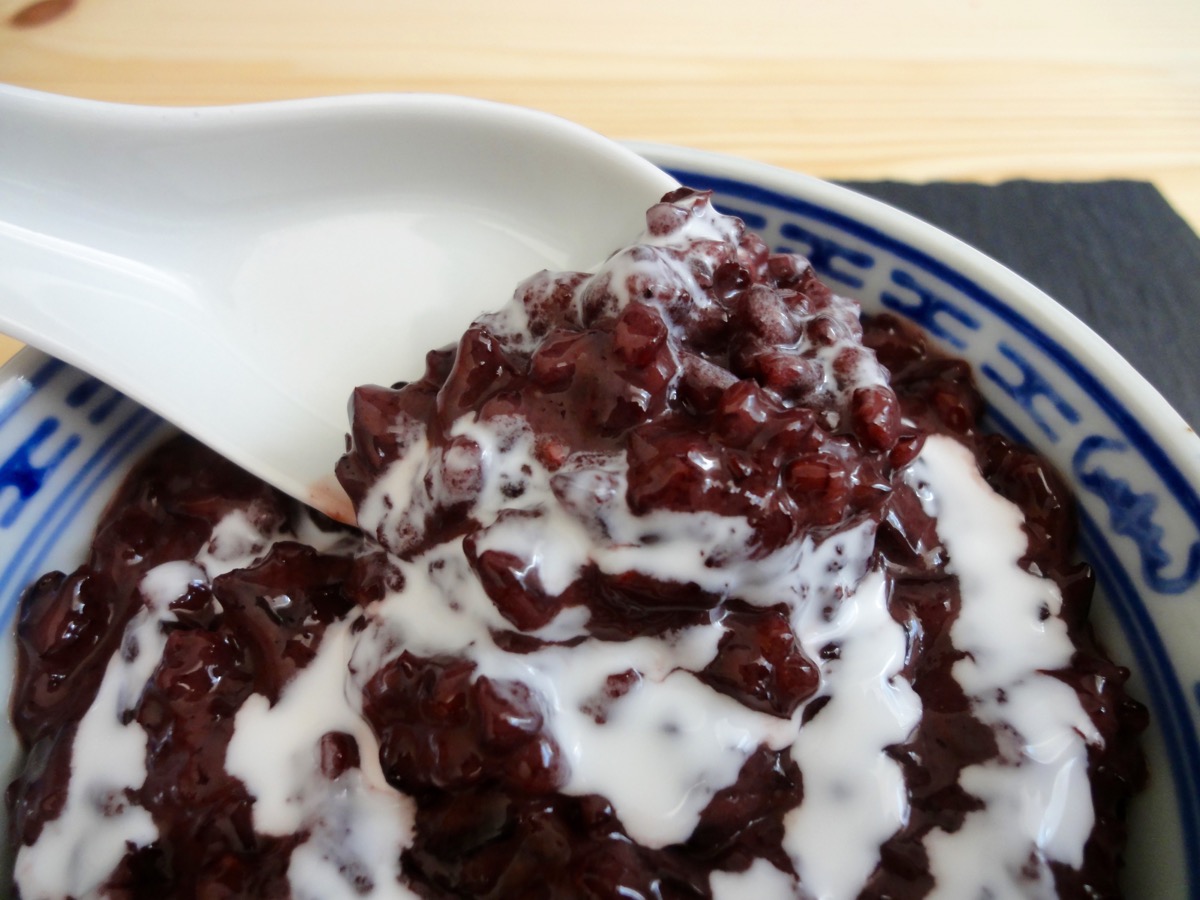
Bubur Pulut Hitam / Black Glutinous Rice Porridge
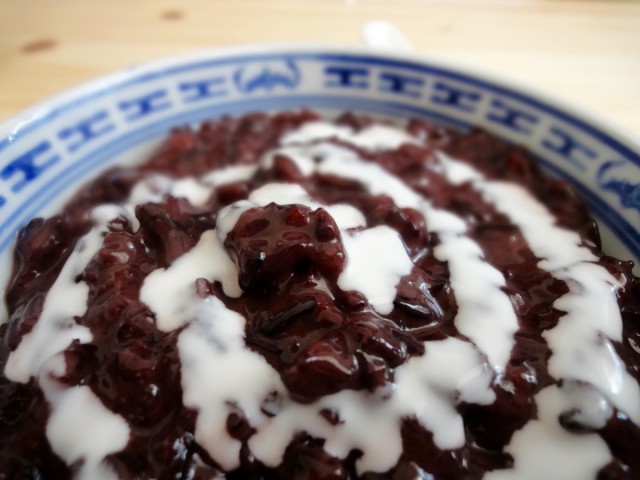
My siblings and I grew up eating this dessert cooked by our mother. It’s one of my favourite local desserts. I can’t find much information on where this dessert originates from, but it’s eaten in many South East Asian countries. There are many variations of this dessert, depending on which country you have it in. But in Malaysia, it’s prepared with just a simple mixture of pulut hitam (black glutinous rice), coconut milk, pandan leaves (screwpine) and gula melaka (coconut palm sugar).
For the longest time, I have been looking for black glutinous rice in Switzerland. Little did I know, it’s more known as black sticky rice here…because it comes from Thailand and there, they call it black sticky rice. Silly of me to not ask or search thoroughly.
So what is this black glutinous rice? It is an unpolished sticky rice, meaning the bran has not been removed, is purplish black in colour and has a chewy texture. It has a nutty flavour and naturally sweet. This black glutinous rice also contains a lot of fiber and antioxidants. It takes some time to cook compared to regular rice, so some soaking in advance is advised. Otherwise just cook it longer.
Ingredients
- 1 cup (182 grams) Black Glutinous Rice
- 5 cups Water
- 1 small block Gula Melaka (Palm Sugar) *
- 4 Pandan Leaves, tied into knots
- ¾ cup Coconut Milk
- ¼ teaspoon Salt
Directions:
- Spread the rice on a bright surface. Check for any impurities such as small pebbles, wood, and so on. This step is optional if you are confident the rice you have is clean.
- Wash rice thoroughly – till the water runs clear. Water will have a slightly purple tint.
- Add water, rice, pandan leaves, salt and sugar into a pot and bring it to boil for 60 minutes or till the rice splits on medium high heat. Stir occasionally to prevent rice from sticking to the pot. You can add more water if the porridge is dry and the rice has not split yet.
- Once the porridge is done, add coconut milk. You can add more if you want the porridge creamier.
- Serve with some coconut milk. It can be eaten warm or cold.
Tips:
- It’s always tastes better the next day.
- Keep refrigerated
- 1 Cup glutinous rice = 182 grams
- Cups to Grams conversions
* if you can’t find coconut palm sugar, you can substitute with regular sugar. Add according to preferred sweetness.
Enjoy!
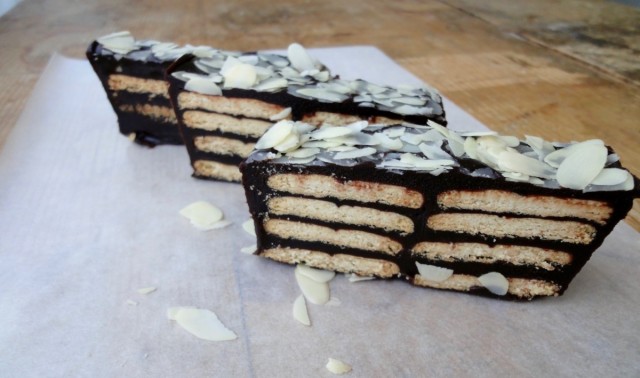
Batik Cake / Kek Batik
Edit 2024:
If you want to see a video tutorial on how to make this, please go to Emmymade on YouTube. It’s such a great honor that she adapted my recipe and I got to see it by chance on YouTube. I’ve been a follower of hers for a few years and, gosh it really made my day. Thanks Emmy!
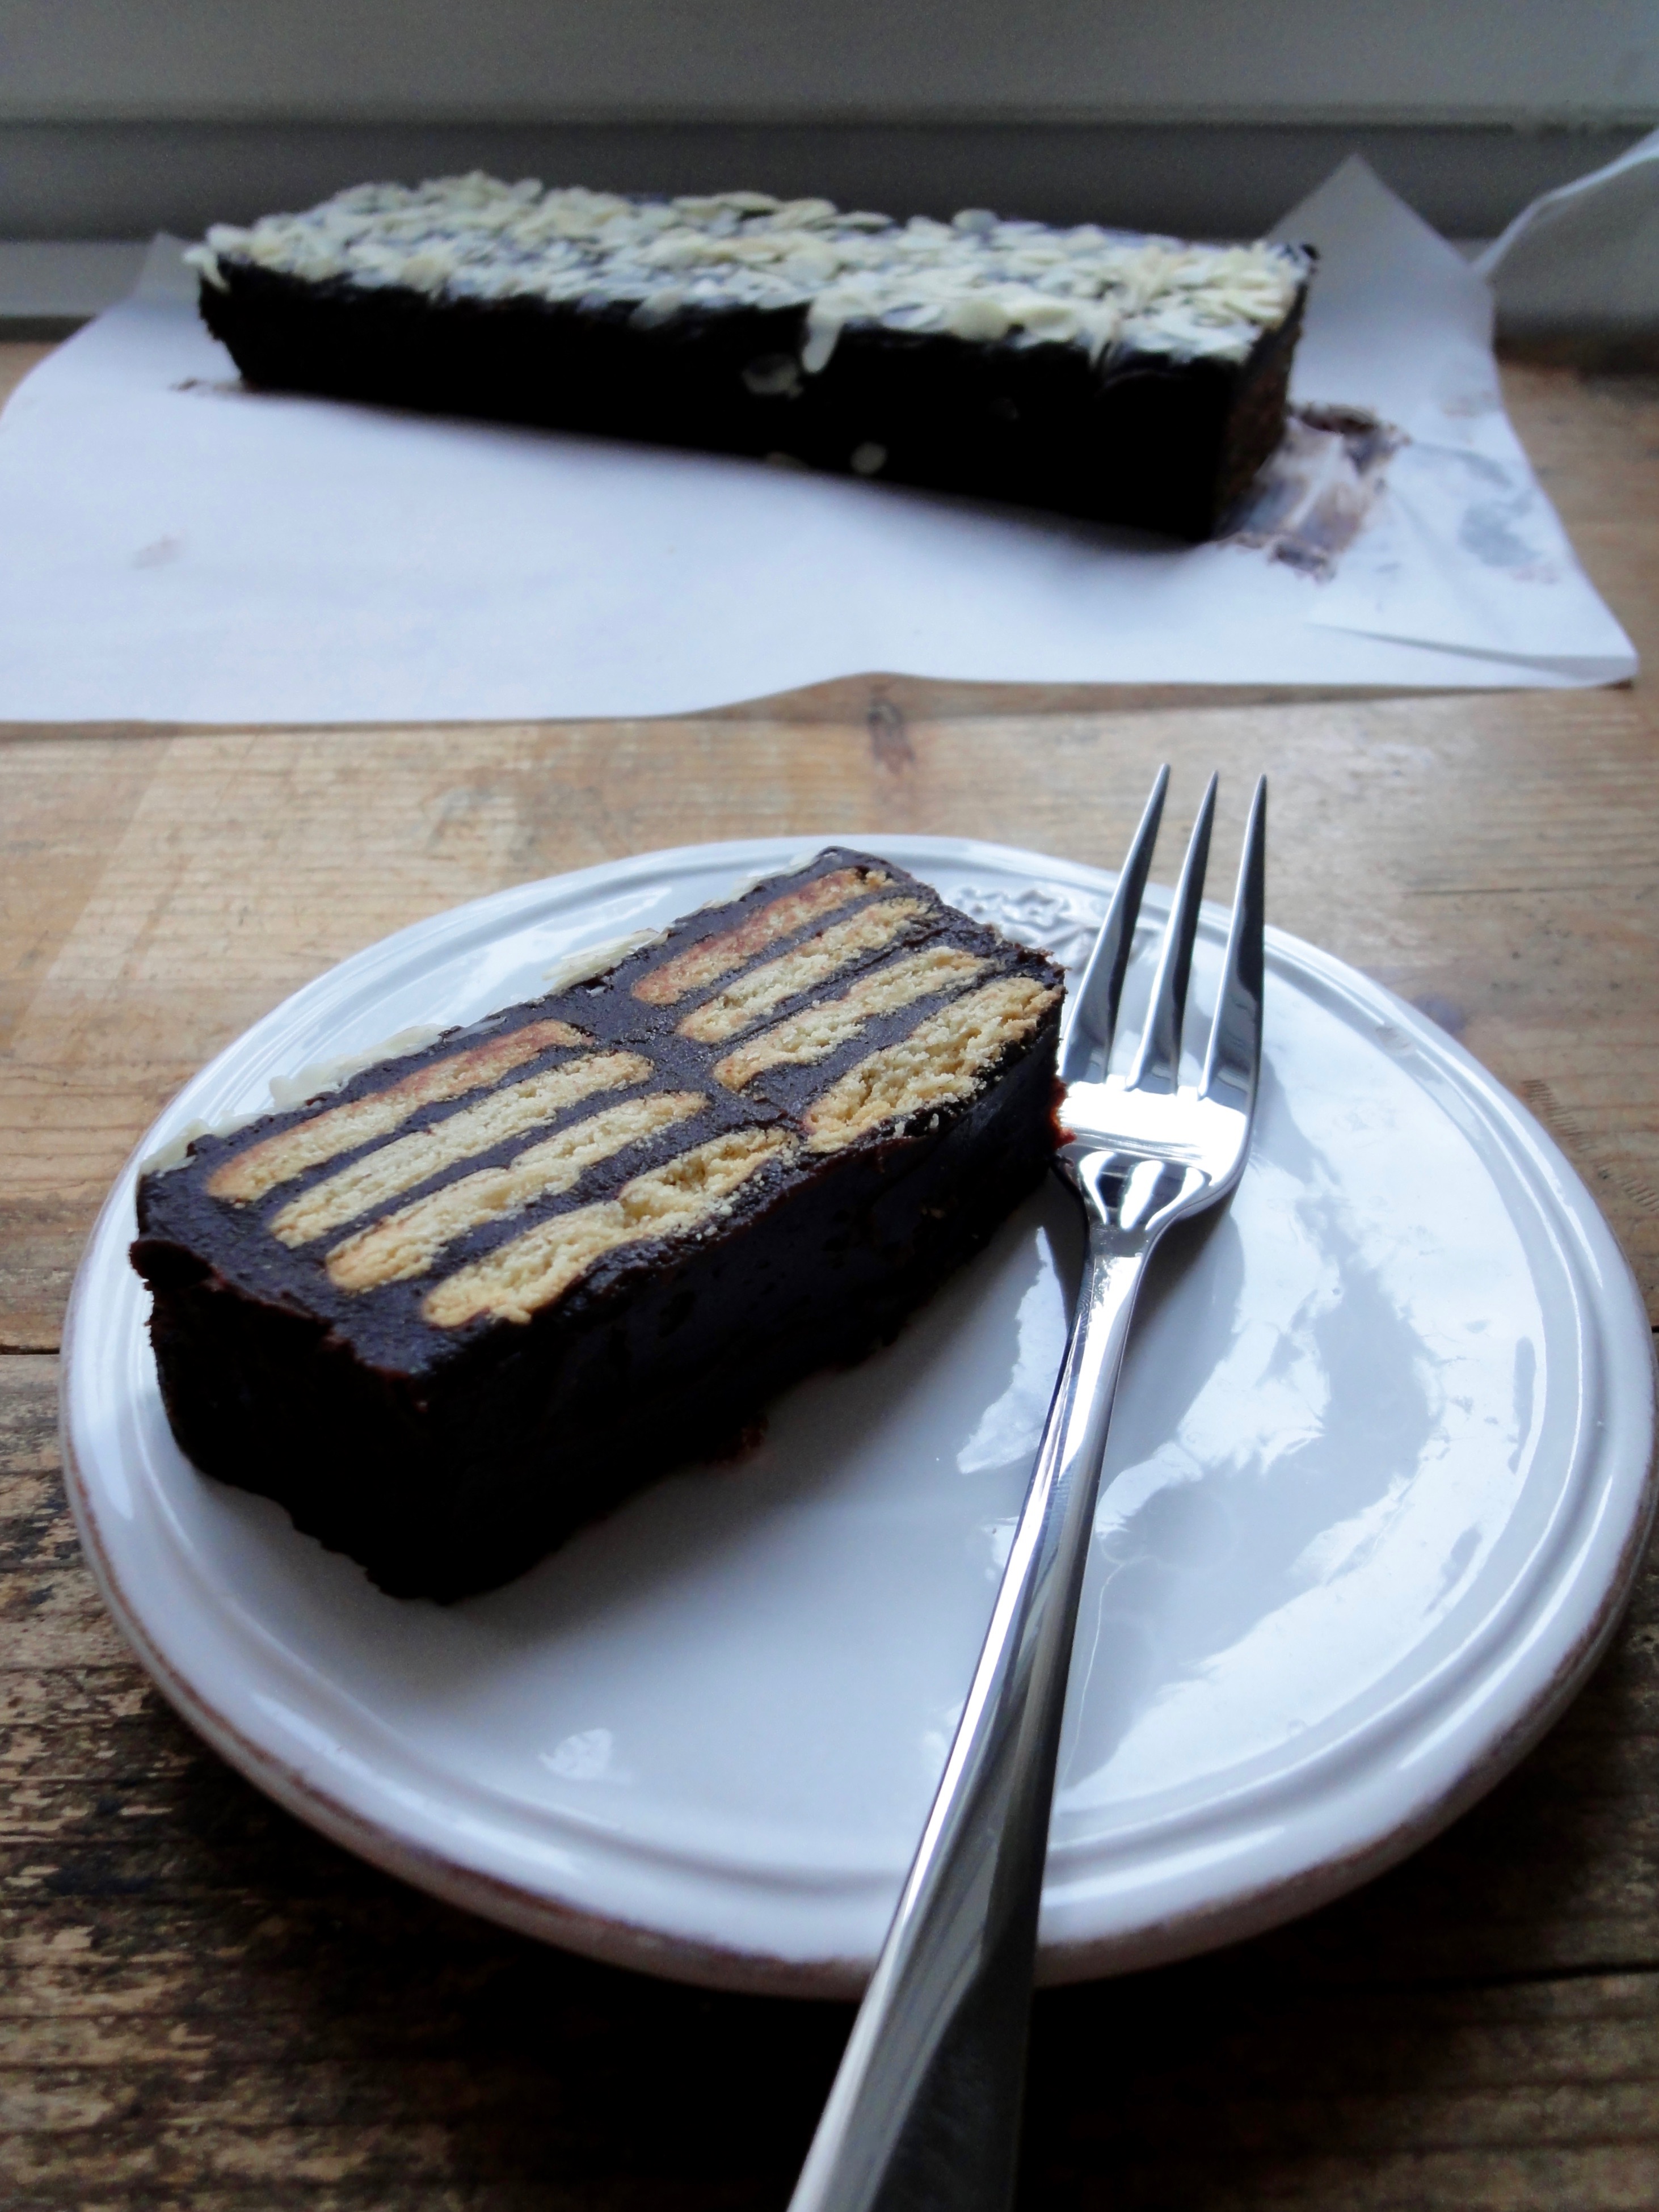
The origin of this cake is unknown or unclear. It bare’s similarities to Australia’s Hedgehog Slice and the English Chocolate Biscuit Cake which Prince William had as one of his wedding cakes. In Malaysia it’s called batik cake due to it having Batik-like patterns from the crushed biscuits. No to be confused with Sarawak’s batik cake which is colourful. This batik cake is made with chocolate fudge and tea biscuits such as Marie Biscuits or Petit Beurre (French butter biscuit).
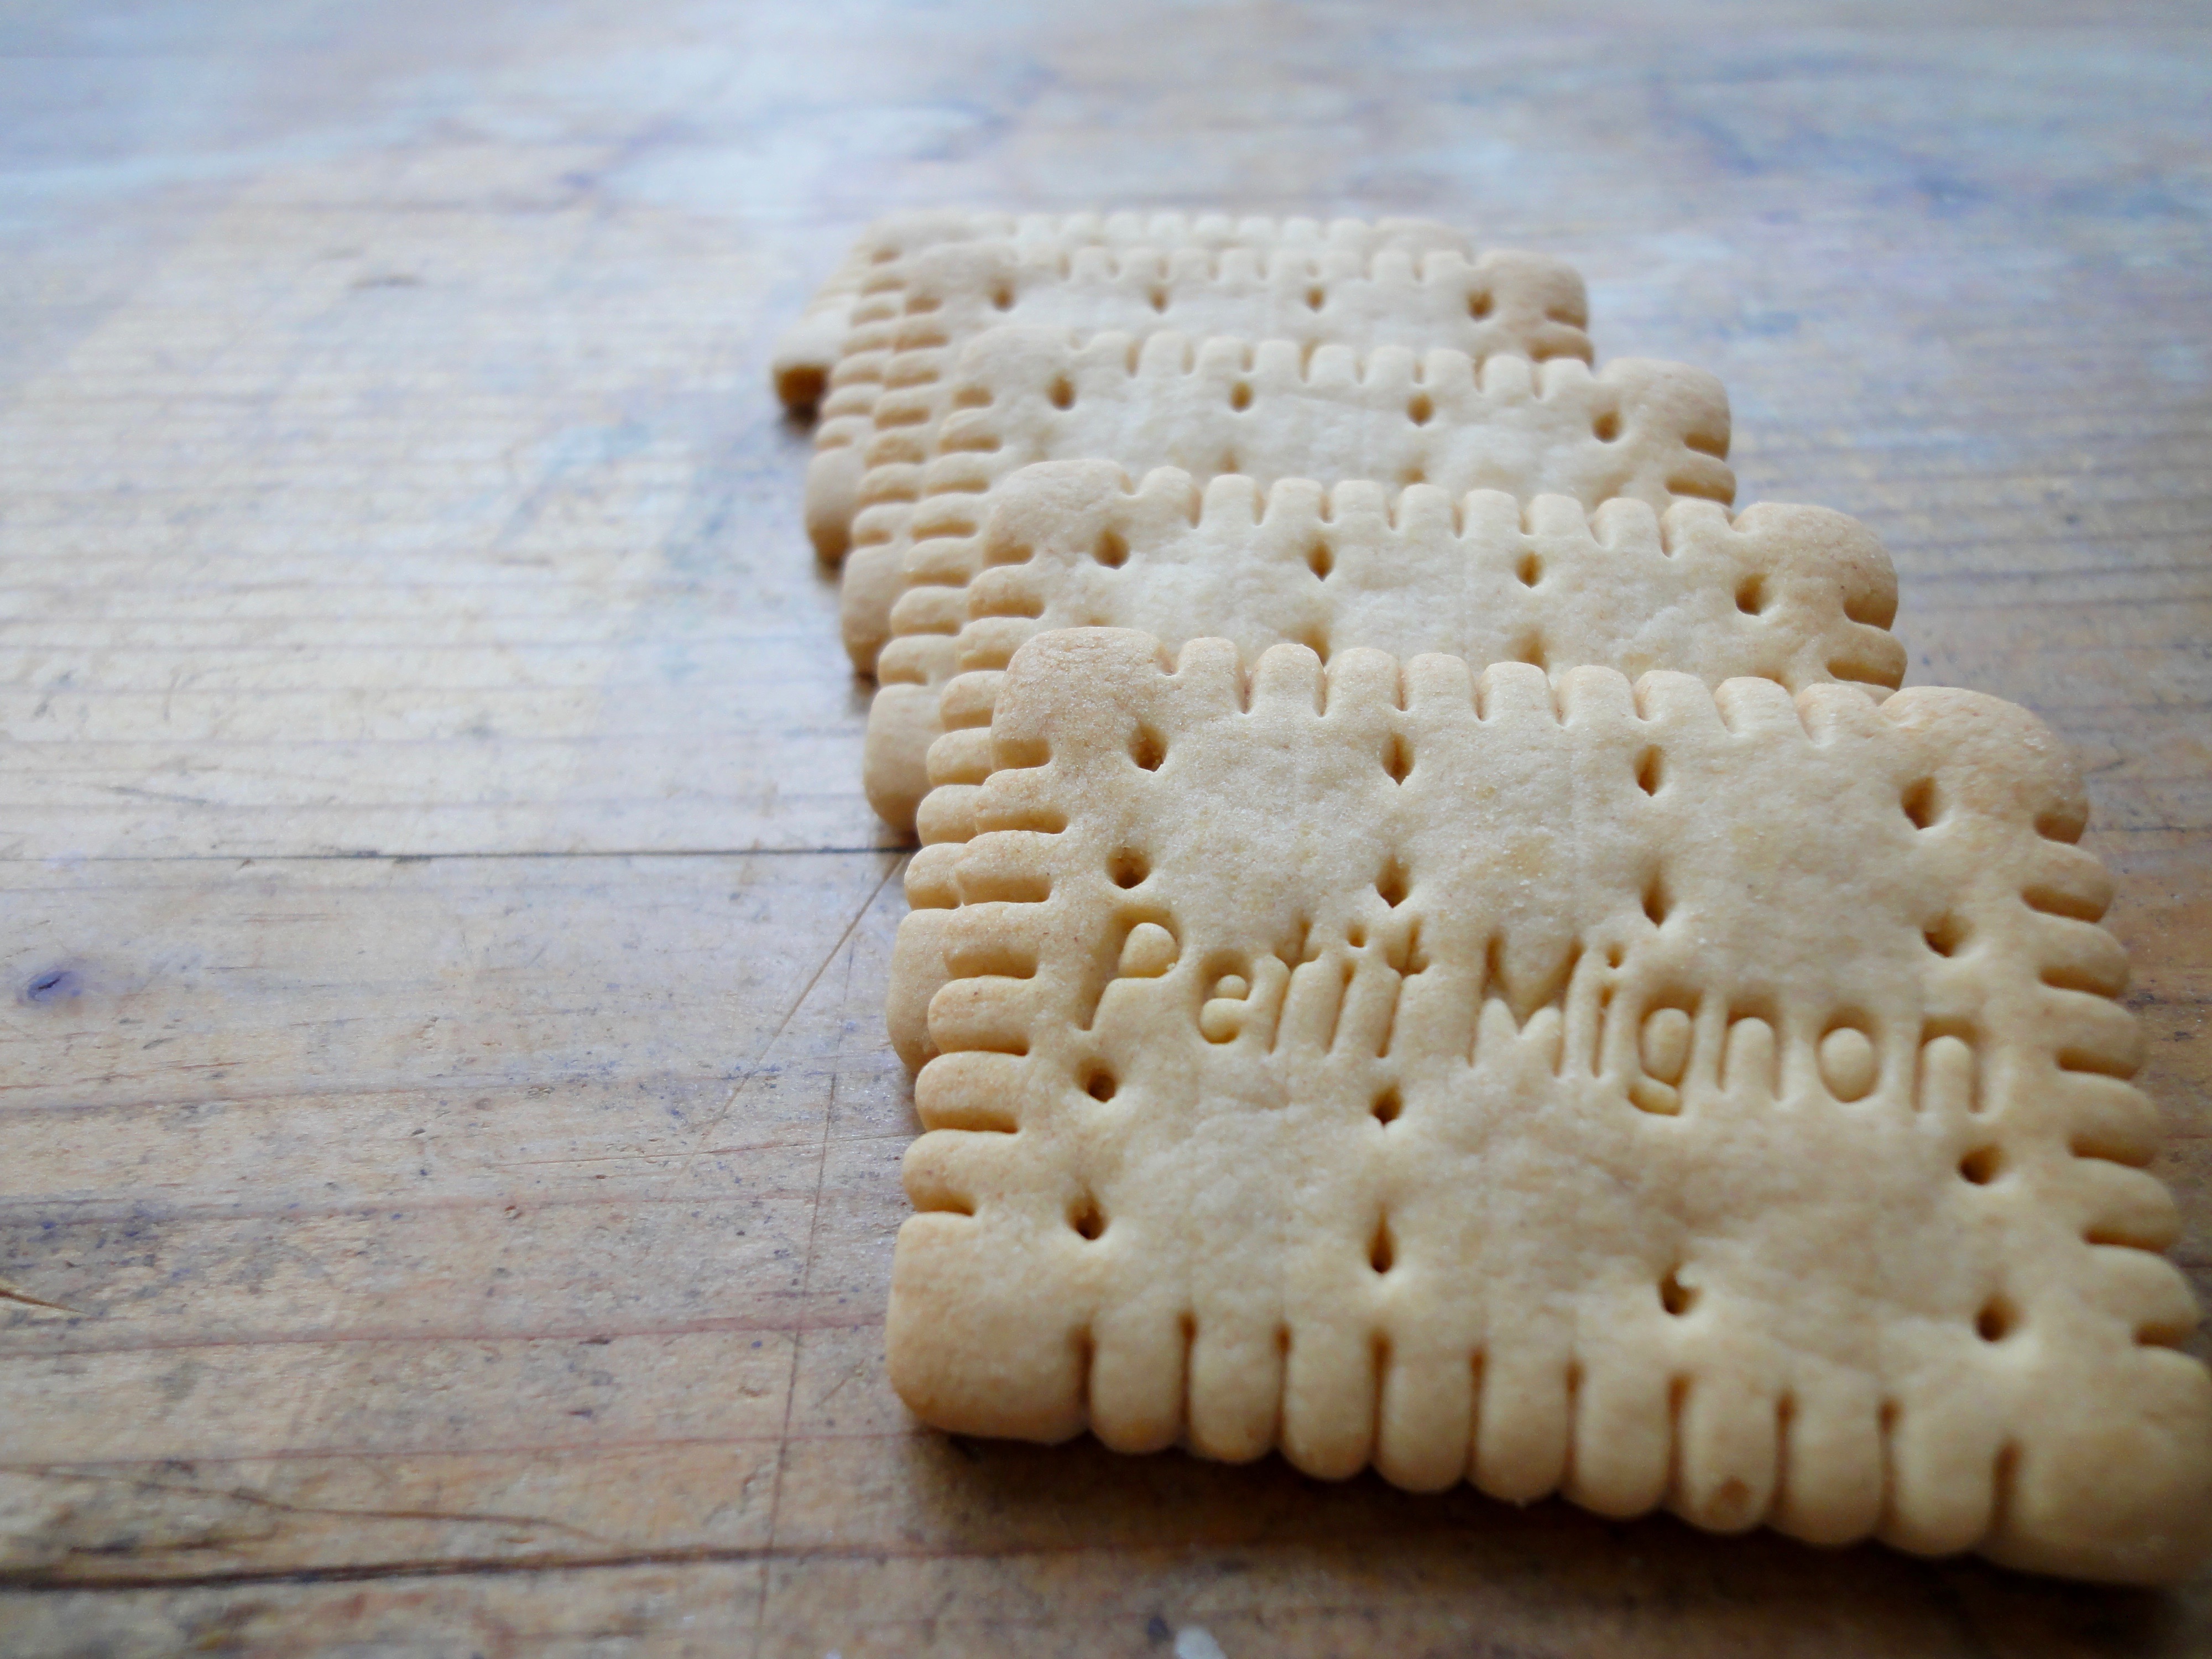
I used small petit beurre’s called petit mignon’s here.
When I had this cake the first time, I fell in love with it. Yes, you can call it love at first sight. The internet was still pretty new at that time so I could not just google for a recipe. Plus, the first time I made it myself, the hubby loved it! Probably the only cake he would eat without me begging him to.
It’s such an easy cake which doesn’t require baking, just make the fudge, combine wth biscuits and refrigerate. You don’t even need to use the highest quality of ingredients for it. The chocolate and malt powder I used here was a supermarket brand – CHF3.10 per kilo, the biscuits also a supermarket brand CHF 2.95 (650 grams)and butter was also a supermarket brand. The only thing I won’t use is Margarine for this…or for anything at all! Never was a fan of margarine. In Malaysia, you would typically use Milo, Vico or Ovaltine for this recipe. Of course any chocolate or cocoa drink powder would be fine, just like what I used since I can’t find Milo here and using Ovomaltine here is just waaaaay too expensive.
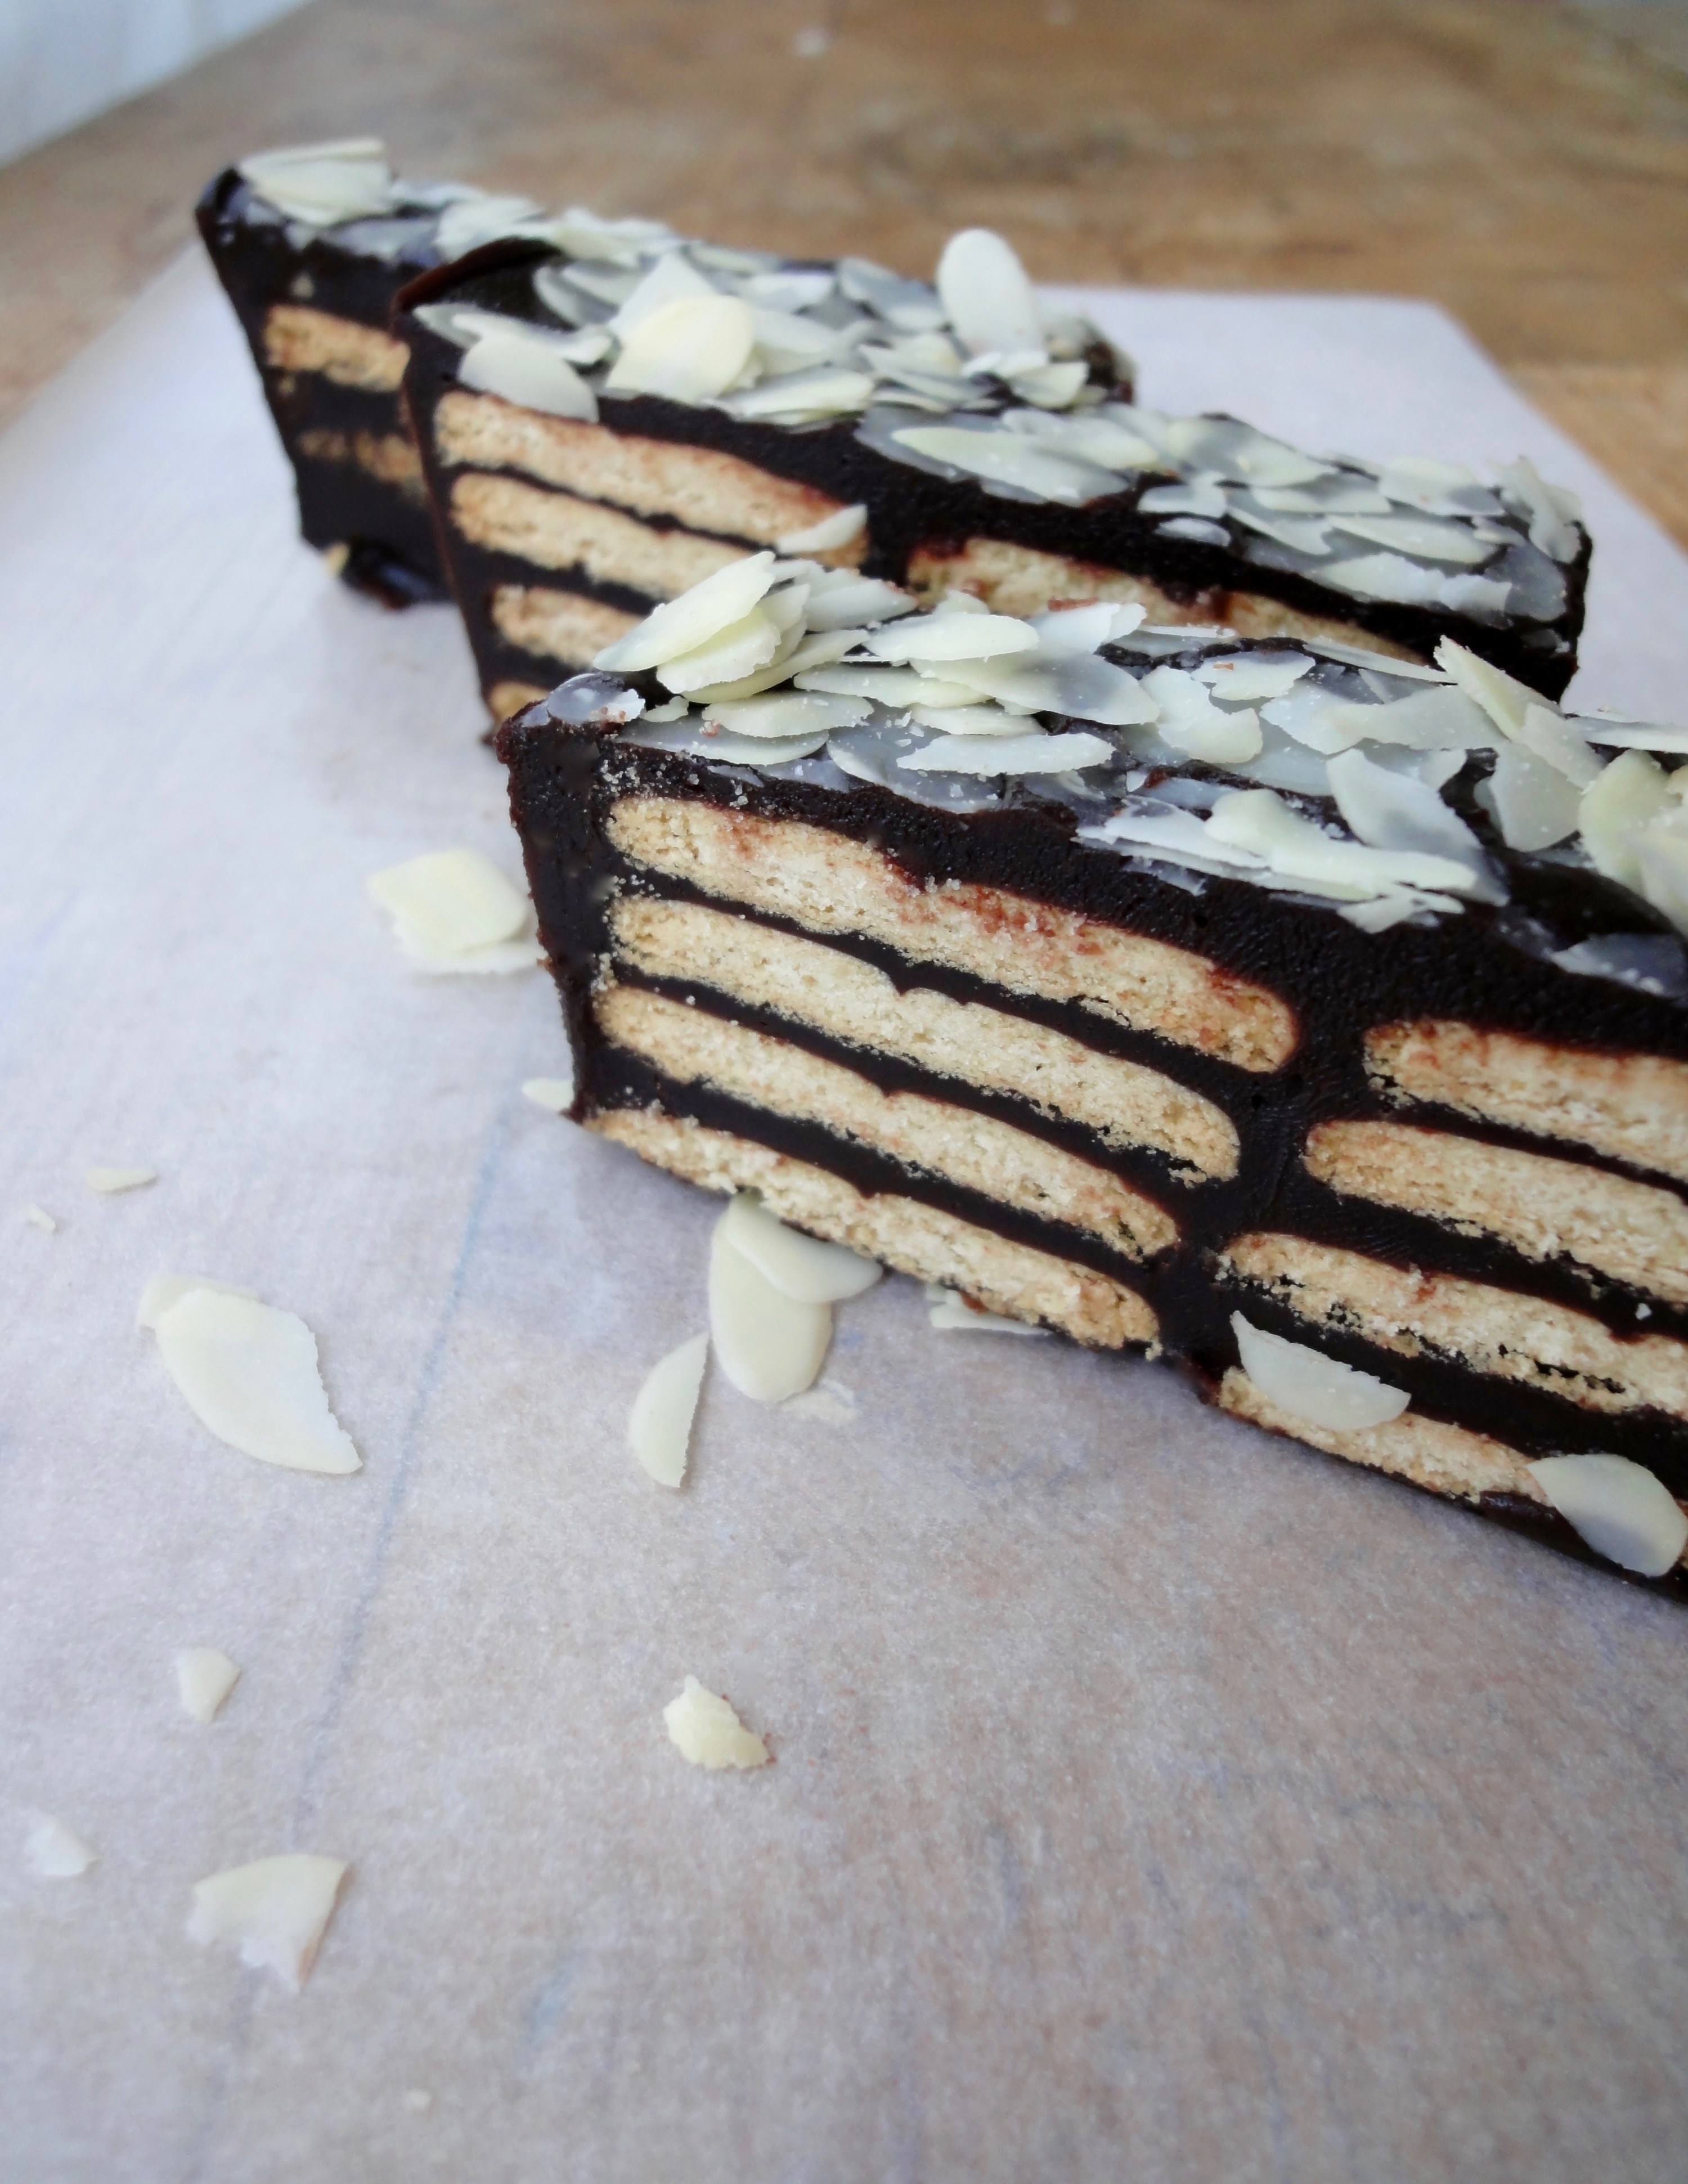
When making this cake, you can either crush the biscuits into quarters or just leave them whole and arrange it nicely. Be sure to make this a day before serving to the biscuits become soft. Cut it cold and leave it out for 5-10 minutes before serving. Great for tea time and dessert.
Ingredients
- 1 small can/397 ml/14 oz Condensed Milk*
- 1 ¾ cups Chocolate Milk Powder**
- ⅔ cup Butter
- 4 Eggs
- 1 Tablespoon Vanilla Extract
- 250 - 300 grams Petit Beurre / Marie Biscuits
- For Garnish Sliced Almonds (optional)
Directions:
- Crush biscuits into quarters (optional). Set aside.
- Prepare a cake pan (round, loaf, square – up to you) by lining it with foil or parchment paper and grease well with cooking spray or butter. I used a 35cm x 9cm loaf pan for this.
- In a medium large pot or wok, gently melt butter on medium heat.
- Mix in condensed milk and chocolate malt powder. Stir till combined.
- Add in eggs and stir continuously on medium to medium high till it thickens to the consistency of hot fudge. Or till it reaches the soft ball stage on a candy thermometer. 118°C to 120°C (235°F to 240°F).
- Once it has thickened, add in vanilla extract. Stir to mix.
- Stir in biscuits is using it crushed. Pour into cane pan and flatten the top.
- If you choose not to crush the biscuits : Spread a layer of fudge into cake pan and layer it with biscuits. Repeat till you run out of fudge.
- Garnish with sliced almonds (optional).
- Leave cake to cool for an hour then cover and refrigerate overnight.
Tips:
- *You can reduce the amount of condensed milk if it’s too sweet for your taste. I’ve tried reducing it to 350 ml’s and still had great results.
- ** Use any chocolate drink powder such as Ovomaltine, Nesquick, or Milo. You can use chocolate bar’s as well, but I can’t vouch for results. You can also reduce the amount of chocolate drink powder to 1¼ cup.
- Do not stir the fudge on high as the egg’s in it will curdle. You might end up with sweet chocolate scrambled eggs.
- Conversion Table
Enjoy!

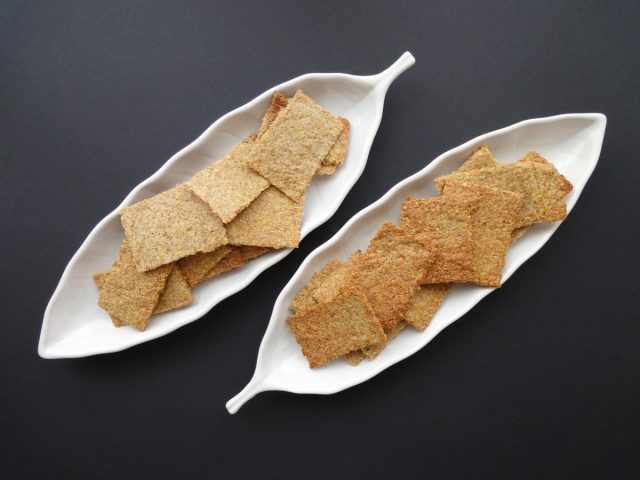
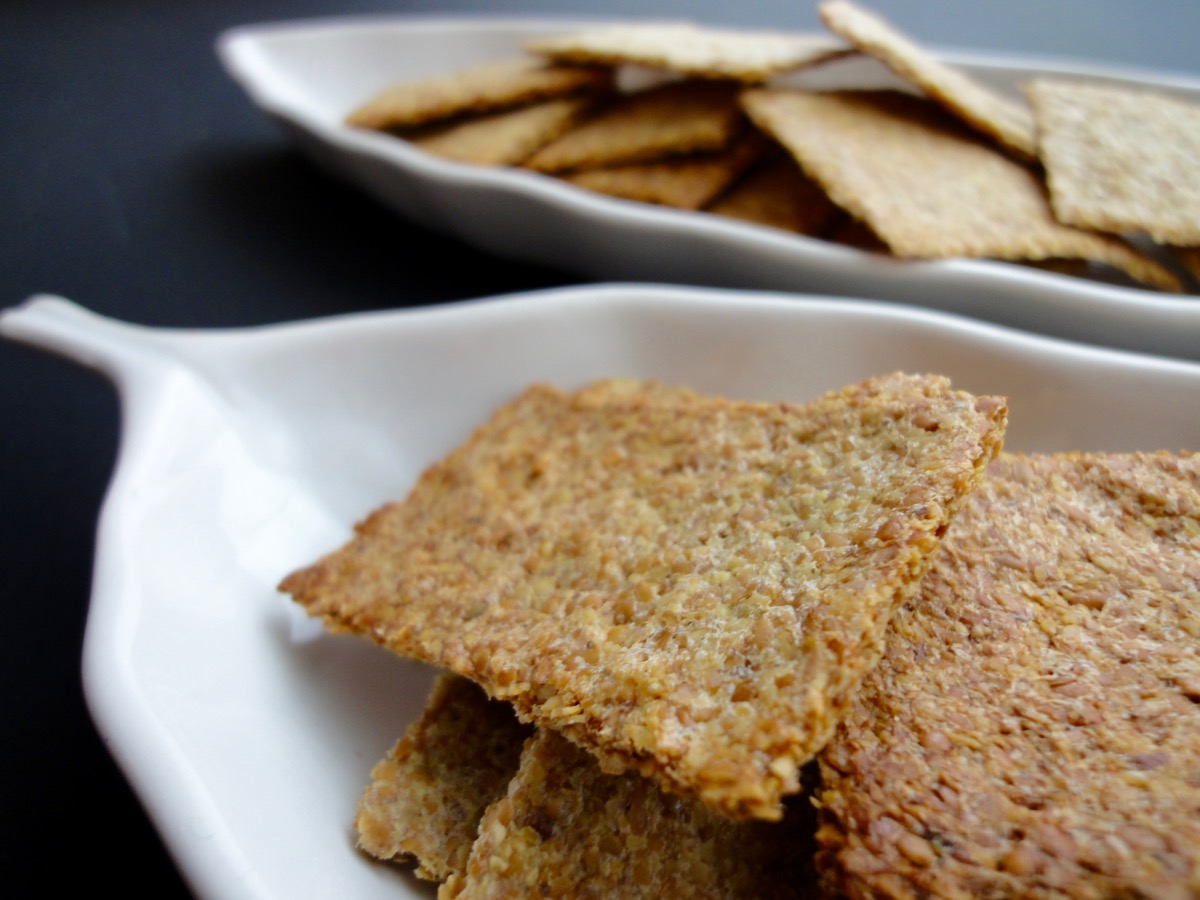
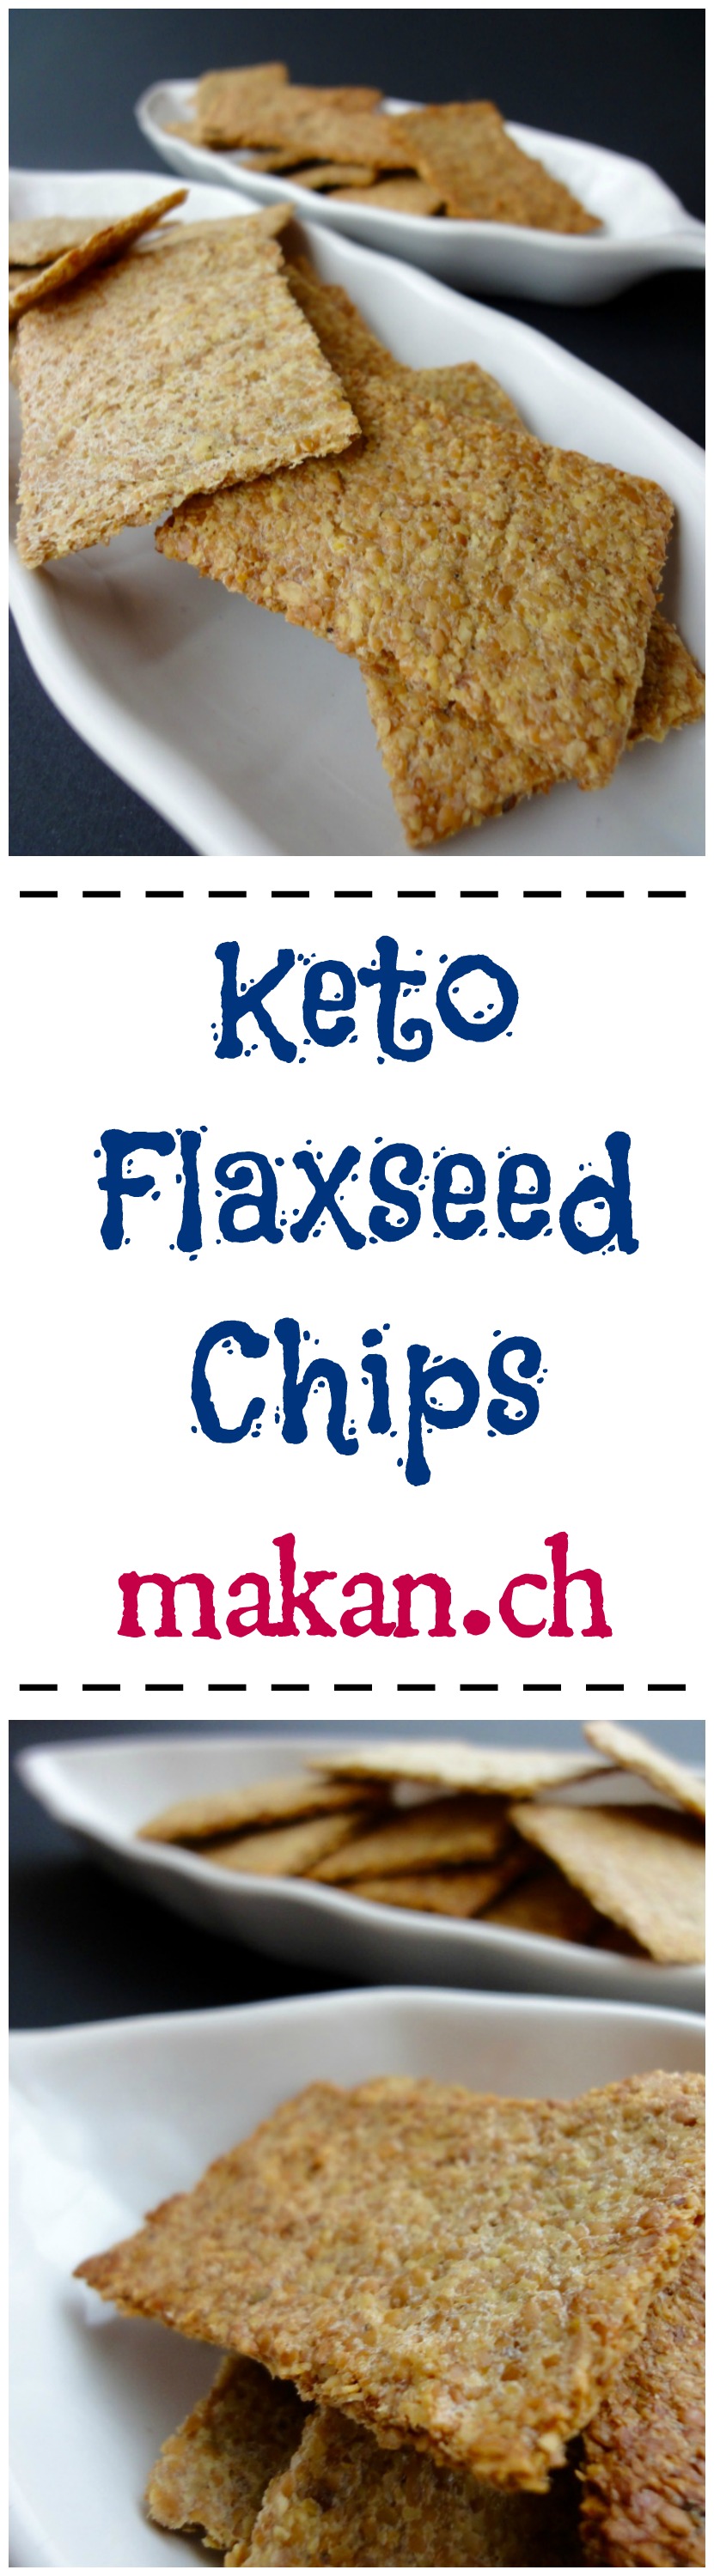
Keto Flaxseed Chips
Hello, hello! I’ve not been spending time on my blog for the past month! Honestly, I’m running out of ideas and I’ve been eating simple meals which I think don’t need to be on the blog. Anyways, I’m getting my groove back and certainly meal ideas for those who are on the keto way of eating.
Most chips sold in supermarkets are made from either potatoes or flour, which are obviously high in carbs. There’s reduced fat, fat free, sodium free and gluten free, but no low carb. So I was looking for something crunchy to snack on or have as dips and I came across this Low Carb Flaxseed Chips from Low Carb Recipe Ideas. I tried it out and got hooked. Hooked so much, I would make it at least once a week.
You can adjust seasoning according to what you like. I like mine a little spicy so I add a chili powder mix of cayenne, chili, cumin, and paprika. These chips are perfect as a dip or a high fiber snack.
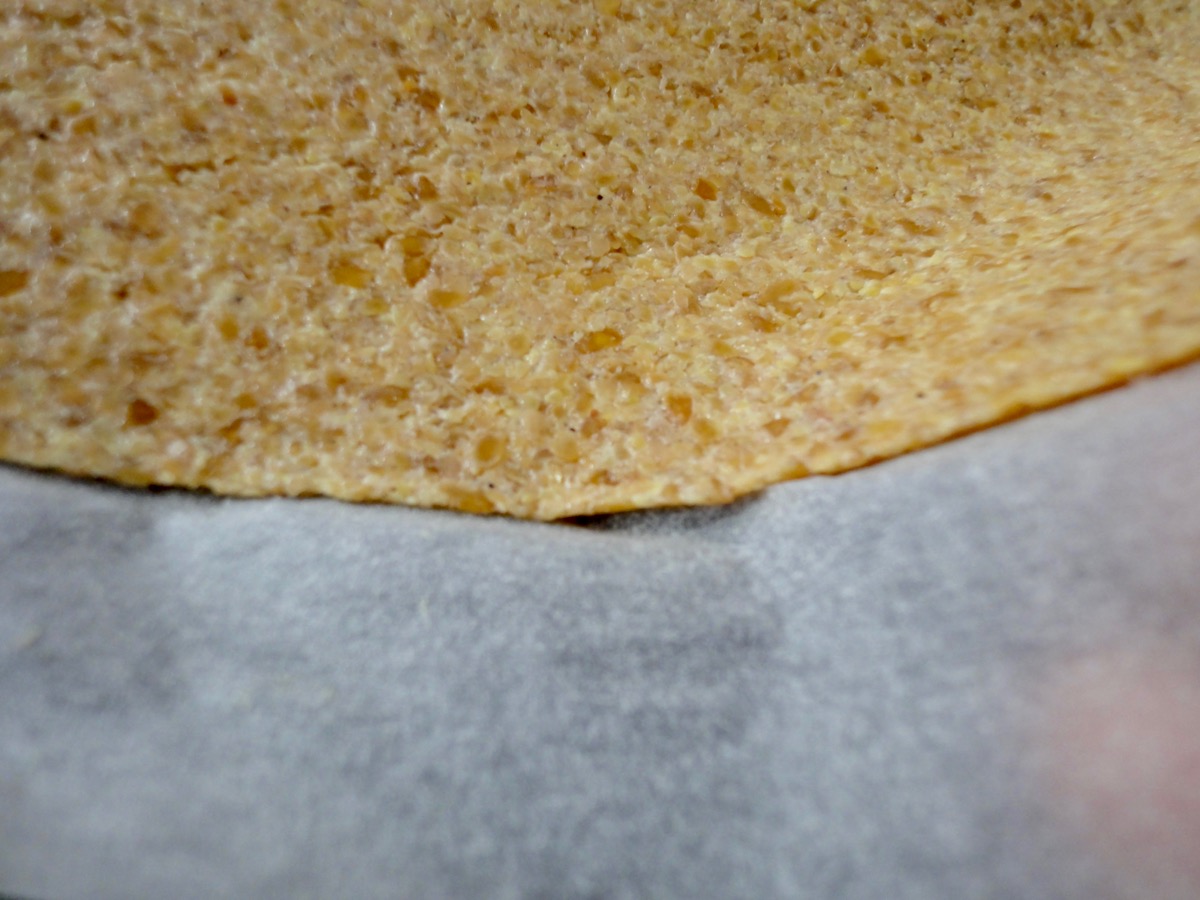
Roll it out as thin as you can between 2 parchment papers.
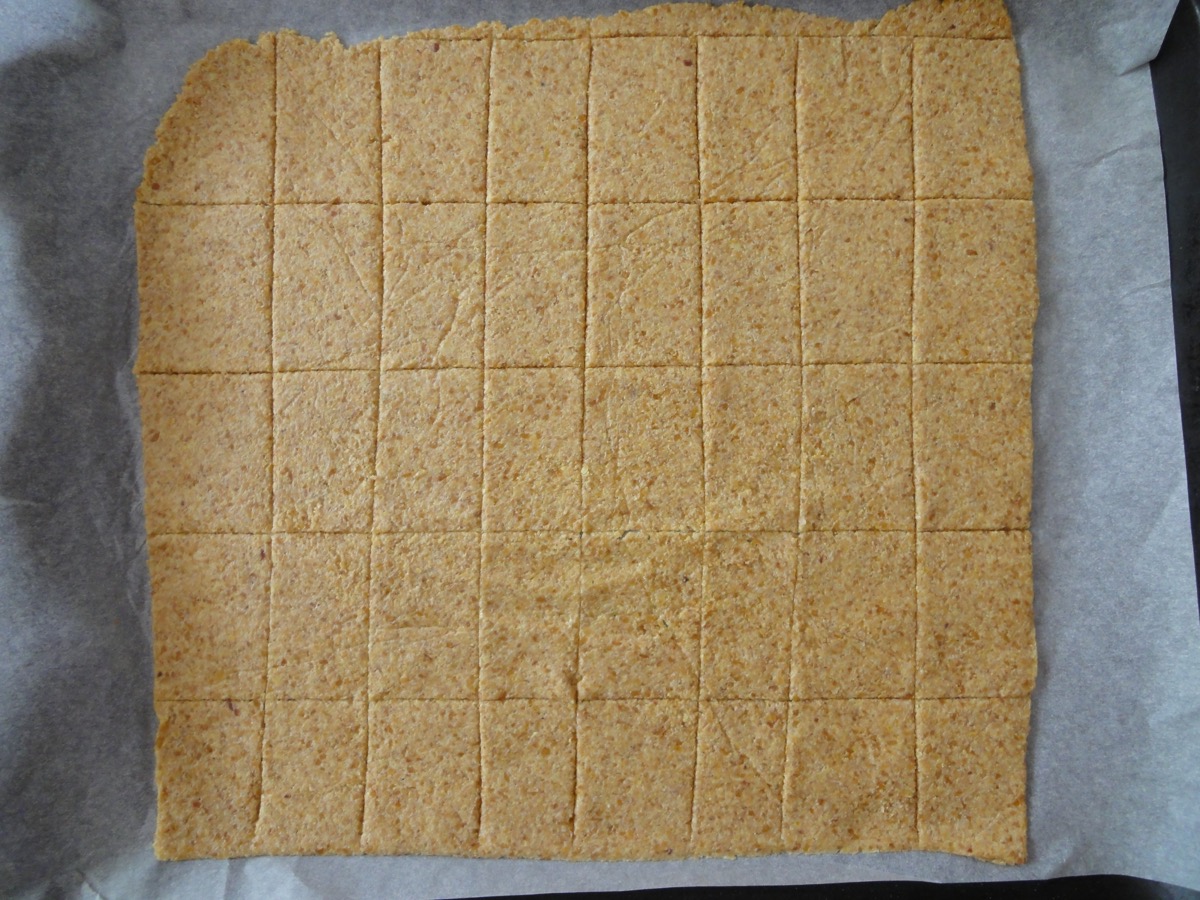
Cut it with a pizza cutter before baking.
Ingredients
- 1 cup Flaxseed Meal (Golden or Brown)
- 2 teaspoons Garlic Powder
- 2 teaspoons Onion Powder
- 2 teaspoons Chilli Powder Mix (Cayenne, Paprika, Chilli) *optional
- ½ cup Water
Directions:
- In a bowl, mix ground flax meal and seasonings well.
- Add water and mix till combined with a spatula.
- Cover and set the dough aside for 10 minutes.
- Pre heat oven to 200°c (400°F).
- Once dough is ready, roll it out between 2 parchment papers as thin as you like. (cooking times will vary according to thickness)
- Gently pull apart parchment paper from each side of the rolled dough onto the other (this is to make sure it does not stick to the paper while baking)
- Place the rolled dough with parchment paper onto a baking sheet and use a pizza cutter to cut into cracker sized pieces.
- Bake chips for 10-15 minutes (longer if thicker).
- Once chips are baked, turn off the oven, remove and break the crackers. Spread the crackers on the baking tray and return to the oven for another 10 minutes with the oven door slightly opened. (this is to dry it out so it gets crispy)
- Allow crackers to cool completely before storing.
Tips:
- Conversion Chart
- You can adjust seasoning according to what you like. I like mine a little spicy so I add a chili powder mix of cayenne, chili, cumin, and paprika. These chips are perfect as a dip or a high fiber snack.
- If you are using MyFitnessPal app to count calories, first copy the recipe URL then go to MyFitnessPal app to Recipes, select Create a New Recipe, then Add from the Web. Paste the URL, match ingredients and that’s it!
- Always match ingredients to the ones you use. Ingredient nutritional facts differ depending on brand.
- Nutrition Facts (based on my ingredients) : Per serving (8 pieces) 124 kcal, Total Fat – 9 g, Total Carbs – 7 g, Fiber – 6 g = NET Carbs – 1 g, Protein – 4 g.
Enjoy!
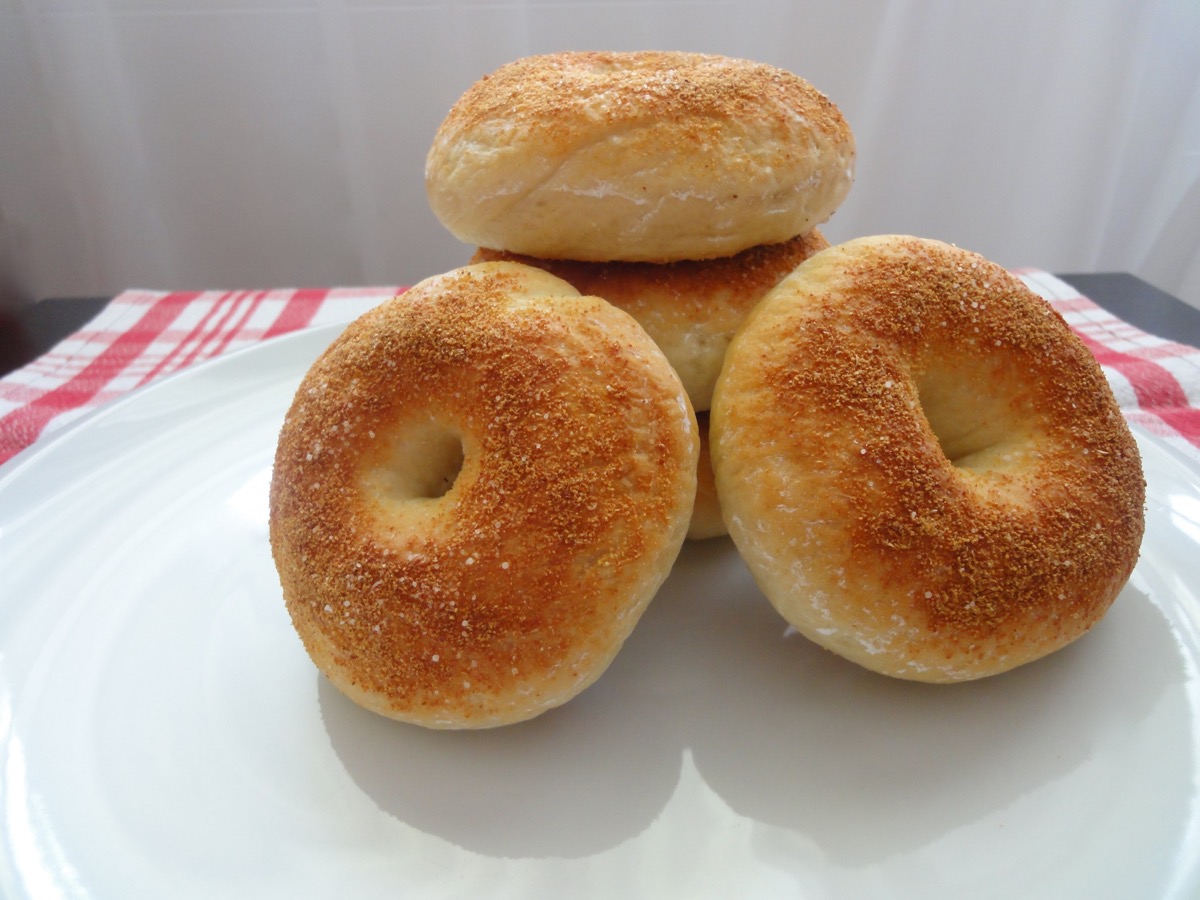
Bagels
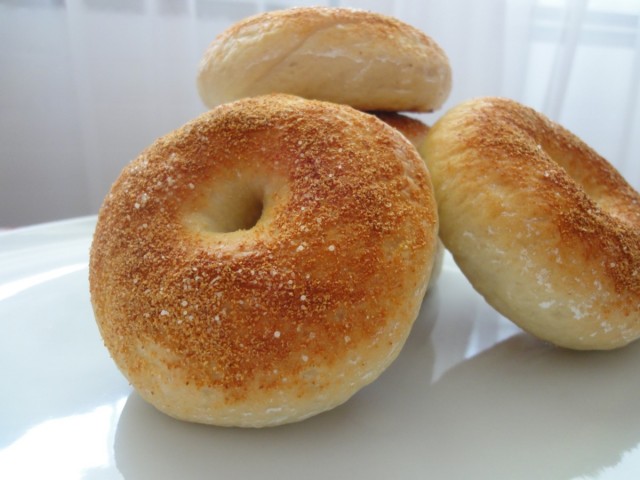
If you watch the series Community, you would know who Britta Perry is. In Season 1 Episode 17: Physical Education, Britta gets mocked by her friends for mispronouncing bagel as bag-el. Though this episode was released in 2009, it was only in 2013 when I watched it again…and hearing the word bagel got me thinking more of it. At the same time, I was working in a Café/Bakery that sold bagels. I never ate the bagels sold at that Café, because their hygiene was horrible, and they used expired ingredients. On top of it, the owner was in debt and on the verge of bankruptcy that she did not have the money to even pay me. I stayed for a month, barely eating anything there during my break time. Thankfully, the Café has been shut down (due to bankruptcy) and I got my salary after waiting for nearly half a year which was only possible because of strict labor rules here.
So when I was jobless again, I started to make my own bagels at home. I found out that making bagels was easier than expected and certainly delicious. My favourite toppings are poppy seeds and garlic granules with sea salt. Of course, you are free to be creative with your toppings. I also like my bagels to have a bit of a chewy bite so I do boil mine slightly longer. If you do not like much chew, boil it for a shorter time. Lastly, I add a little honey to the water to boil. It gives out a really nice light scent and taste.
Ingredients
- 3 ½ cups Flour
- 1 ½ teaspoons Salt
- 2 teaspoons Dry Yeast
- 1 ⅓ ( +/-) Warm Water (45°C)
- 1 ½ tablespoons Sugar
For Boiling
- Medium Sized Pot Water
- 4 tablespoons Honey
Topping (optional)
- 1 nos Egg + 1 tablespoon Water (egg wash)
- 1 tablespoon each Cornstarch + Water (use this if you do not want to use eggs for egg wash)
- Poppy Seeds
- Sesame Seeds
- Garlic Granules
- Sea Salt
- Sunflower Seeds
- Minced Onions
Directions:
- Take 1 cup of the warm water and add sugar and yeast. Let the mixture sit for 5 minutes or till the yeast starts frothing a little. I like to put it in the oven with just the light on which creates enough heat on a winters day.
- Mix flour and salt in a large bowl. Pour in yeast mixture and mix (by hand or you can also use a stand mixer if you have. I use my stand mixer to combine ingredients and hand knead half way).
- Add in the rest of the water. You may add more water if needed. The dough should be slightly moist but firm after mixing.
- Transfer to lightly floured countertop and knead for about 10 minutes (5 minutes if you started off with stand mixer) until it forms a stiff and firm dough.
- Use cooking spray to grease a bowl, add dough and cover the bowl with a damp towel. Let the dough rise for an hour in a warm place (I use my oven for this in winter, just slightly warm it up on the lowest setting 5 minutes prior)
- Divide dough into 8 pieces (for large ones) and shape it into round pieces.
- Coat finger in flour (prevents sticking to finger) and gently press your finger through the centre of each ball to form a ring. Stretch the ring of the bagel and place on a lined baking tray.
- Cover bagels with a damp towel and let it rest for 10 minutes.
- Preheat oven to 220°C. In the meantime, bring a pot of water to boil, add honey. Reduce heat. Use a slotted spoon to lower bagels in. Boil a few at a time, but do not overcrowd.
- Boil for a minute, and them flip them over to boil for another minute. Extend the boiling times to 2 minutes each, if you prefer a chewier bagel. Remove and put on lined baking tray.
- If you want to add toppings, do so right after you take the bagels out from the water. You will need to use egg wash or a mixture of cornstarch and flour to get the toppings to stick.
- Once all bagels have been boiled and have been topped with toppings, bake for 20 minutes.
Tips:
Enjoy!
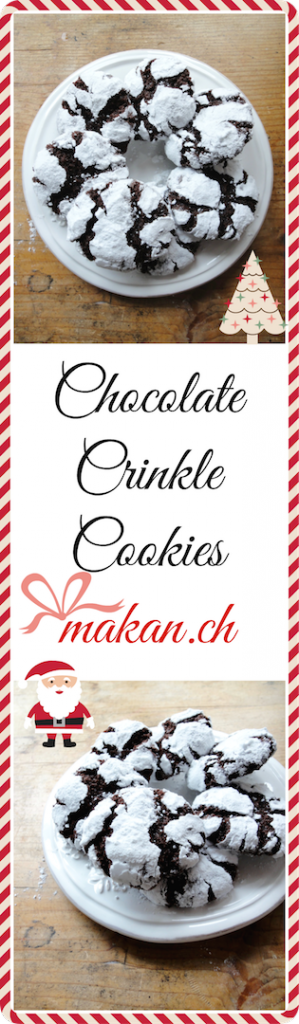
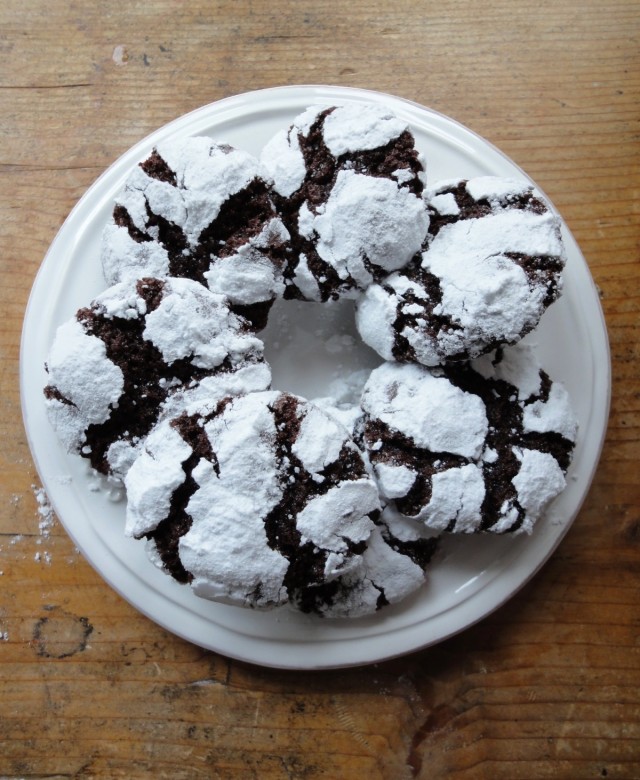
Christmas Edition: Chocolate Crinkle Cookies

Christmas time to me : a good excuse to bake sweet treats and eat them! I’ve always related Christmas to sweets – cookies, hot chocolates, candy canes, puddings, and mince pies (so far, I’ve chowed down a dozen of mince pies?). I just can’t help but to be merry!!
I did not do this with the first Christmas Edition post, but I would like to start it now. My Christmas Gratitude. I am thankful that even though life may sometimes seem unfair and difficult, I have a roof over my head and a warm meal everyday. All these could have never been possible without the hard work my husband does so that we are always cared for, independent and we do not need to rely on anyone but ourselves in our daily lives.
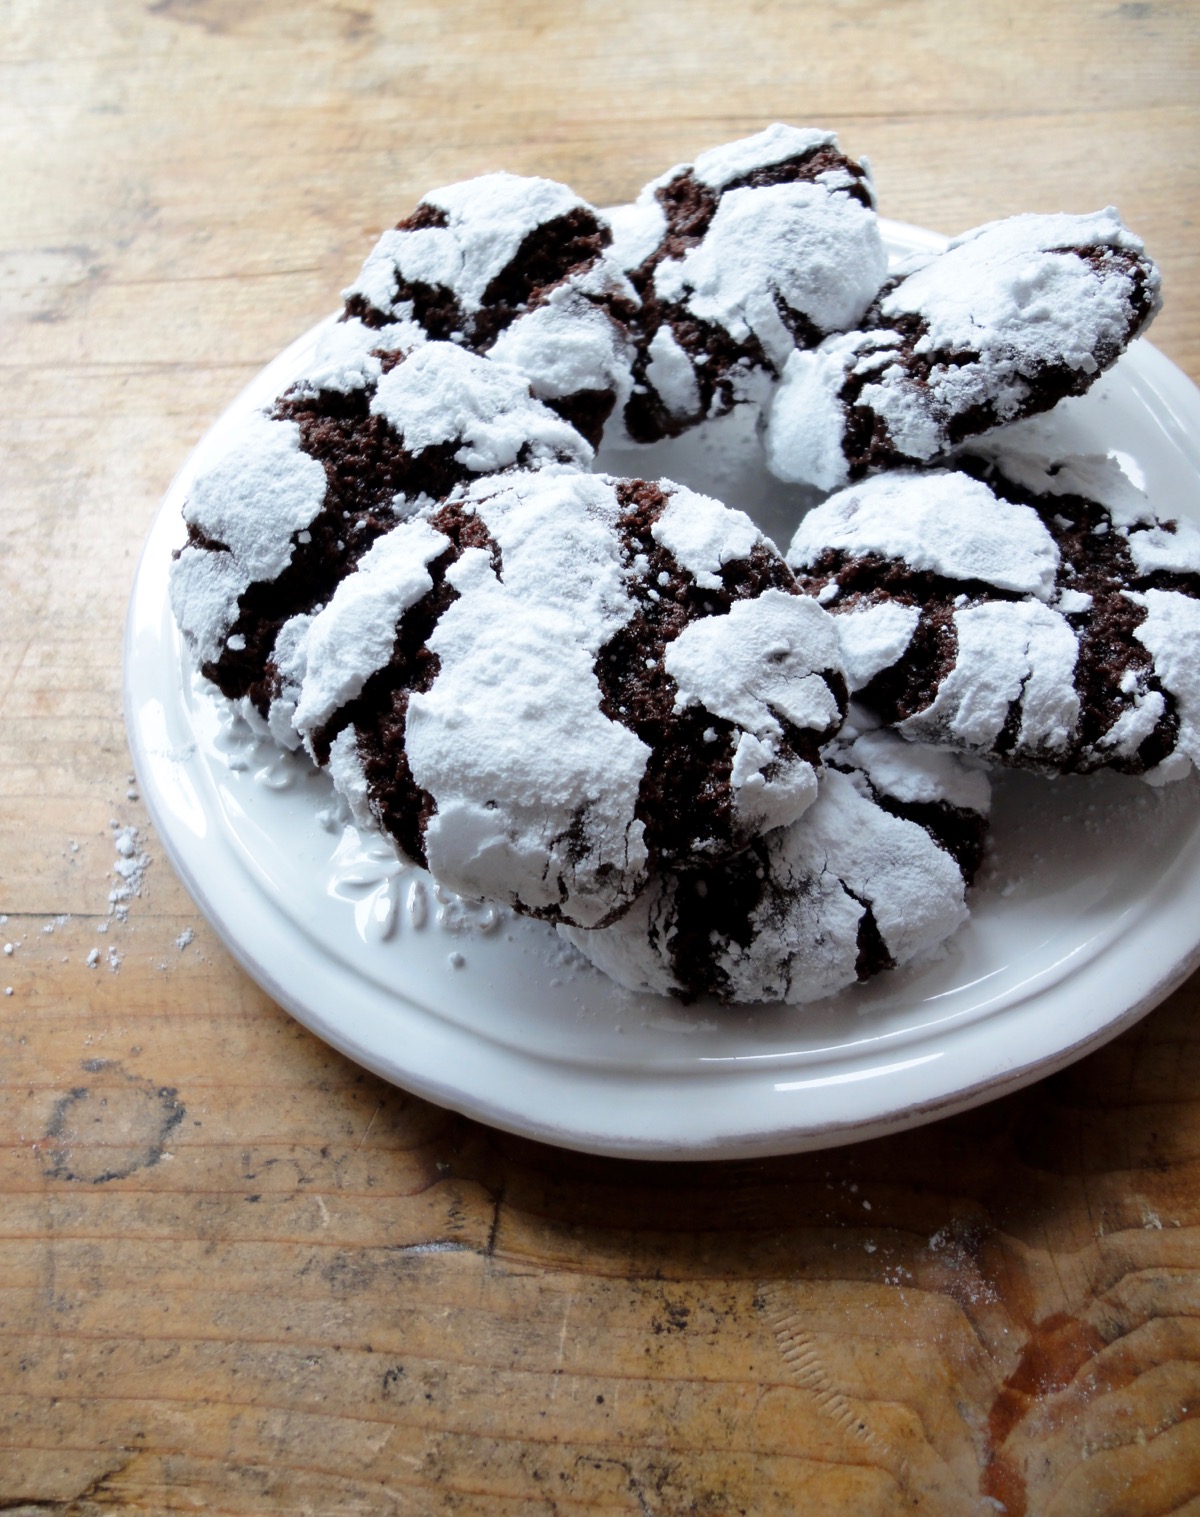
These cookies are totally perfect to indulge during this wintery season. Fudgey-brownie like goodness coated in powdered sugar to give it that snow-look. It’s another soft-dough type of cookie like the Ginger Cookies, just that this one requires some chillin’ before working with it. The cookie is great to make if you have kids as they can have fun rolling it in powdered sugar.
Recipe adapted from allrecipes .

Ingredients
- ½ cup Butter
- 2 cups Sugar
- ½ teaspoon Salt
- 1 cup Cocoa Powder
- 4 Eggs
- 2 teaspoons Vanilla Extract
- 2 cups All Purpose Flour
- 2 teaspoons Baking Powder
- ½ - ¾ cup Powdered Sugar, for coating
Directions:
- Melt butter (do not boil) and set aside to cool.
- In a large mixing bowl or a stand mixer with flat paddle attachment, add sugar, salt, cocoa powder and cooled melted butter. Mix till combined.
- Add vanilla extract (or peppermint for peppermint flavoured cookies) and eggs one at a time. Mix well and scrape down if necessary.
- Add all purpose flour and baking powder. Mix till everything is combined. Dough will be soft.
- Cover with plastic wrap and refrigerate for at least 4 hours.
- Pre-heat oven to 175°C (350°F). Prepare several baking trays and line with parchment paper.
- Lightly wet your hands before rolling. Roll dough into 1-inch balls or scoop out ½ Tablespoon of dough and roll it. Chill dough balls if it starts getting soft.
- Generously (till you can’t see the dough) coat each ball in powdered sugar and place on prepared baking trays. I could fit 16 dough balls per tray.
- Bake for 12 minutes. Baking time my vary depending on oven and size of dough balls.
- Allow cookies to cool down on baking tray for a couple of minutes before transferring to cooling rack.
Tips:
- Conversion Table
- Add peppermint extract instead of vanilla for peppermint flavour
Enjoy and merry baking!