Oopsie Rolls / Bread
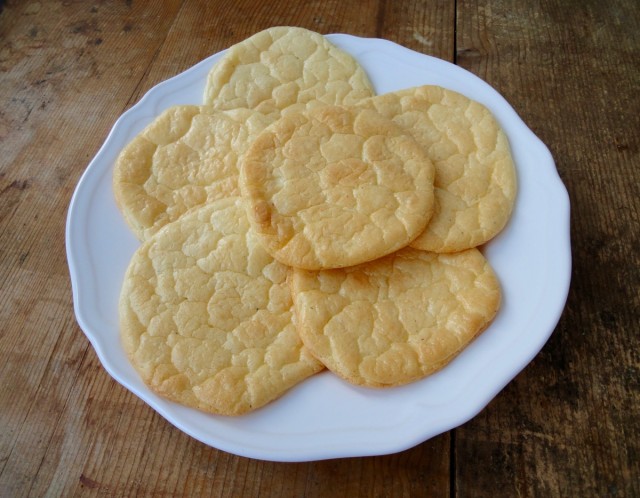
Watching your carbs but can’t resist bread? On a LCHF or Keto diet and miss that bun on your burger? Sick of just eating meat without a starch to accompany it? Here’s the solution. Oopsie Rolls / Bread. Of course it’s not the same as bread, but I find it a reasonable and quick substitute. These rolls/bread was created (not by me) by accident, hence the name of it. Use it as a replacement for foods that you would normally have with bread such as, hotdogs, burgers, sandwiches or wraps. You can even use it as a dessert like swiss rolls, pancakes or crepes. However, there are better keto friendly dessert recipes other than this.
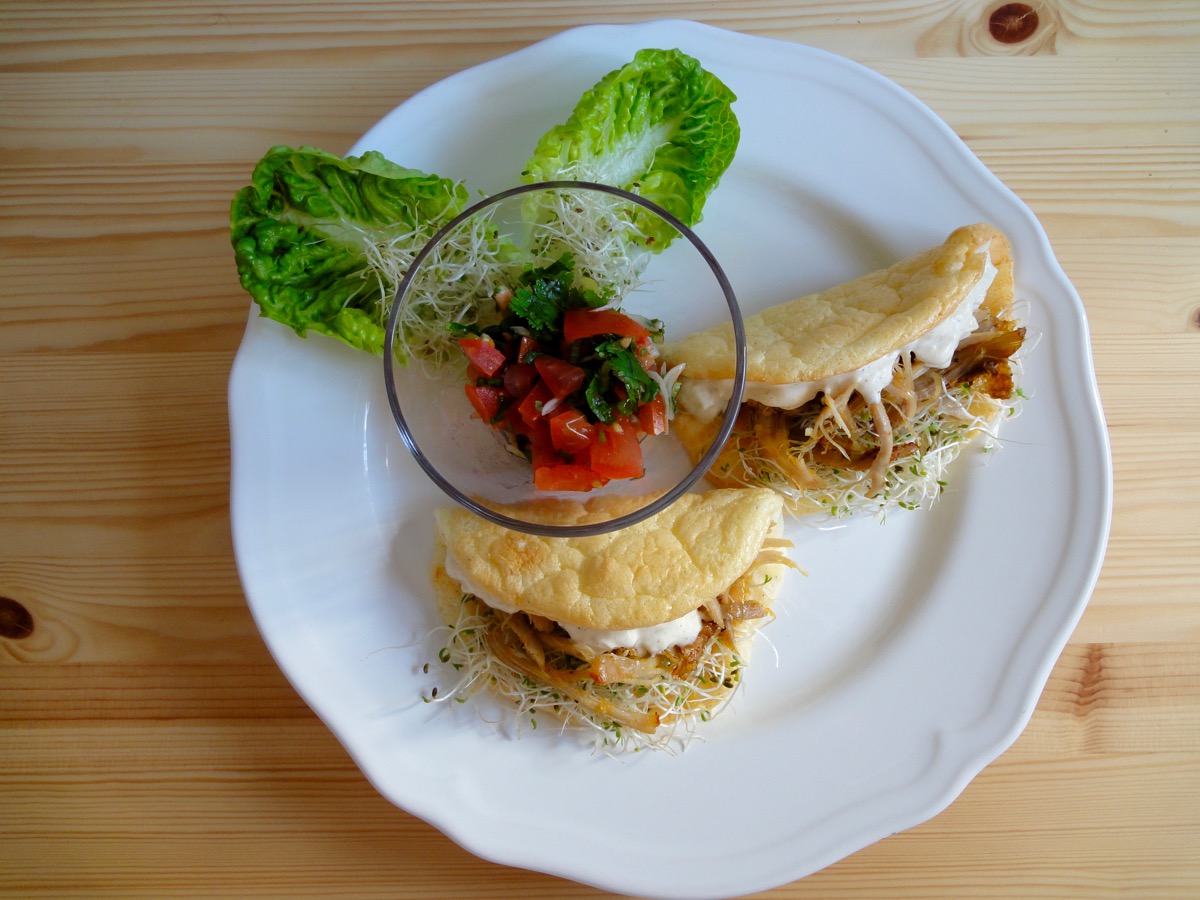
My keto lunch today, Oopsie Rolls with Alfalfa Sprouts, Shredded Chicken (leftovers), aioli with a side of homemade salsa. 530kcal, 4g Carbs, 25g Fat, 34g Protein.
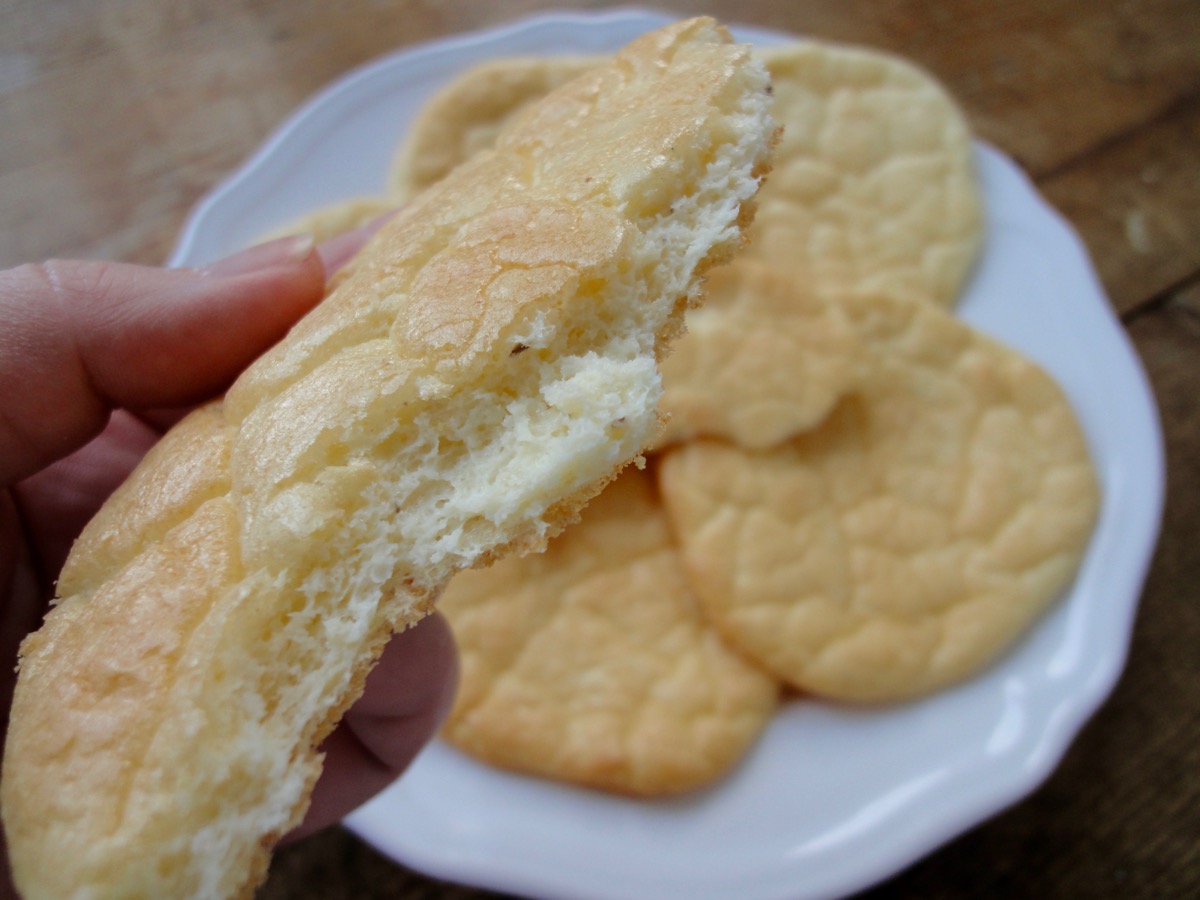
The texture of these rolls/bread is like an overly fluffed up scramble egg. Very soft, spongy, delicate and tear very easily. It’s best to eat the rolls/bread the day you make it.
This is a very simple recipe and you probably already have the ingredients on hand. Psyllium husk is optional but it is a good edition as it is a source of soluble dietary fiber and it gives you a full feeling. It also does not affect the taste of the rolls/bread. Be sure to drink lots of fluids when using psyllium husk. Also, if you do not know about psyllium husk, research it well before using it. It can be bought in any health stores, reformhaus, or amazon.
Recipe from DietDoctor.
Ingredients
- 3 Eggs, medium (separated)
- 100 grams / 3½ oz Cream Cheese
- ½ teaspoon Baking Powder
- ½ Tablespoon Psyllium Husk Powder (optional)
- To Taste Salt
Directions:
- Pre-heat oven to 150°C (300°F). Line a baking tray with parchment paper.
- Have 2 bowls ready. Separate eggs. White in one bowl and yolk in the other.
- Take the bowl with yolk. Add cream cheese and whisk till frothy and fully combined (no more clumps).
- Mix in baking powder and psyllium husk powder if using. Set aside.
- Using a hand mixer/stand mixer, whip up egg whites till it reaches stiff peaks. It should be able to not fall/drop when you turn the bowl upside down and shake.
- Gently fold in egg yolk mixture into the egg whites. Be very gentle with it as you do not want to deflate the egg whites.
- Once fully mixed, scoop out mixture onto baking tray. 6 big ones or 8 small ones.
- Bake for 25 minutes.
Tips:
- Conversion Table
- For more nutritional information, please visit my Yummly page and scroll to the bottom of the recipe.
- If you are using MyFitnessPal app to count calories, first copy the recipe URL then go to MyFitnessPal app to Recipes, select Create a New Recipe, then Add from the Web. Paste the URL, match ingredients and that’s it!
- Always match ingredients to the ones you use. Ingredient nutritional facts differ depending on brand.
Enjoy!

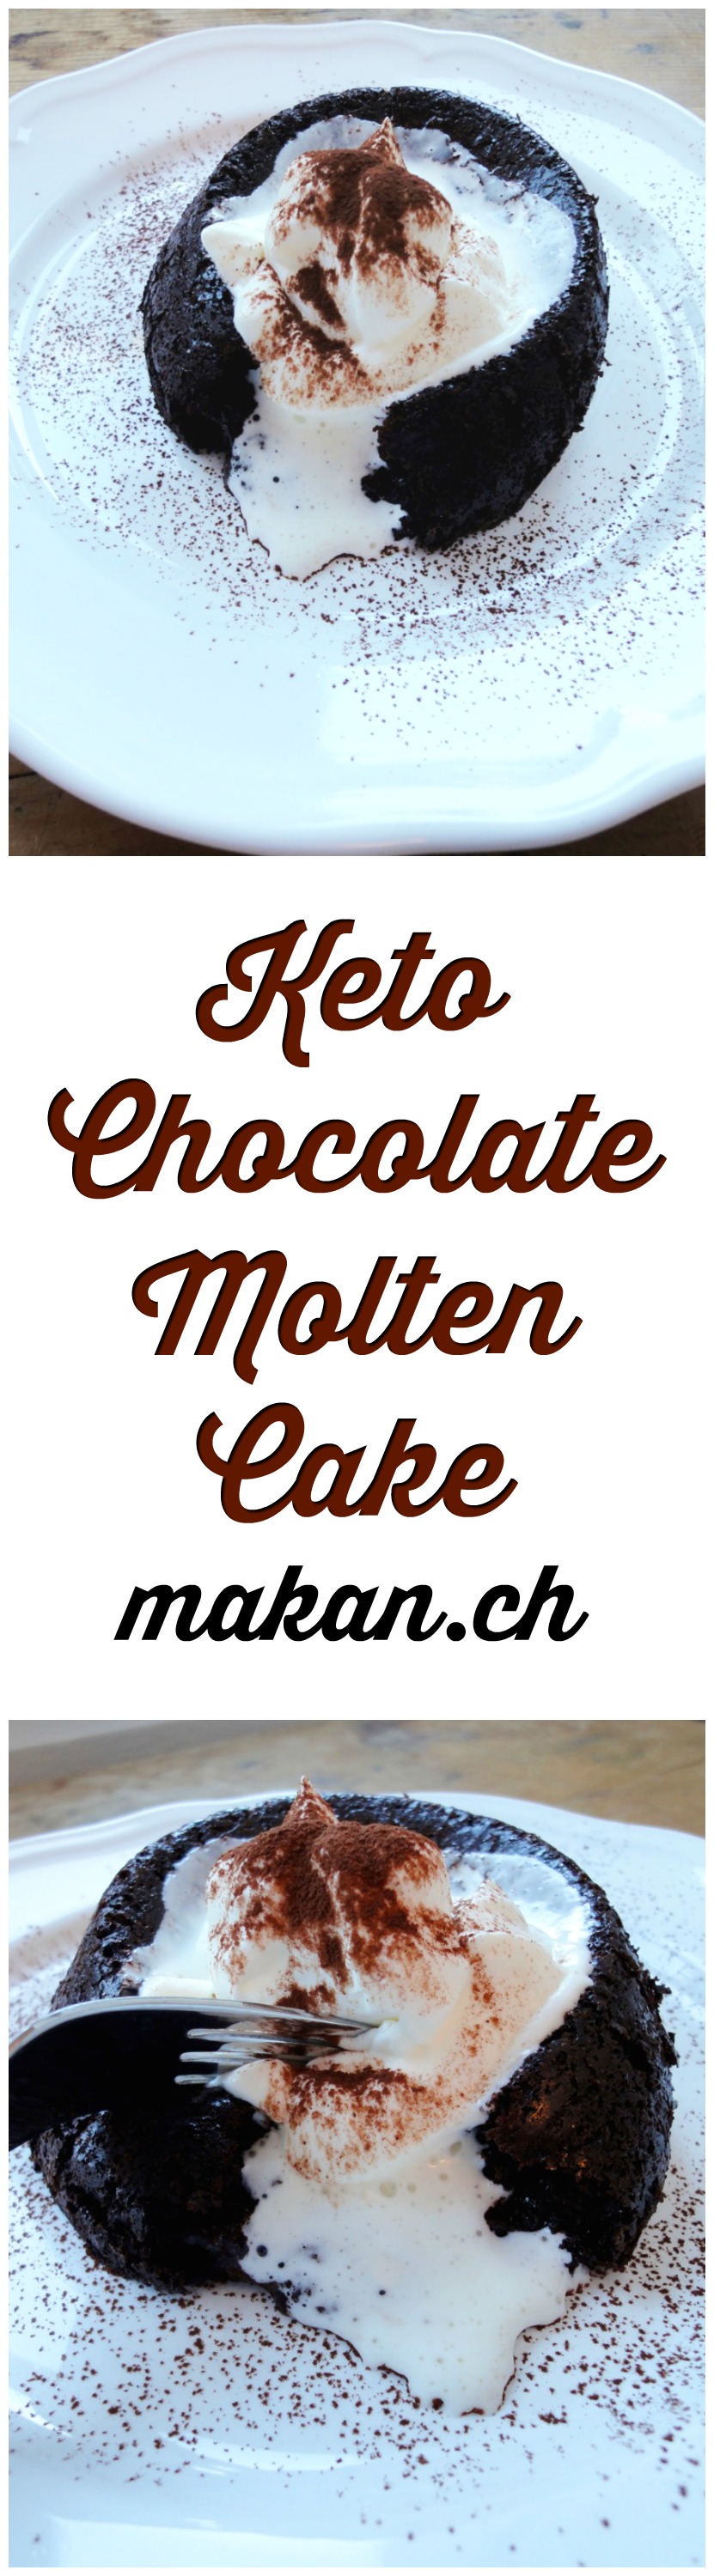
Keto Chocolate Molten Cake
“Only Cherry can find a diet that still lets her eat desserts” – The Husband (2016)
A few posts back I claimed that I won’t be baking anymore sweet treats. I didn’t lie! I just found a loophole. With a whole lot of substituting, researching, shopping, and money, I am still able to bake sweet stuff! Woohoo! However, if you really have sugar addiction and are on a strict no-sugar diet, I do not recommend you do this ‘cheat’. Yes, you do not use real sugar but the sweet taste will take you back to all your delicious sweet treats and the tendency of to submit those cravings are high. If you have good willpower, you may treat yourself.
1st loophole : I found that sukrin (erythritol) is a good substitute for sugar in baking and cooking. It taste’s like sugar, looks like sugar and works like sugar but it is 100% natural, has ZERO calories, doesn’t damage teeth, and it does not cause blood sugar to spike. Please do your own research before purchasing or using a product.
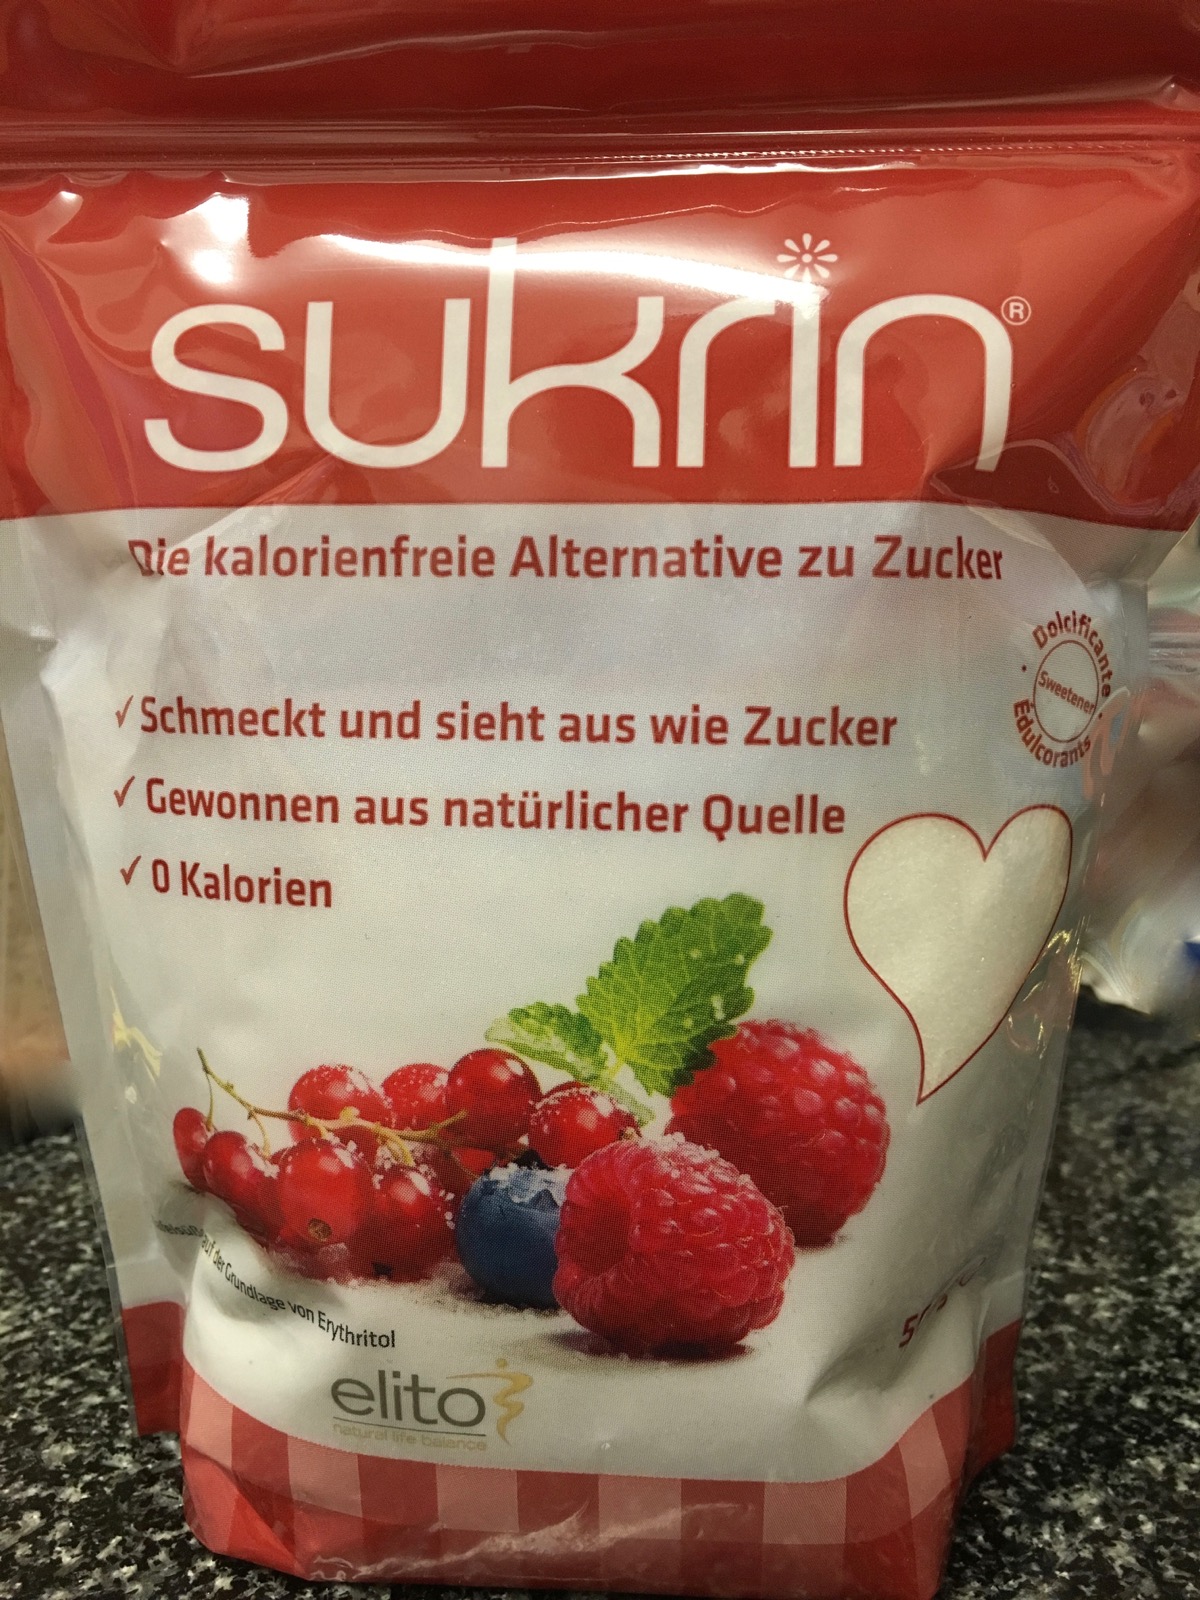
Sukrin: the calorie-free alternative to sugar. Taste and looks with sugar, 100% natural, Zero calories
2nd loophole : There are many recipes that use coconut flour or almond flour as substitutes to all-purpose flour. I have not tried using any of those two flours yet, but I will soon. Or just go flourless for now, like this recipe.
3rd loophole : Find or create sweet treats that have less than 5 grams of carbs per serving. With all the substituting, its very possible to have 5 grams of carbs per serving. If not, just eat a smaller portion.
However, the ingredients needed to create low carb sweet treats are rather expensive compared to if you do not substitute. For example, 1 kilo of sugar costs CHF 1 (in Switzerland) whilst a 500 gram packet of sukrin costs around CHF 14.50 and that’s without delivery. That alone is enough to discourage me from using much of it. I would use it for that biweekly or monthly treat and a little in the morning when I make my cocoa drink. I’m used to drinking Nesquik in the morning but I sadly have to give that up. :'(
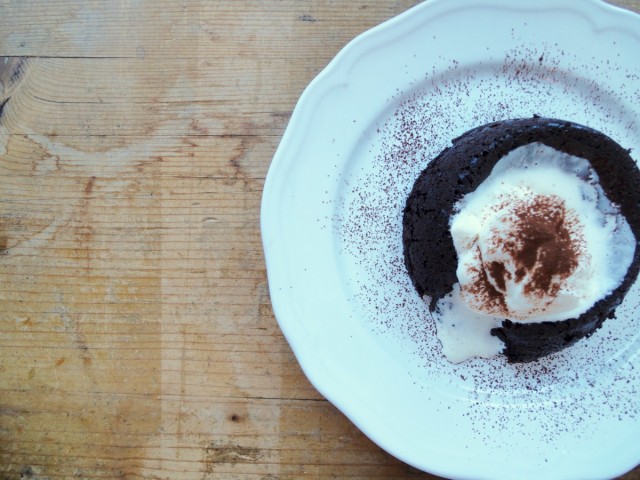
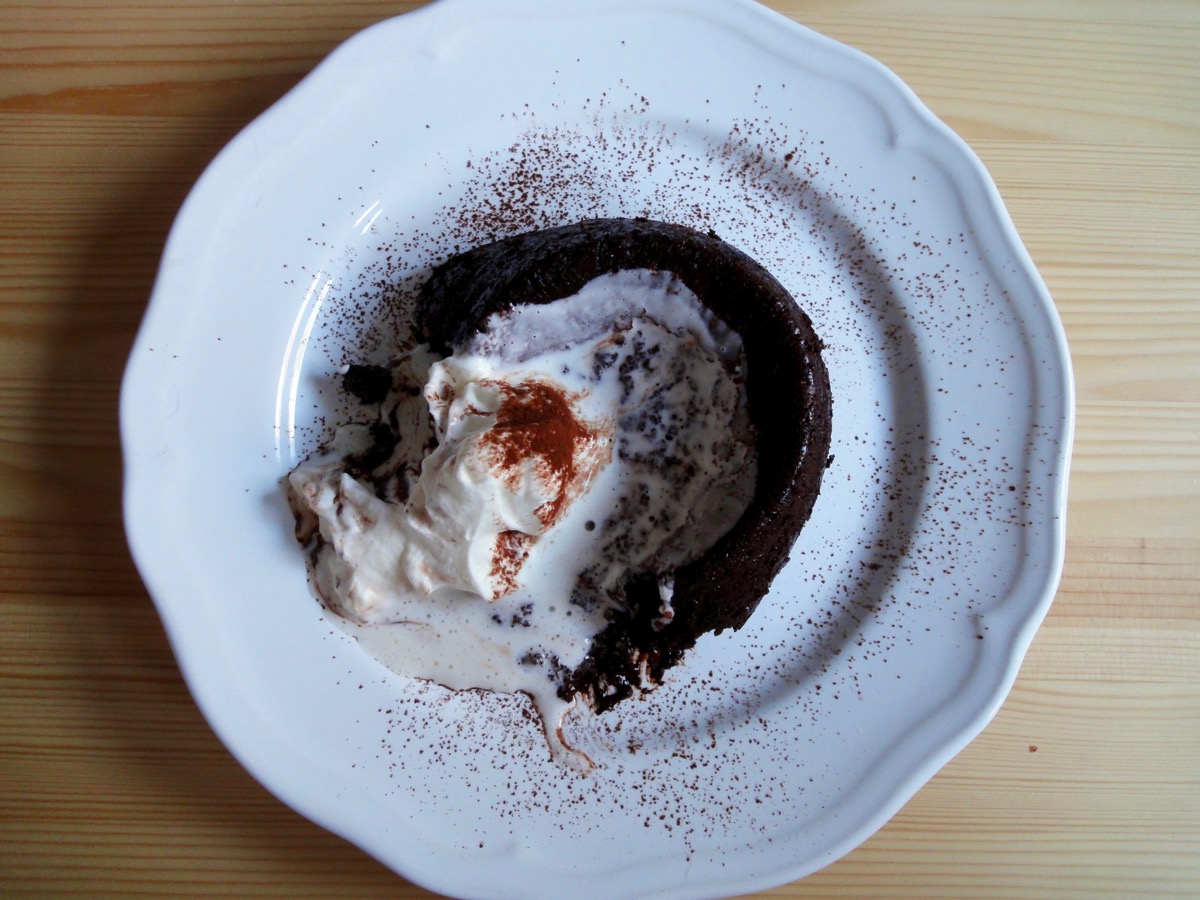
So, here’s that delicious (and a little bitter) keto chocolate molten cake. Recipe adapted from Tasteaholics.
Chocolate Molten Cake
- 4 Tablespoons Unsweetened Cocoa Powder
- 2-4 Tablespoons Erythritol (Sukrin)
- ½ teaspoon Baking Powder
- To Taste Salt
- 2 Egg, medium
- 2 Tablespoons Heavy Cream (35%)
- 1 teaspoon Vanilla Extract
Vanilla Whipped Cream
- ½ cup Heavy Cream (35%), cold
- 2 teaspoons (or according to taste) Erythritol (Sukrin)
- 1 teaspoon Vanilla Extract
Directions:
- Chocolate Molten Cake
- Preheat oven to 175°C (350°F). If using microwave, skip this obviously.
- Spray or butter up your ramekins or heat-proof bowls. Set aside.
- Mix erythritol (sukrin), unsweetened cocoa powder and baking powder. Break up any clumps and set aside.
- In another bowl, whip/beat the crap out of the eggs until it’s frothy and aerated. (the cake is flourless so beating it till frothy and aerated is going to help the cake rise.
- Add the egg, heavy cream, vanilla extract and salt to the cocoa mixture.
- Gently fold in the mixture till combined.
- Pour batter equally into prepared ramekins.
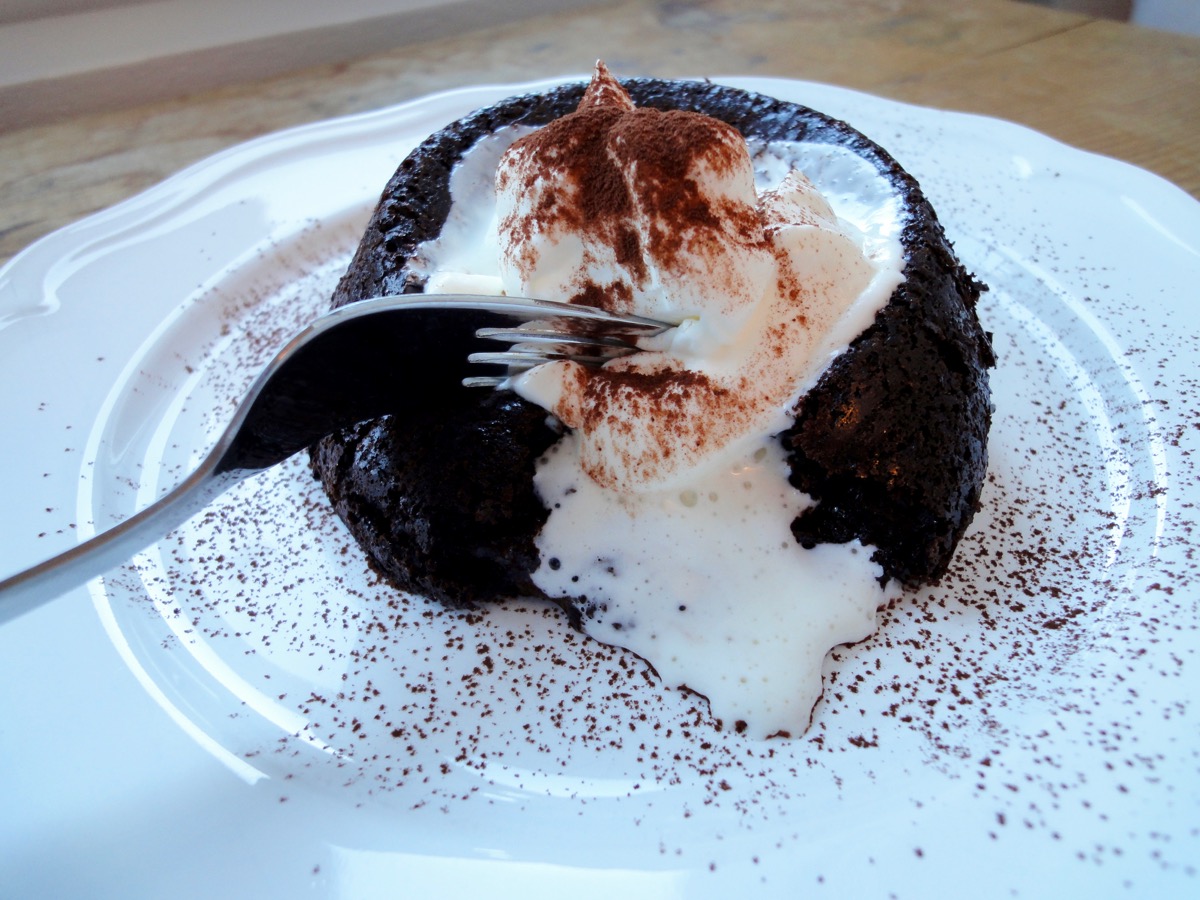
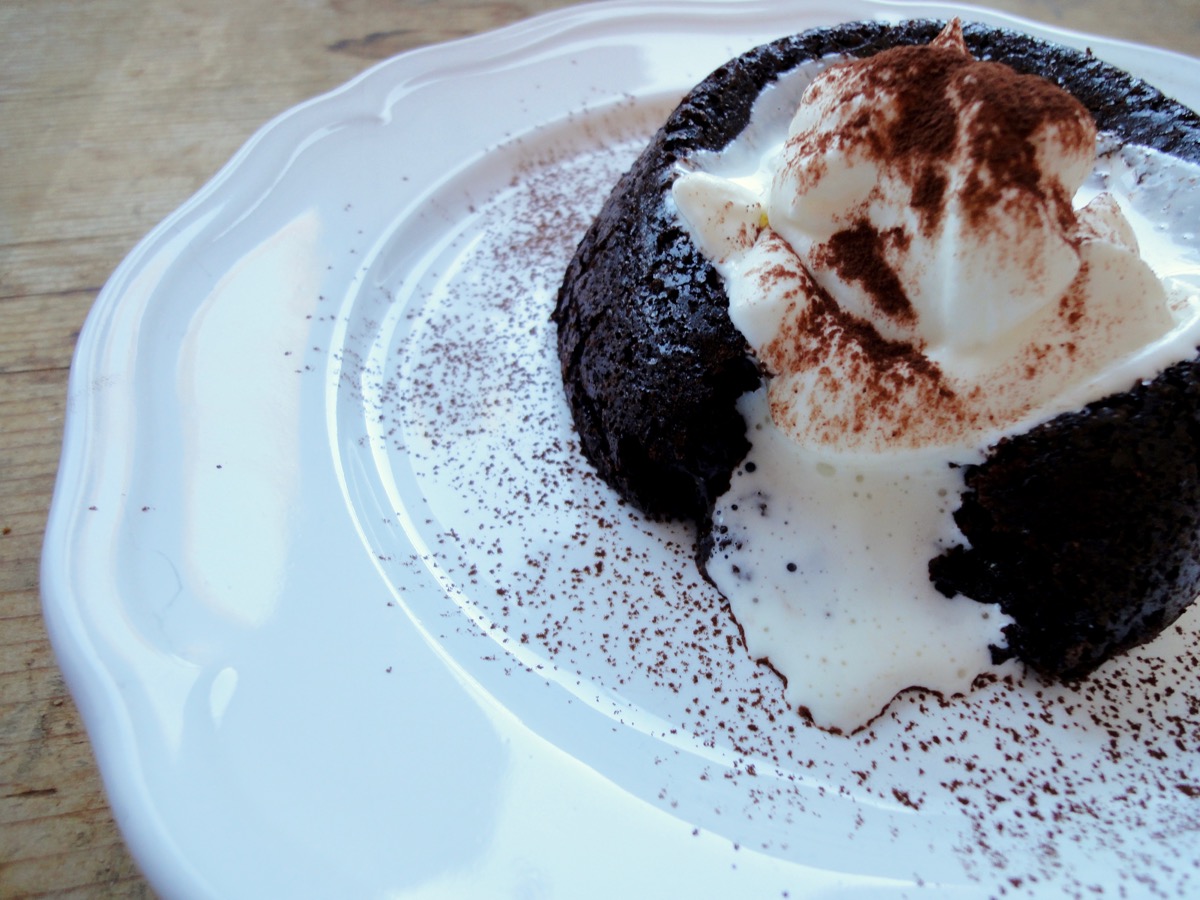
- Bake for 15 minutes or microwave it for a minute (or till it’s cooked, all microwaves are different) In the meantime, prepare whipped cream. See 2nd set of instructions below. It should still be jiggly. If cooked too long, you wouldn’t get that molten effect and you’d just land up with a cake which is also nice.
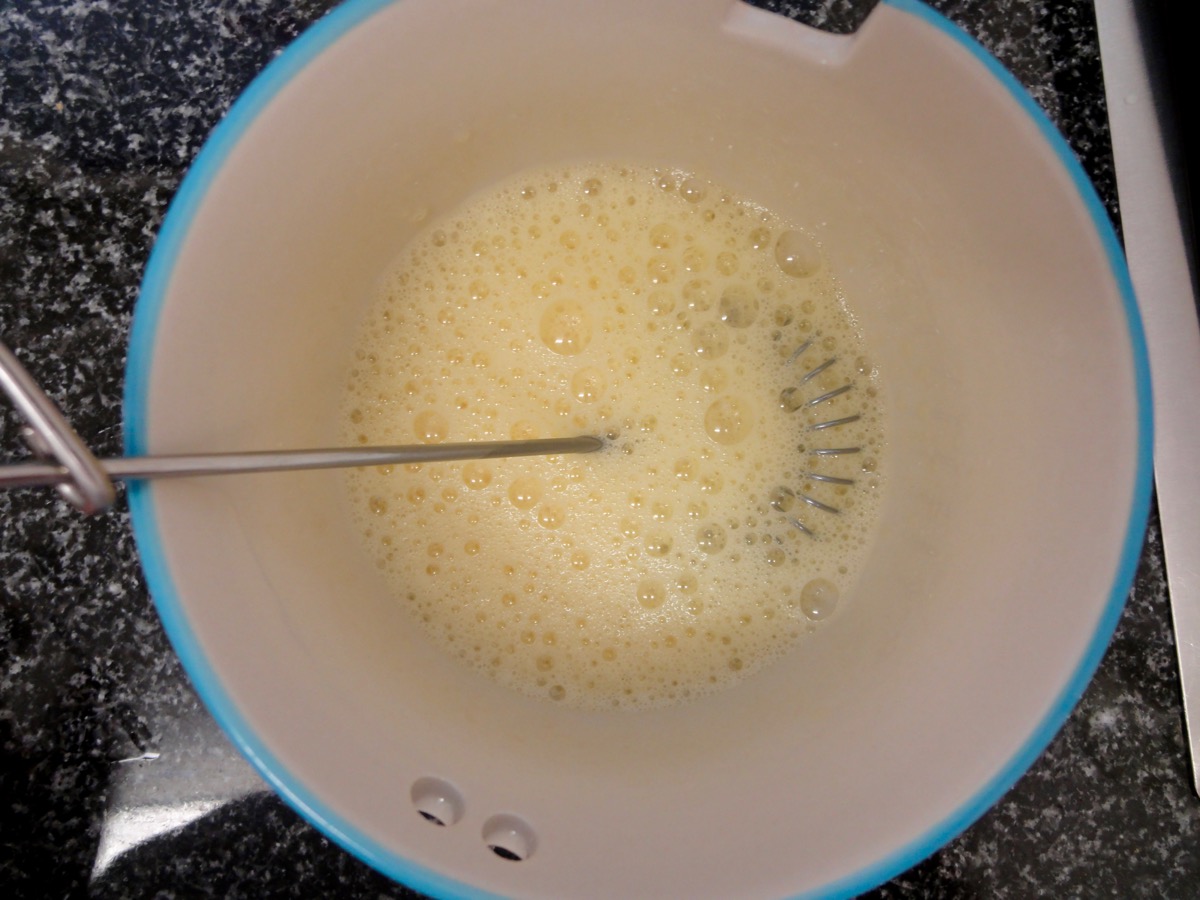
Whisk/Beat till frothy
- Whipped Cream
- Add heavy cream, erythritol (sukrin) and vanilla extract to a large bowl.
- Whip till it forms stiff peaks. You can use a hand mixer, stand mixer or if you like a challenge, whisk it manually.
- Set aside or put it in the refrigerator until needed.
- Assembly
- Carefully run a knife around the edge of each cake, then turn out onto serving plates and serve with a dollop of vanilla whipped cream.
Tips:
- If cooked too long, you wouldn’t get that “lava” effect and you’d just land up with a cake which is also nice.
- Make your own Vanilla Extract!
- Conversion Table
- If you are using MyFitnessPal app to count calories, first copy the recipe URL then go to MyFitnessPal app to Recipes, select Create a New Recipe, then Add from the Web. Paste the URL, match ingredients and that’s it!
- Always match ingredients to the ones you use. Ingredient nutritional facts differ depending on brand.
- Nutrition Facts (based on my ingredients) : Per serving 302 kcal, Total Fat – 25 g, Total Carb – 4 g, Protein – 11 g.
Enjoy and just eat one portion! Don’t be greedy.
By the time I was done taking photo’s I was left with this mess.
Bulletproof Hot Cocoa

Disclaimer: This is strictly for those who are on a LOW CARB diet. For regular carb eaters, please please do not make this. It is high in fat and calories!
For those who have not heard about bulletproof drinks (coffee, chocolate, etc.) please google it. Do lots of research on LCHF diets, read the pro’s and con’s of it. Do not follow anything blindly.
Some years back, I picked up a book at a bookstore during one of my morning shifts. It’s called Leaving Mother Lake. It’s a beautiful memoir of Yang Erche Namu who is a Moso, an ethnic minority that lives in the Himalayas in southwestern China. In the book, the author mentions butter tea, which is tea mixed with yak butter and salt. Since butter is the main ingredient, butter tea provides plenty of caloric energy and is particularly suited to high altitudes. FYI I’m not living on the alps. At that time, I could not think of it being nice. Butter goes on toast. Tea goes with milk. I was not too convinced this was a nice beverage. Maybe because when I read it I was in a tropical country with the heat and humidity…the whole idea of it was very bad. But now, I could actually picture myself drinking it.

However, the concept of mixing butter in beverages is very well known with LCHF dieters. It’s supposed to leave you feeling full, energized and focused for hours. Some of the claimed benefits is that it helps you stay in Ketosis, burns fat, boosts brain power and bumps up energy levels. I do not claim any of these, but since I am in the LCHF diet, it’s suitable for me. What’s important when drinking this is to always make sure it fits in your diet and check if it fits your macros. I started making this as I was getting a little fed up of having lots of cream and butter for lunch or dinner which is quite a typical LCHF meal. I would probably not get fed up of it if it’s accompanied with pasta or rice but since that’s out of the picture, I had to find an alternative. This for me, was a perfect solution. I could have my cocoa on a regular basis since I gave up drinking Nesquik.

This recipe does not use regular white sugar. It’s also not advised to use any other sugar substitute if you have sugar addiction. Recipe also contains coconut oil which is essential for rapid fat-burning, and butter (preferably grass-fed if you can find) but I just use regular Swiss Butter. Recently I have been omitting the coconut milk in the recipe due to the extra calories that I could not spare. It taste’s just as great.
For more information, visit Low Carbe Diem for other recipes. This recipe is adapted from there too.
Ingredients
- ½ cup Filtered Water
- ½ cup Coconut Milk
- 2 Tablespoons Unsalted Butter (grass-fed)
- 1 Tablespoon Coconut Oil or MCT Oil
- 2 Tablespoons Unsweetened Cocoa Powder
- ¼ teaspoon Vanilla Extract
- A dash Cinnamon
- 1-2 teaspoons Erythritol (Sukrin) - Optional
Directions:
- In a medium sized pot (if using hand blender) or a small pot (if using blender), bring water and coconut milk to a boil.
- Remove from heat.
- Add the rest of the ingredients into the coconut milk and water.
- Blend using a hand blender (like the ones for soups) or pour the mixture into a blender and blend till frothy.
- Pour into a mug and enjoy.
Tips:
- Conversion Table
- Find coconut milk that is low in carbohydrates and sugar but still high in fat.
- For nutritional information, please visit my Yummly page and scroll to the bottom of the recipe.
- Nutrition Facts (based on my ingredients) : Per serving (1) 486 kcal, Total Fat – 48 g, Total Carbs – 7 g, Fiber – 4 g = NET Carbs – 3 g, Protein – 4 g.
- If you are using MyFitnessPal app to count calories, first copy the recipe URL then go to MyFitnessPal app to Recipes, select Create a New Recipe, then Add from the Web. Paste the URL, match ingredients and that’s it!
- Always match ingredients to the ones you use. Ingredient nutritional facts differ depending on brand.
Enjoy!


Croutons
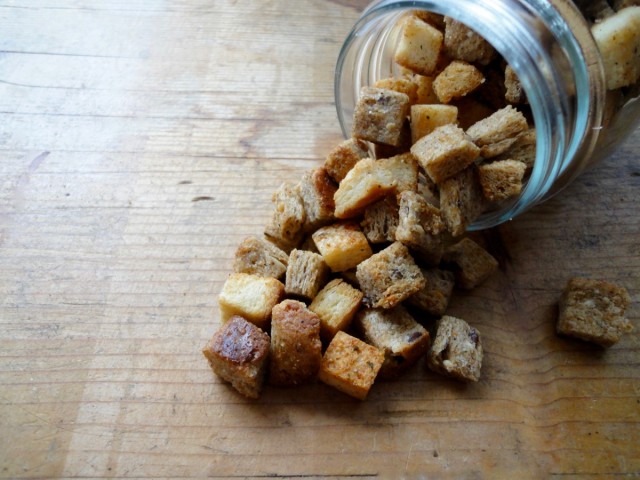
Little gems on salad! Tastes 100% better than store bought croutons.
I love croutons and I love making them. Back when I was working, I used to eat croutons with sour cream everyday. I was addicted to it. Then in my other job, I had to make croutons twice a week using lovely brioche toast which made the croutons taste even better! I could not keep my hands off those too, that’s why I had to make it twice a week!
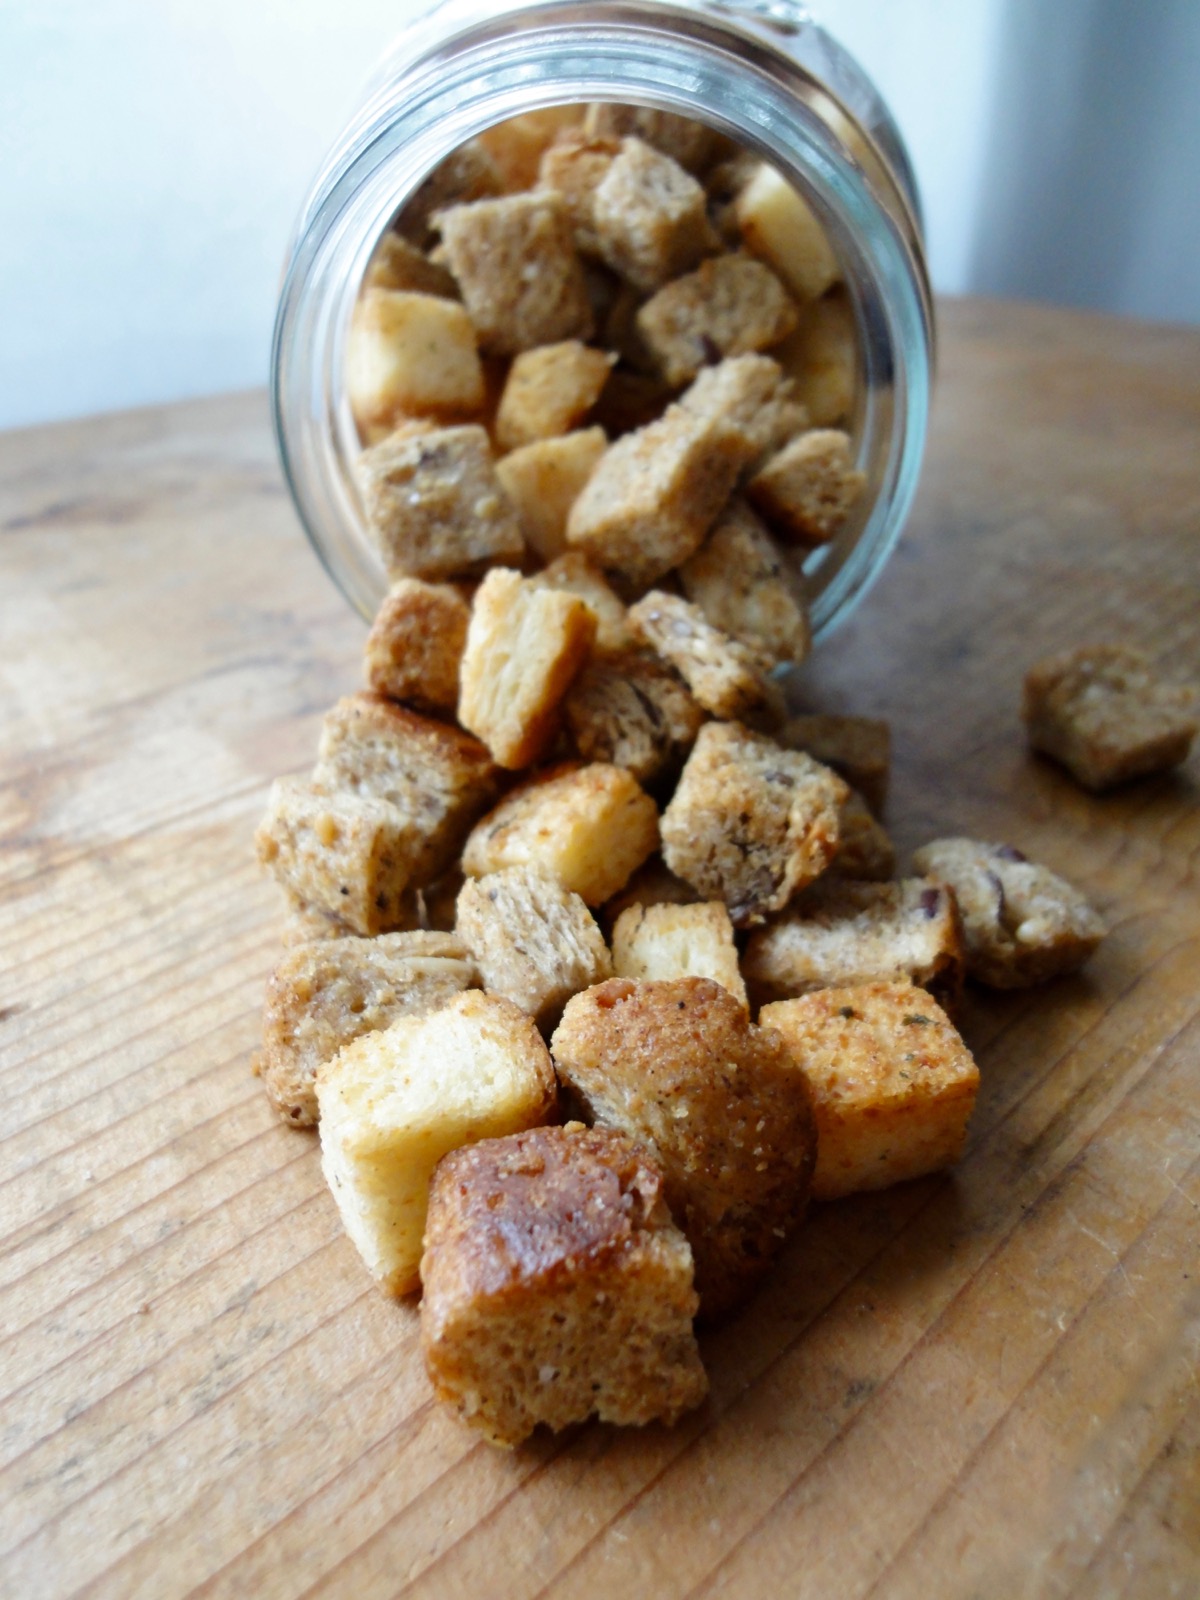
Now I’m on a very strict low carb diet. So croutons are out of the picture. I’m only on day 4 and I miss bread so much! Anyways, I made this batch here with half white bread and half wholemeal bread – just to make myself think it’s better than just going full white. I gladly sprinkled it over my salads while it lasted. So for all those who are not on a strict diet, please eat some on my behalf.
This post is dedicated to my sister. After she got married, she started to cook at home. See, she’s not that domesticated when it comes to the kitchen. She’s better in the cleaning department and keeping the place tidy. I remember one day she made salad and then posted on Facebook that she did not have croutons. So I told her just toast up some bread and you’d have croutons. Her reply was, why would I make a condiment! HAHAHA I’m sure her cooking has improved a lot over the few years plus she knows how to cook rice well. I’ve not eaten her cooking yet. Though, there was a close call when we were younger. Our mother was out and we were playing outside the kitchen. She proceeds to cut grass and brings some water to boil. She then boiled the grass and added salt and pepper. The next thing I knew was she was trying to force me to drink her grass soup!!!! Mother came back in time to save the day. So dear sister, you are a year older today and I hope you do not attempt to cook grass soup anymore. 😛 Happy Birthday and cook more!
Ingredients
- 8 slices Sandwich Bread
- 2 Tablespoons Olive Oil
- 2 teaspoons Garlic Powder
- 2 teaspoons Onion Powder
- 1 teaspoon Oregano
- To taste Salt
- To taste Black Pepper Powder
Directions:
- Pre-heat oven to 150°C (300°F) and line a baking tray with parchment paper.
- Cut sandwich bread into small cubes. Put bread cubes in a medium sized bowl.
- Drizzle oil over bread and toss or mix by hand. Make sure bread cubes are evenly coated.
- Sprinkle seasoning and herbs. Toss or mix by hand again till coated.
- Spread croutons out onto baking tray.
- Bake for 20 -30 minutes or till it’s lightly brown. Pay attention to the croutons once it starts browning as it can go south very quickly.
- Remove from oven and allow to cool completely before storing in an air-tight container.
Tips:
- Conversion Table
- Use any type of bread of choice
- Feel free to use your own choice of oil such as peanut oil, vegetable oil, canola oil, sunflower oil, rapeseed, or even butter.
- Add parmesan for extra yumminess!
- For nutritional information, please visit my Yummly page and scroll to the bottom of the recipe.
- If you are using MyFitnessPal app to count calories, first copy the recipe URL then go to MyFitnessPal app to Recipes, select Create a New Recipe, then Add from the Web. Paste the URL, match ingredients and that’s it!
- Always match ingredients to the ones you use. Ingredient nutritional facts differ depending on brand.
Enjoy!
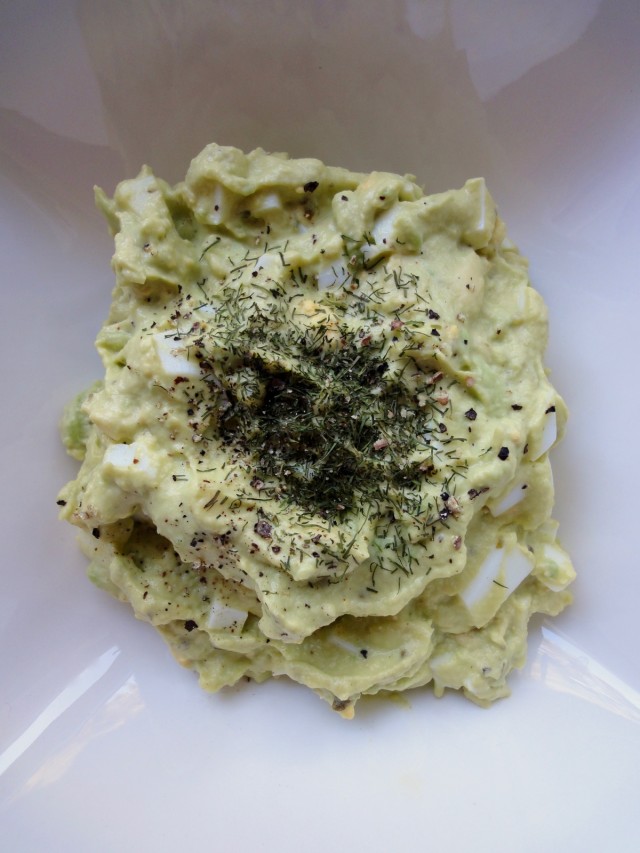
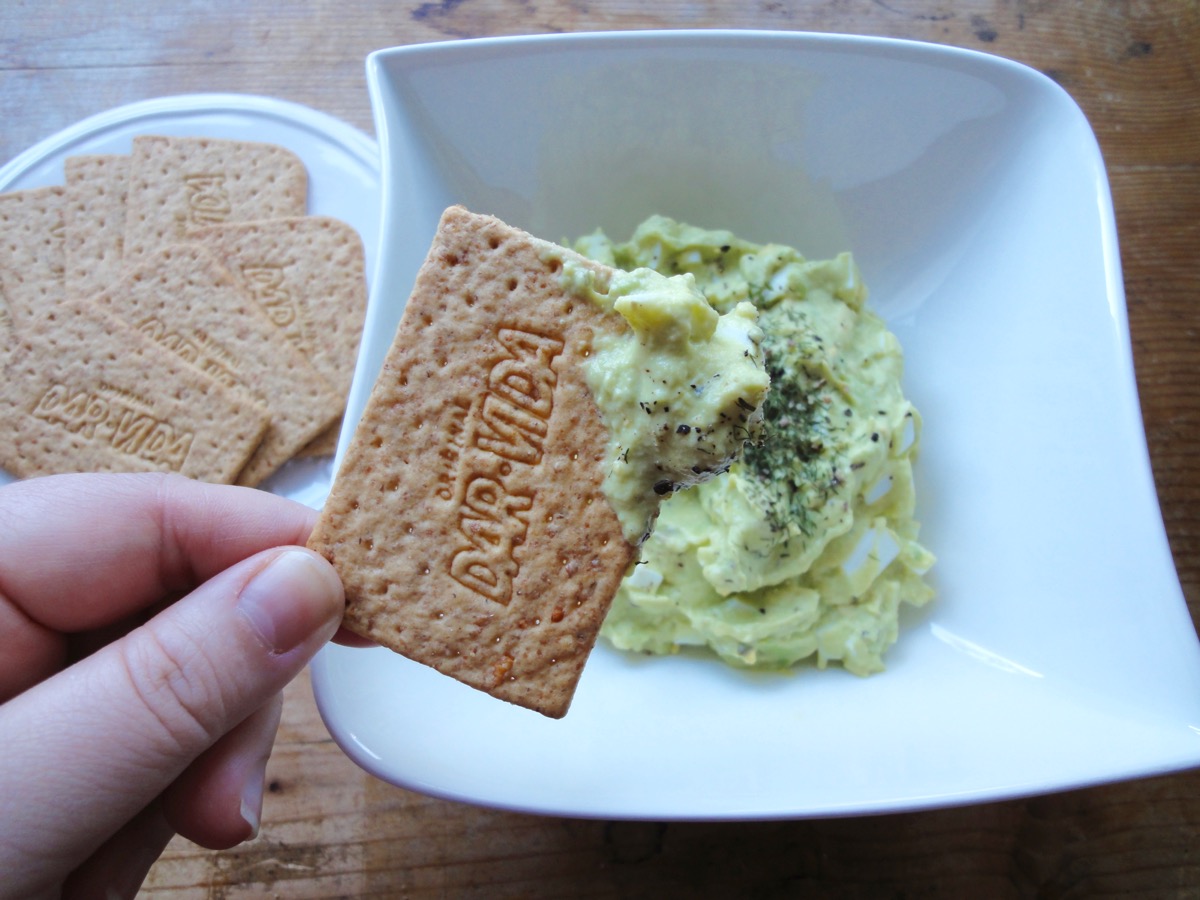
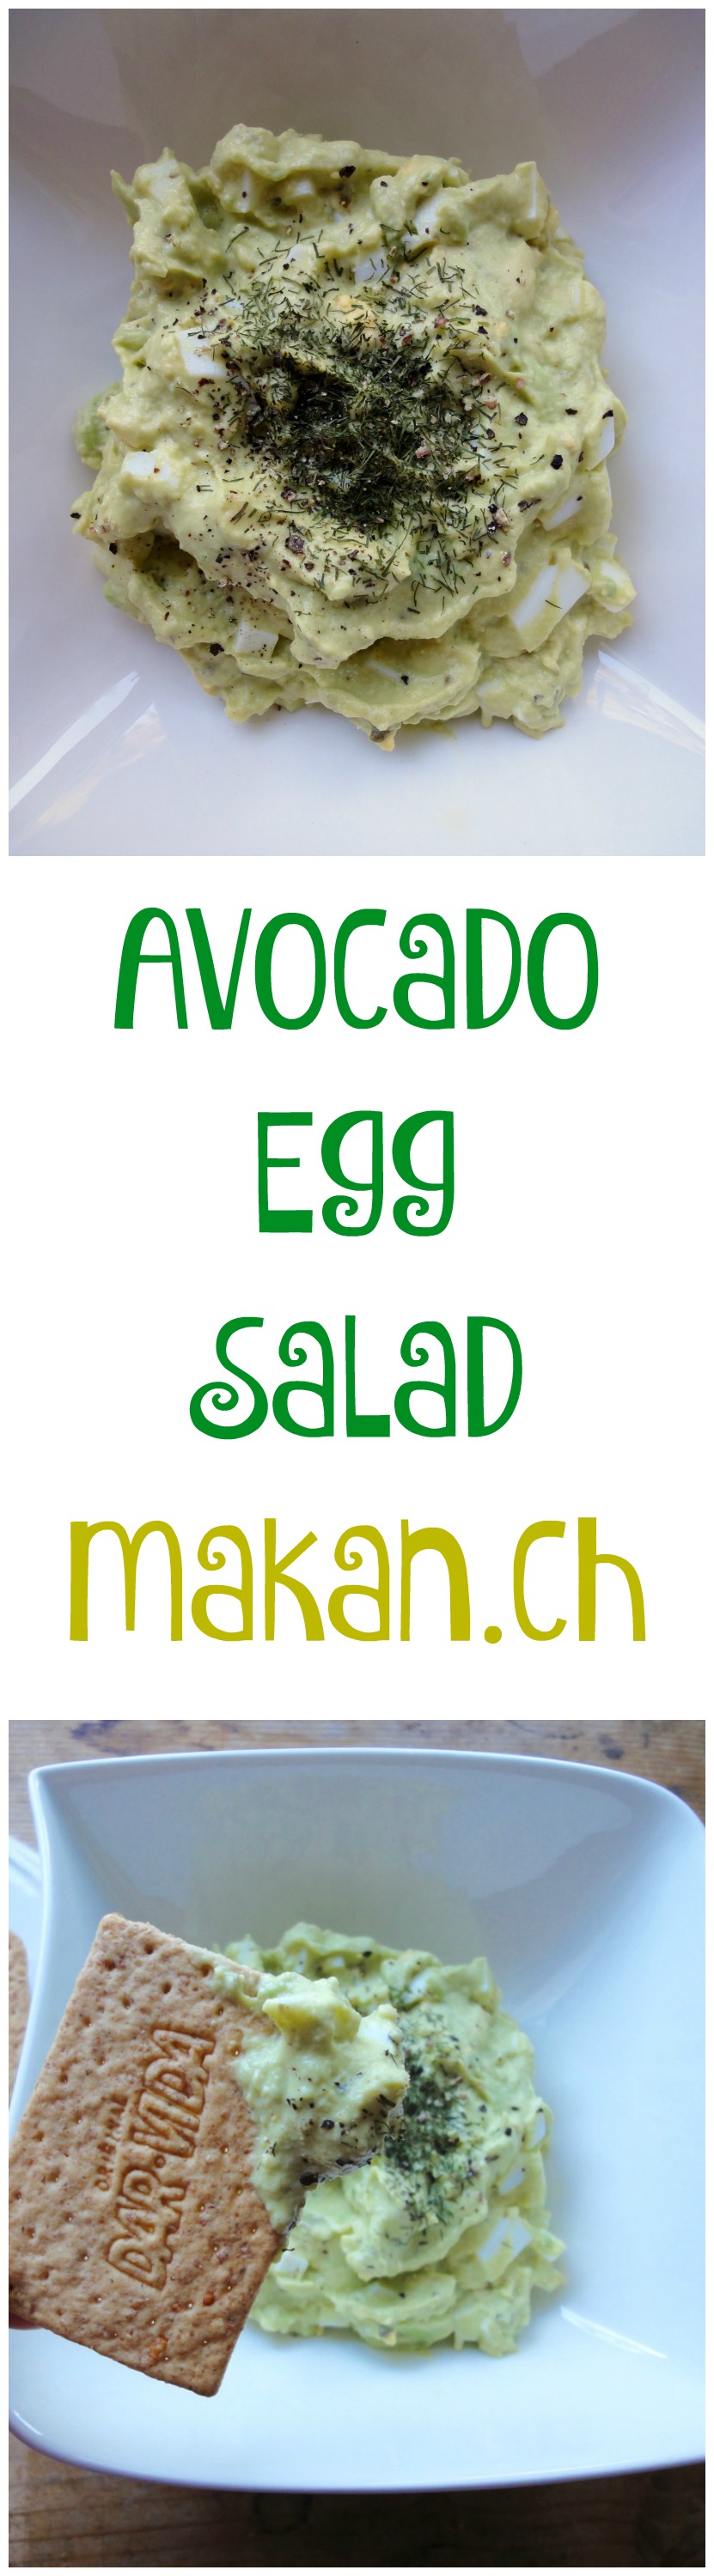
Avocado Egg Salad
A month has flown by so fast. Could 2016 be any faster? I’m just hoping February and March would past even faster cause by the end of March I would be done with my weekly allergy shots to prepare for spring. For the past 2 springs I had up to 3 months of suffering from my allergies. The first year I thought I was just having a very long cold. But last year it happened again and this time it got worse. I could barely breathe throughout the night causing me sleepless nights and finishing up 3 boxes of tissue a month was annoying. I was jumping from one antihistamine to another until I finally found one that reduces half the blocked nose and so on. By the time I started taking it, the amount of pollen subsided and it got better. So, I decided to take a test to see what was I allergic to exactly. Turns out I’m allergic to cats and grass! I find it a little ironic how I, from a tropical country is allergic to grass out of all things. Don’t mind being allergic to cats cause I’m more of a dog person.
Anyways, this recipe is a twist on the regular mayonnaise based egg salad. It’s also a basic so you can freely add whatever condiment you like such as onions, pickles and so on. If you do not like mayonnaise and butter this is a good solution. Plus, avocados are very nutritious. Also a good way to get vitamins, healthy fats and other nutrients for kids who do not like veggies.
You can of course add mayonnaise into the mixture but it’s simply not necessary. Goes perfectly with toast, oopsie rolls, cucumbers, celery or crackers. I dipped mine in whole wheat crackers but from now on I would go the vegetable route instead.
Ingredients
- 3 Hard Boiled Eggs, peeled
- 1 large Avocado, roughly chopped
- To Taste Salt
- To Taste Black Pepper
- ½ teaspoon Lemon Juice*
- 1 Tablespoon Crème fraîche (optional)
- For Garnish Dill
Directions:
- In a bowl, mash eggs till small chunks.
- Add avocado, crème fraîche – if using, salt and pepper. (Add lemon juice if you are not eating the salad right away. This is to prevent the avocado’s from going dark/black – oxidation)
- Mix ingredients together.
- Cover bowl with cling wrap and refrigerate for an hour or serve immediately. I like cold egg salad.
Tips:
- Conversion Table
- Per serving : 161 calories, 12 grams total fat, 4 grams total carbohydrate, 10 grams protein.
- For nutritional information, please visit my Yummly page and scroll to the bottom of the recipe.If you are using MyFitnessPal app to count calories, first copy the recipe URL then go to MyFitnessPal app to Recipes, select Create a New Recipe, then Add from the Web. Paste the URL, match ingredients and that’s it!
- Always match ingredients to the ones you use. Ingredient nutritional facts differ depending on brand.
Enjoy!
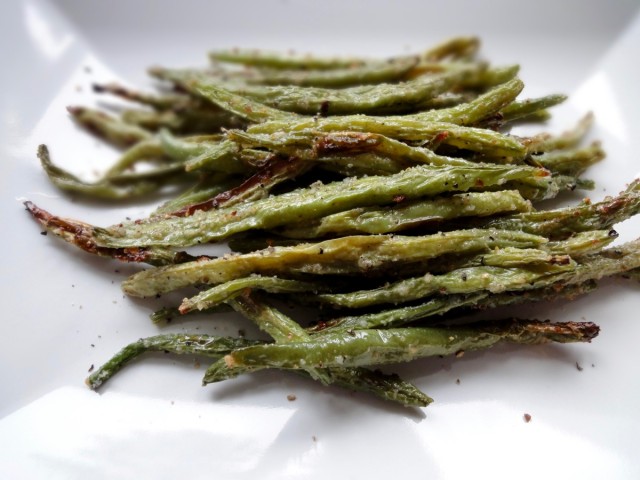
Roasted Green Beans


Since I’ve been at this whole eating healthier/trying to shed some weight, I’ve been trying to eat more vegetables. I like vegetables, just that sometimes I don’t pay attention to it as much as I do my protein and starch. Most of the time I like to just dump my vegetables into a pot to boil or I would buy ready-made frozen spinach where you just have to put it in a pot with a tablespoon of water and cook it.
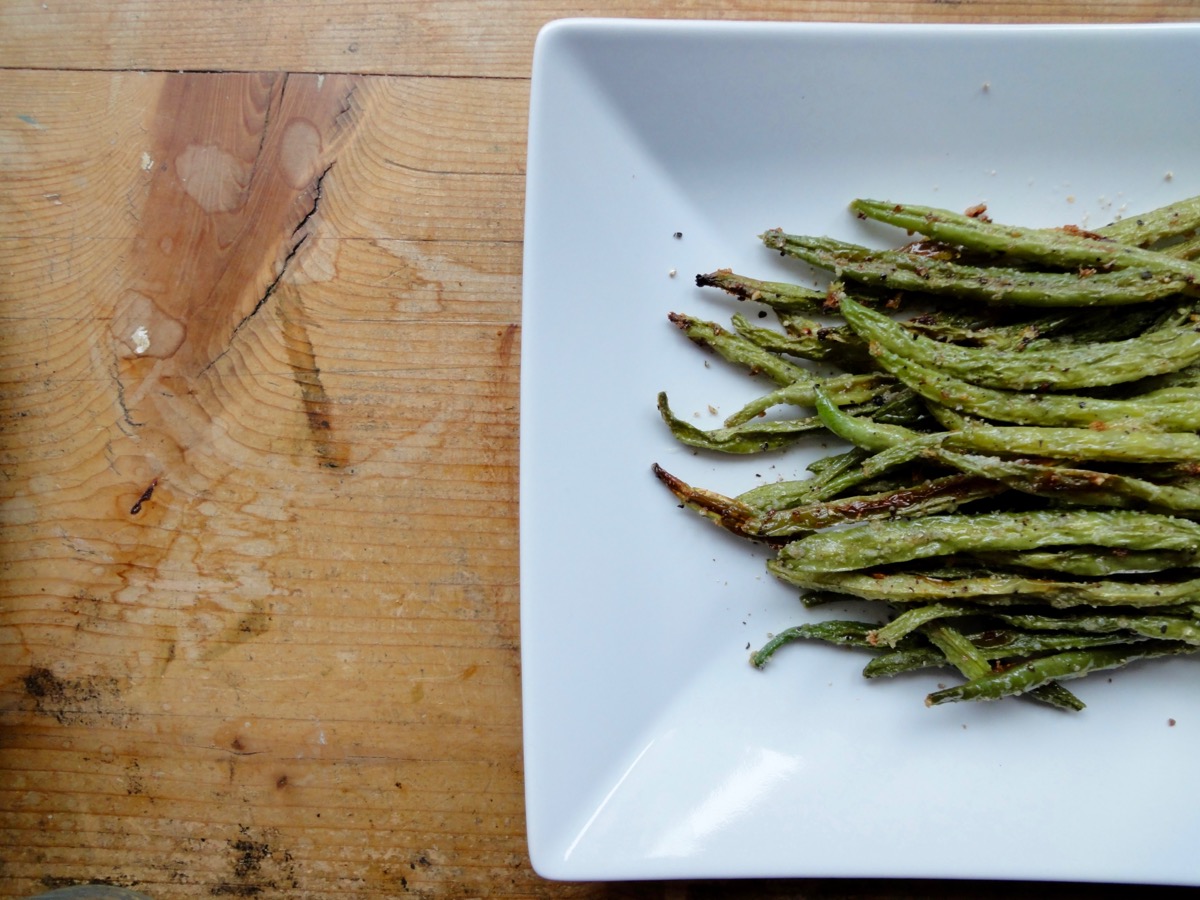
Green beans are the one of our top favourite vegetables. However, my husband likes it boiled/steamed till it’s very soft (like most restaurants in Switzerland) whilst I like it still crunchy. I thought roasting it would solve our problem of having our beans two different ways as it gets soft but still has a crunch due to the high temperature of roasting it. He is not a fan of this but I love it. In fact, I just had this for lunch. Just roasted green beans. Belly is still grumbling, but what to do!

This recipe is very basic. Just green beans, some oil, salt, ground black pepper, and garlic powder. Many recipes call for adding parmesan cheese, but that’s simply up to you.
Ingredients
- 500 grams ( 1 pound) Green Beans
- ½ Tablespoon Olive Oil
- ½ teaspoon Garlic Powder
- ¼ teaspoon Salt
- To Taste Freshly Ground Black Pepper
Directions:
- Pre-heat oven to 200°C (400°F) and prepare baking tray with parchment paper.
- Break the top and tail of the green beans and rinse it. Dry with paper towels.
- Spread green beans onto baking tray. Drizzle with oil and sprinkle with salt, ground black pepper and garlic powder.
- Mix green beans to coat evenly.
- Bake for 20 minutes. Serve immediately.
Tips:
- Conversion Table
- You can use fresh or frozen green beans. Frozen green beans need to be defrosted before baking.
- For nutritional information, please visit my Yummly page and scroll to the bottom of the recipe.
- If you are using MyFitnessPal app to count calories, first copy the recipe URL then go to MyFitnessPal app to Recipes, select Create a New Recipe, then Add from the Web. Paste the URL, match ingredients and that’s it!
- Always match ingredients to the ones you use. Ingredient nutritional facts differ depending on brand.
Enjoy!

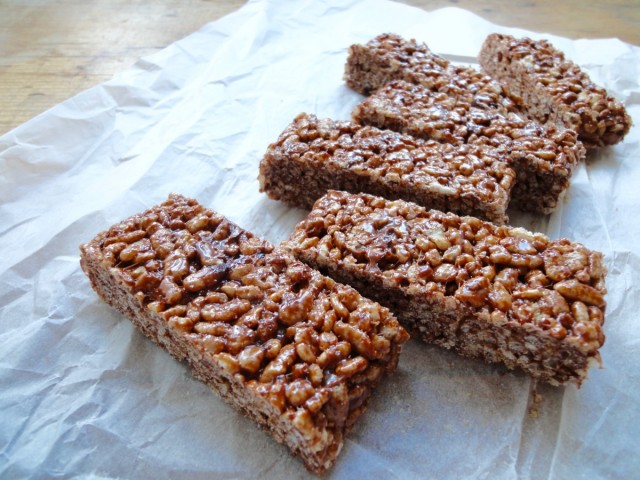
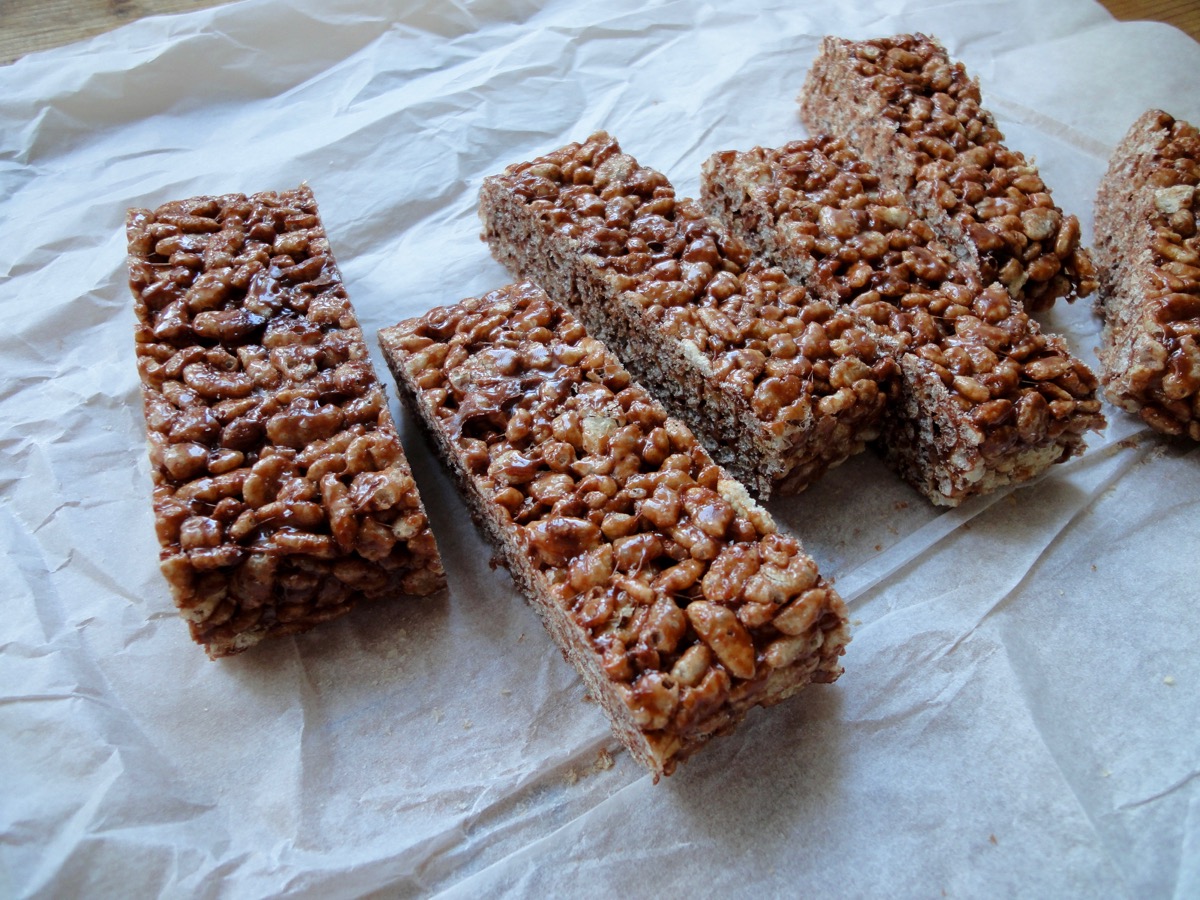
Chocolate Rice Krispies Treats
Back from a little Christmas/New Year break! Though it’s already into the second week of year 2016, I would like to wish you a Happy New Year and may this year be better than before.
As you may notice, I’ve got a thing for sweet stuff. I prefer anything sweet over flowers or materialistic things. Bring me a nice box of chocolates, confectionary or cake and I will be super happy! Sadly, my waistline won’t be happy. Heck, I can’t even see my waistline! Few nights ago I realised that it’s finally time to REALLY do something about my weight and sugary cravings. I’ve tried many things for a number of years and always made excuses. Now with great apps available on my phone and TV, it makes it easier to count calories, how many steps you take a day, and to analyse your food intake to help you make better choices. I’m really not one to make healthy choices with foods as I live to eat. This time I’m really going to try slowly but surely to cut my “protective” layers. What way better than to start off by posting a bitter sweet end to my sweet addiction? Chocolate Rice Krispies Treats. So hopefully after this you won’t be seeing much sweet recipes here unless I make something that doesn’t have much calories and sugar in it.
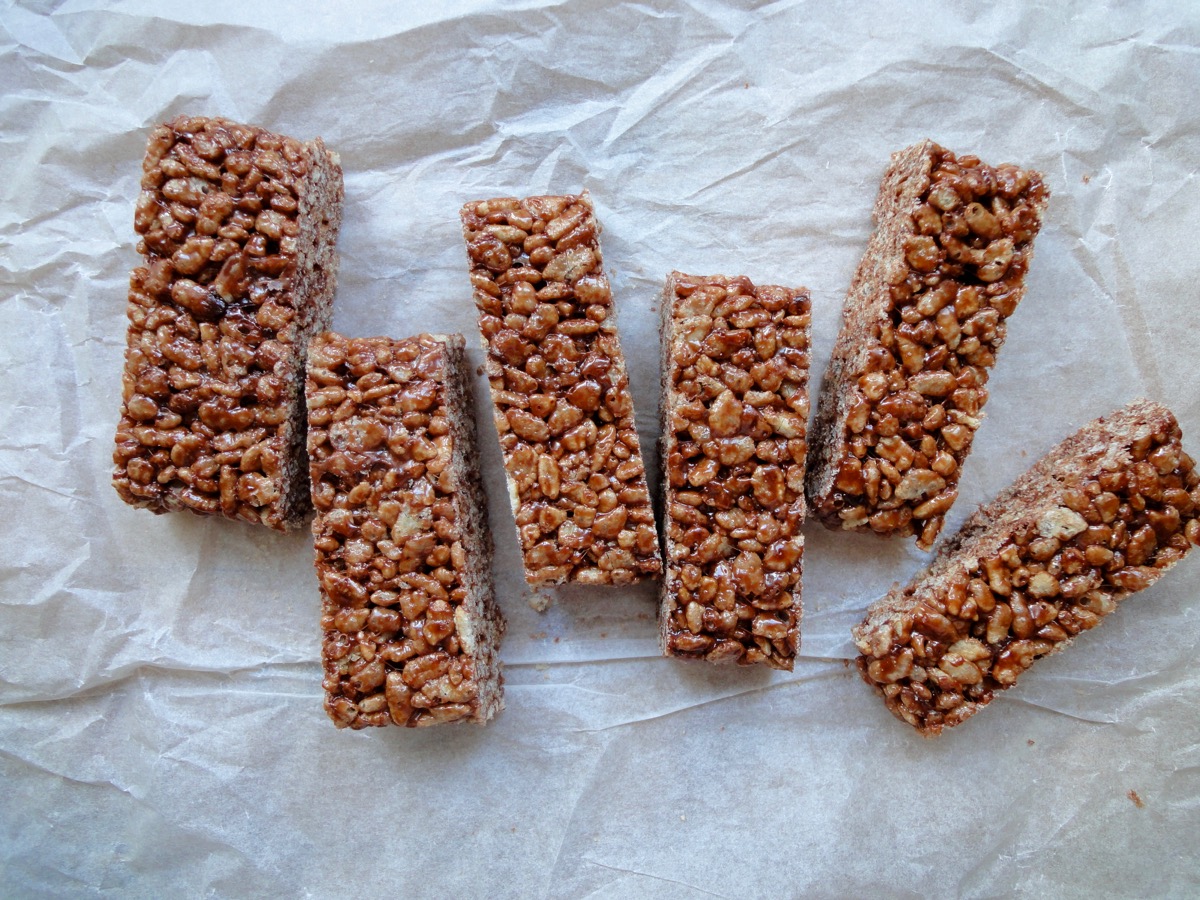
Chocolate Rice Krispies Treats are a variation of the regular Rice Krispies Treats. Simple and fast to make for a quick snack or fulfilling those sugar cravings. These that I made here are very basic, and if you are looking for something more eye catching then throw in some M&M’s, or drizzle some white chocolate on it to make it, pop.
Recipe adapted from Kelloggs The Original Treats ™ .
Ingredients
- 1 ½ Tablespoons Butter
- 5 oz / 140 grams Marshmallows
- 3 cups Chocolate Rice Krispies
- 1 teaspoon Vanilla Extract
- 2 Tablespoons Cocoa Powder
Directions:
- In a large non-stick pan, melt butter on low heat.
- Add marshmallows and stir until completely melted.
- Mix in cocoa powder and vanilla extract. Remove from heat.
- Add chocolate rice krispies, stir well until well coated.
- Transfer to parchment paper.
- Using another parchment paper or the same, press down the rice krispies and shape it into a rectangle. Size and shape depends on you.
- Allow to cool for 45 minutes. Cut and serve.
Tips:
- Conversion table
- 10 large Marshmallows = 3 oz = 85g
- 20 large Marshmallows = 6 oz = 170g
- 30 large Marshmallows = 9 oz = 250g
- 40 large Marshmallows = 12 oz = 350g
- 1 large Marshmallow = 10 miniature Marshmallows
- 10 large Marshmallows = 1 cup miniature Marshmallows
- 1 – 10oz bag miniature Marshmallows = 2 cups miniature Marshmallows
- You can also use a 13 x 9 x 2-inch pan coated with cooking spray to mould the treats. I use parchment paper as there’s less mess and one less dish to wash.
- You can also microwave the butter and marshmallow. In microwave-safe bowl heat butter and marshmallows on HIGH for 3 minutes, stirring after 2 minutes. Stir until smooth. Follow steps 3 onwards.
Enjoy and happy treating!

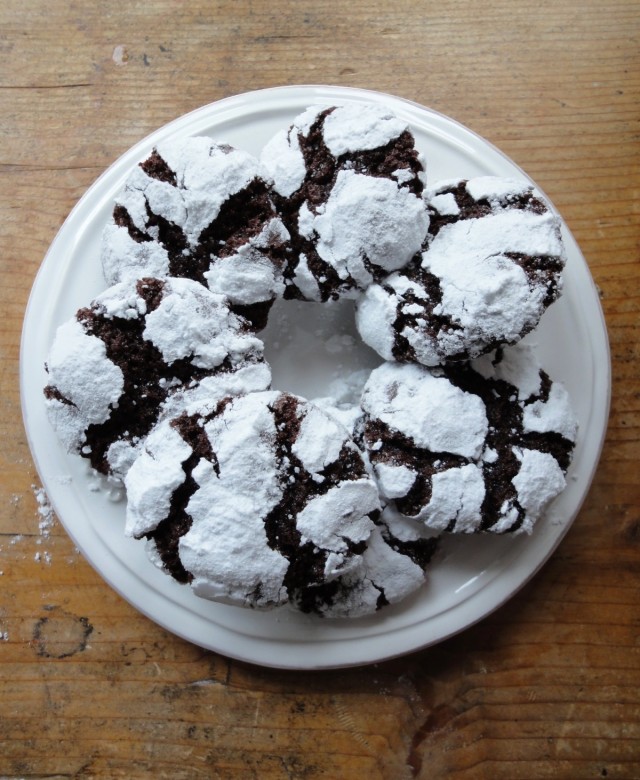
Christmas Edition: Chocolate Crinkle Cookies
Christmas time to me : a good excuse to bake sweet treats and eat them! I’ve always related Christmas to sweets – cookies, hot chocolates, candy canes, puddings, and mince pies (so far, I’ve chowed down a dozen of mince pies?). I just can’t help but to be merry!!
I did not do this with the first Christmas Edition post, but I would like to start it now. My Christmas Gratitude. I am thankful that even though life may sometimes seem unfair and difficult, I have a roof over my head and a warm meal everyday. All these could have never been possible without the hard work my husband does so that we are always cared for, independent and we do not need to rely on anyone but ourselves in our daily lives.
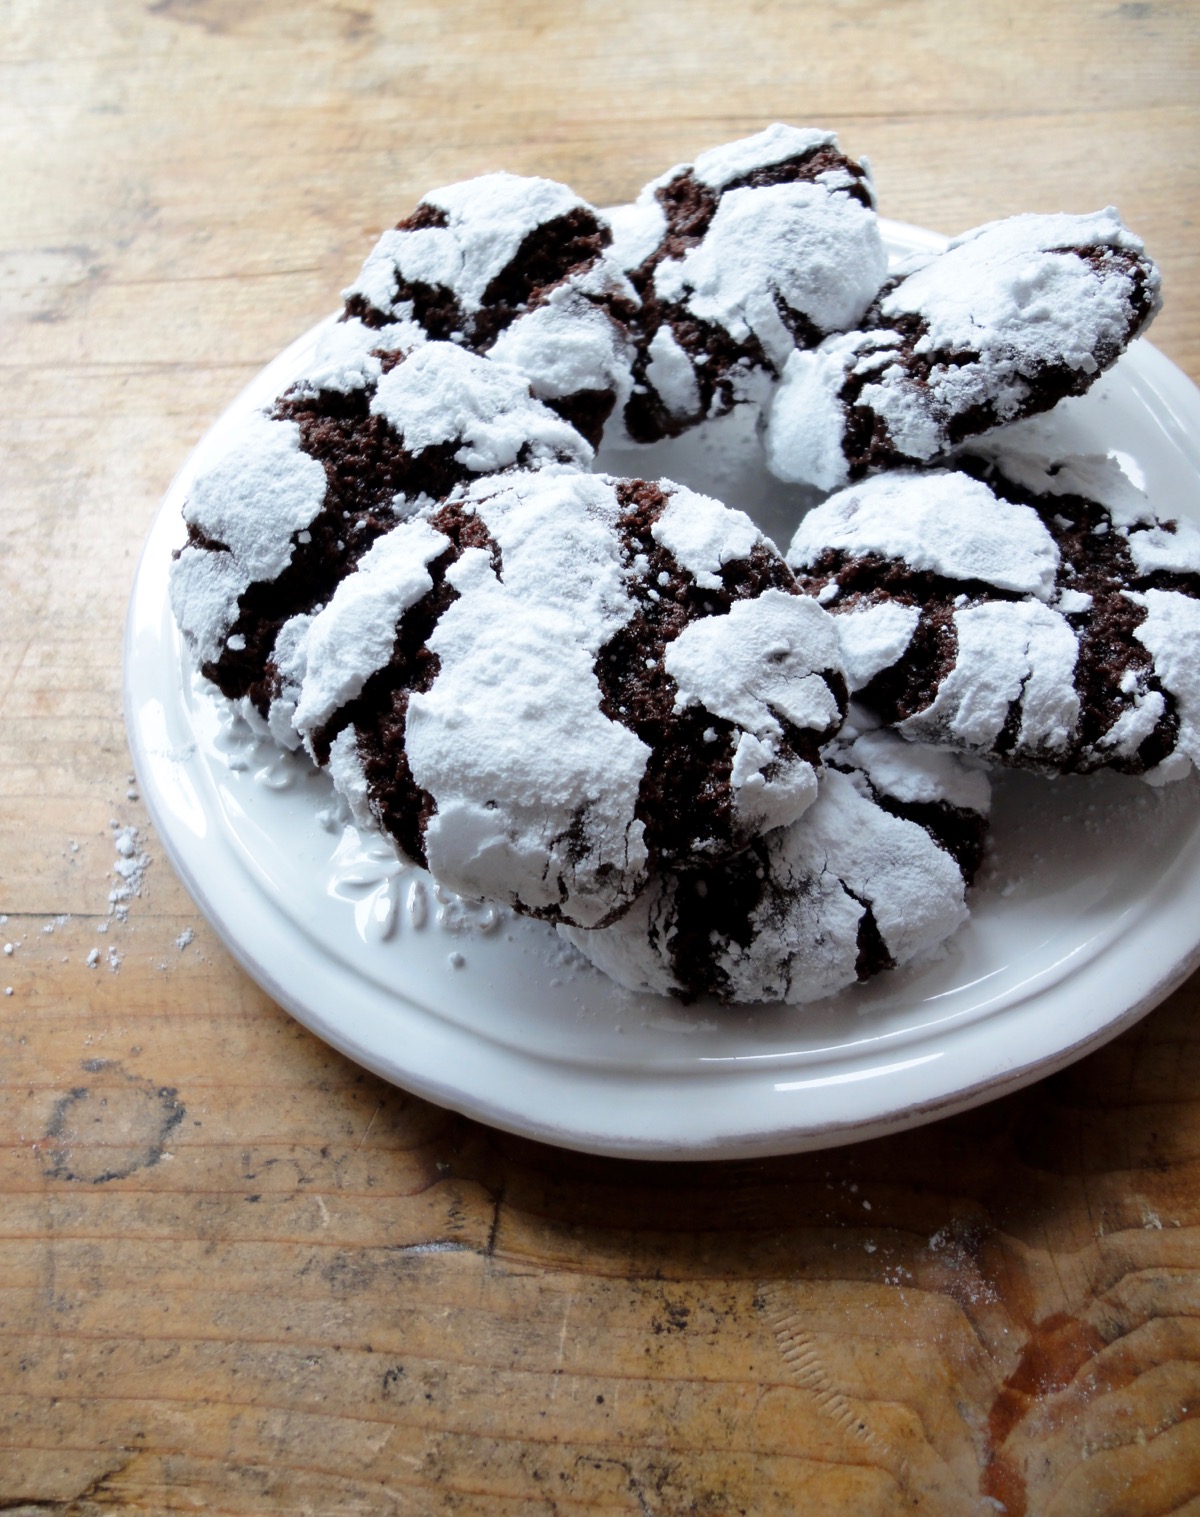
These cookies are totally perfect to indulge during this wintery season. Fudgey-brownie like goodness coated in powdered sugar to give it that snow-look. It’s another soft-dough type of cookie like the Ginger Cookies, just that this one requires some chillin’ before working with it. The cookie is great to make if you have kids as they can have fun rolling it in powdered sugar.
Recipe adapted from allrecipes .

Ingredients
- ½ cup Butter
- 2 cups Sugar
- ½ teaspoon Salt
- 1 cup Cocoa Powder
- 4 Eggs
- 2 teaspoons Vanilla Extract
- 2 cups All Purpose Flour
- 2 teaspoons Baking Powder
- ½ - ¾ cup Powdered Sugar, for coating
Directions:
- Melt butter (do not boil) and set aside to cool.
- In a large mixing bowl or a stand mixer with flat paddle attachment, add sugar, salt, cocoa powder and cooled melted butter. Mix till combined.
- Add vanilla extract (or peppermint for peppermint flavoured cookies) and eggs one at a time. Mix well and scrape down if necessary.
- Add all purpose flour and baking powder. Mix till everything is combined. Dough will be soft.
- Cover with plastic wrap and refrigerate for at least 4 hours.
- Pre-heat oven to 175°C (350°F). Prepare several baking trays and line with parchment paper.
- Lightly wet your hands before rolling. Roll dough into 1-inch balls or scoop out ½ Tablespoon of dough and roll it. Chill dough balls if it starts getting soft.
- Generously (till you can’t see the dough) coat each ball in powdered sugar and place on prepared baking trays. I could fit 16 dough balls per tray.
- Bake for 12 minutes. Baking time my vary depending on oven and size of dough balls.
- Allow cookies to cool down on baking tray for a couple of minutes before transferring to cooling rack.
Tips:
- Conversion Table
- Add peppermint extract instead of vanilla for peppermint flavour
Enjoy and merry baking!

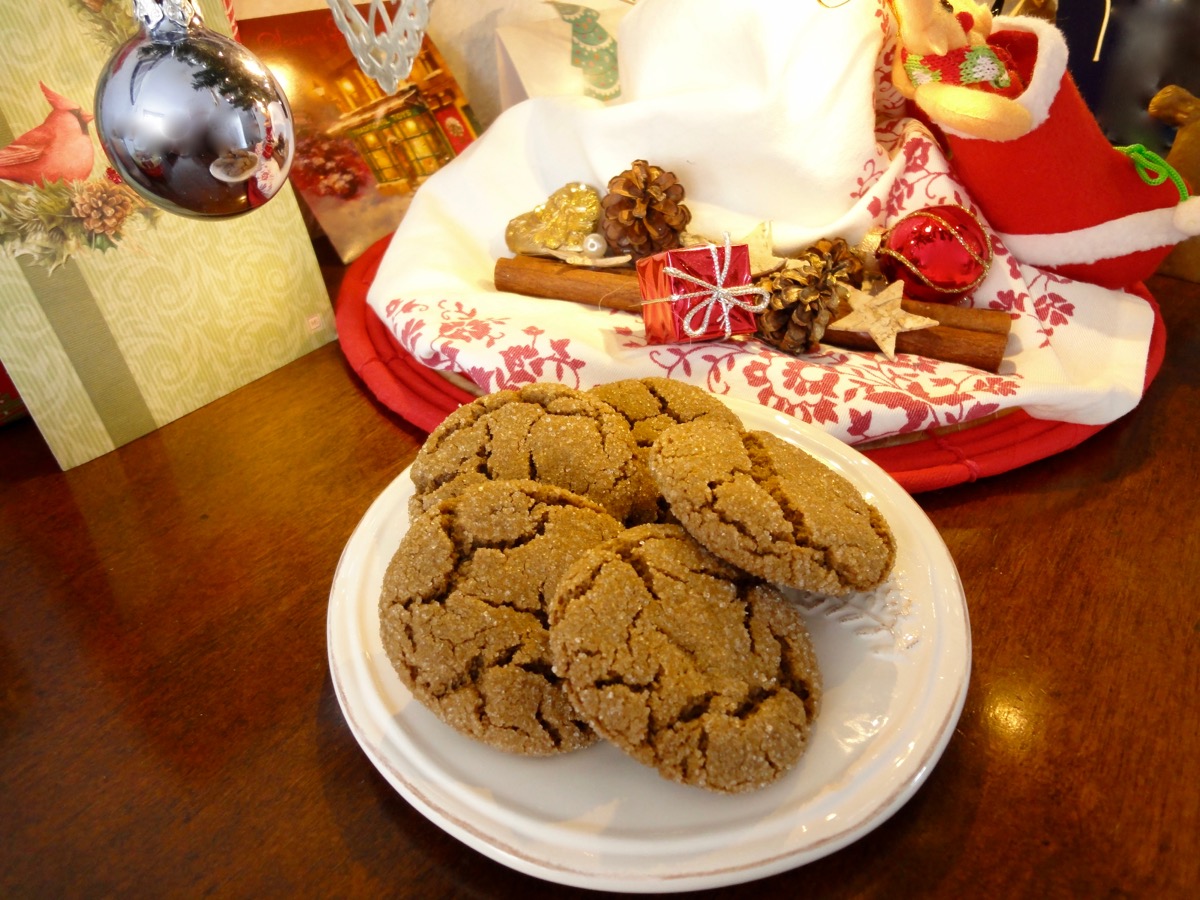
Christmas Edition: Ginger Cookies

Yay! The most wonderful time of the year is here! Christmas has always been my favourite holiday. The food, the decorations, the presents, the carols, and the heat… what? what heat? Why, Malaysian Christmas of course! I spent 21 years celebrating tropical Christmases, and now that I get to celebrate Christmas during winter makes me even love it more. I finally understand the carols where they roast chestnuts on an open fire, sip hot chocolate, that it’s actually cold outside, and most of all…a white Christmas. I had my first white Christmas in 2010. It was also my very first Christmas with my husband (then boyfriend).

Christmas Tree at a restaurant where I used to work back in 2010. My very first Christmas away from home. I cried when I saw this tree. I’m a little cry baby. 🙂
Christmas, has always been special to me. Lot’s of sadness and happiness all in one day. Being away for the most important holiday in my family has got to be one of the hardest days ever. But as I celebrate Christmas with my new family-just my husband and I, I am happy and get happier with each and every year I do with him. I get to annoy him by playing carols and watch corny Christmas movies. This year is particularly exciting as we are trying to set our own traditions. We already have 2 that we do each year, which is having Spaghetti à la Carbonara for our Christmas Eve dinner and on Christmas day, we stay home and watch my corny Christmas movies.

Our little Christmas tree. If it was up to me, I would have a 6 footer. 😀
Baking skills are often put to the test during the festive season. I tried to do a 12-day of Christmas Cookies for the blog but I started out a little too late to test out new cookies and having 12 types of cookies will certainly make my pants tighter! So instead, I shall give a few of my favourite treats during the holidays. First one being Ginger Cookies. Crunchy on the out and soft on the inside. These cookies are nice and spicy perfect for a cold cold winters day. These are thicker and soft cookies. If you want gingersnaps, you’d have to use shortening instead of butter. I never used to like ginger cookies, not until I had some from my mother’s close friend Aunty Emily. It’s been a long time since I had her ginger cookies but I fell in love with her cookies and the rest is history! Last year, instead of baking my own ginger cookies I got mine from Ikea. It’s not too bad, but it was too much for me to finish. I also thought that it required lots of work but it’s really easy!
So here it is…
Ingredients
- ¾ cup Butter
- 1 cup Sugar
- ¼ cup Molasses
- 1 Egg
- 2 cups All Purpose Flour
- 2 teaspoons Baking Soda
- 1 Tablespoon Ginger Powder
- 1 teaspoon Cinnamon Powder
- ¼ teaspoon Nutmeg Powder
- ½ teaspoon Salt
- ½ Cup Sugar, for coating
Directions:
- Preheat the oven to 175°C (350°F) and prepare baking trays with parchment paper.
- In a mixing bowl, cream butter and sugar till smooth.
- Add molasses and egg. Mix till combined.
- In another bowl, mix together ginger powder, cinnamon powder, nutmeg powder, flour, baking soda and salt.
- Add the dry ingredients into the wet ingredients and mix till it forms into a dough.
- Pour ½ cup of sugar into a bowl.
- Take 1 Tablespoon of dough and roll it into a ball. Drop the dough ball into the bowl of sugar and coat. Pop it in the fridge for 20 minutes if the dough gets warm.
- Place balls on prepared baking tray about 2 inches apart from each other. I would suggest 12 balls per tray.
- Bake for 10-12 minutes. *Please pay attention to the cookies 8 minutes in. Baking times may vary.
- Allow cookies to cool down on baking tray for 10 minutes before transferring to cooling rack.
- Store in an air tight container.
Tips:
- Conversion Table
- Dough is very soft, so you might need to pop it into the fridge for 30 minutes to make rolling easier. When I baked mine, my kitchen was very cold so I could roll and bake right away.
Enjoy and merry baking!

Pandan Chicken
I’m back from my holidays + sick days! Not like anyone has noticed :'( My husband and I went for a short holiday to Amsterdam with a close friend who then surprised us with another close friend! . We ate like gluttons, shopped and walked around a lot. The only sucky part was that except for one day, it was raining and windy the rest of the time we were there. It was a lovely place and I would definitely want to go back there again.

The day it didn’t rain. Lovely sunset view from Amsterdam Noord. Chilling at in front of Pllek.
I also went to London for an all-nighter with the 2 close friends (husband didn’t join because he said we were crazy for pulling an all-nighter). It was awesome, just that I caught the cold and the weather in London did not help it either. Like Amsterdam, it was rainy and windy but it was still awesome. It was also refreshing to hear people speaking English all over!
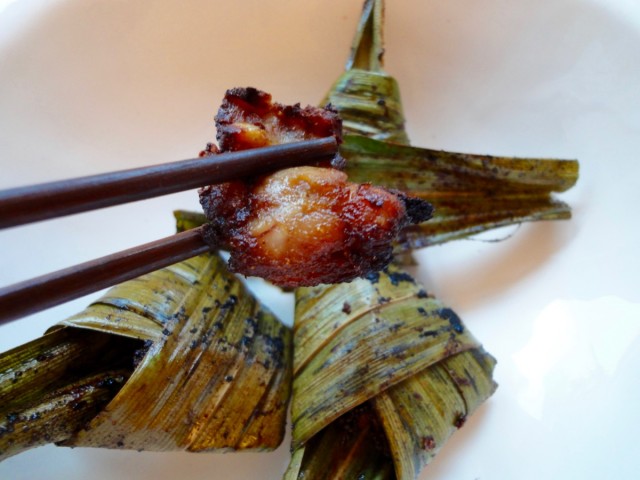
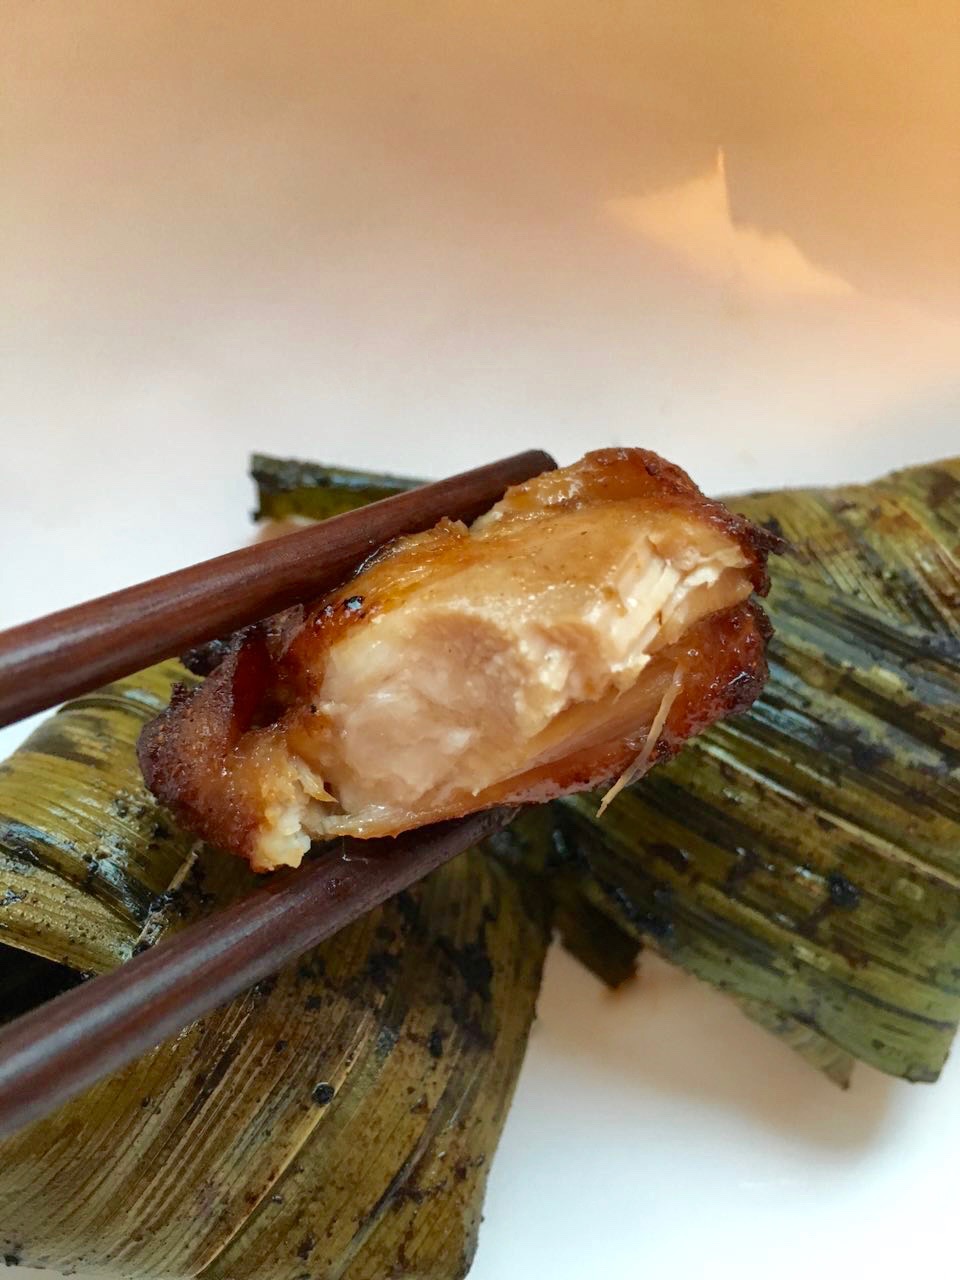
So, after 2-3 weeks of not posting anything, I present to you pandan chicken. It’s originally a Thai dish but it’s also known in Malaysia. It’s really fragrant and tasty due to the pandan leaf, especially when you start frying it and the whole kitchen smells of it. Lovely!
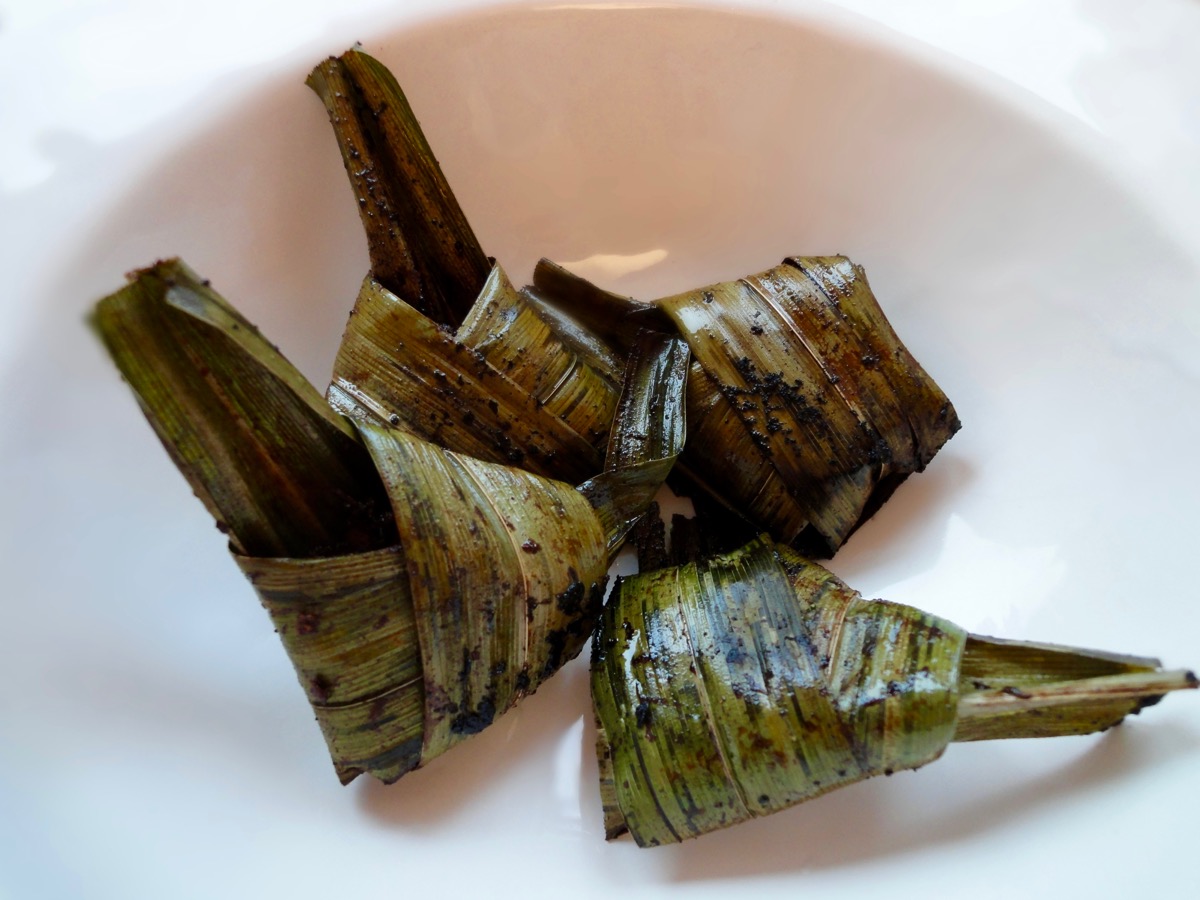
In this recipe, I use cut chicken thighs as I find it tastier and the meat is tender. You can use chicken breast too, but I would advice to tenderize it prior to marinating it. If you do not want to wrap the pandan leaf as shown, just roll it up and secure it with a toothpick. By rolling it up, the chicken may not be as juicy as the wrapped ones.
I have also included my very first video on how to wrap the pandan chicken. Thanks to my husband for taking the video. To get that view, he had to rest his hands on my shoulders (sort of like a human go-pro, just that it’s not attached to a head). Lucky I’m short and he is tall!
Ingredients
- 500 grams (about 2 pieces) Chicken Thigh or Breast, cut into 2-inch pieces
- 12-15 pieces (1 leaf per chicken piece) Pandan Leaf
- For Frying Peanut Oil
Marinade
- 1 ½ Tablespoons Oyster Sauce
- 1 ½ Tablespoons Light Soy Sauce
- 2 Tablespoons Sesame Oil
- 1 Tablespoon Sugar
- 3 roots Coriander Root
- 3 cloves Garlic
- 1-inch Ginger, roughly chopped
- 3 dashes White Pepper Powder
Directions:
- Marinade
- In a blender or small food processor, add cleaned coriander roots, garlic, chopped ginger and blend into a paste. Add a little oil to help the blending process.
- Mix the paste with oyster sauce, light soy sauce, sesame oil, sugar and white pepper powder. Set aside.
- Chicken
- If using chicken thighs : Debone chicken and remove skin. Cut into 2-inch pieces.
- If using chicken breast: Tenderize chicken with a meat tenderizer tool. Cut into 2-inch pieces.
- Marinate chicken with marinade for 3-4 hours.
- Clean pandan leaves in cold water.
- Wrap chicken in leaves.
- Add peanut oil into a deep pan/deep fryer/deep pot and heat it up to medium heat.
- Fry pandan chicken for about 10-12 minutes.
- Place fried pandan chicken on a paper towel to soak up excess oil.
- Serve.
Tips:
- Remove pandan leaf before eating.
- Conversion Table
- Serve with rice and choice of vegetables.
Enjoy!
Took this photo with my iPhone 6s as my camera battery died.
