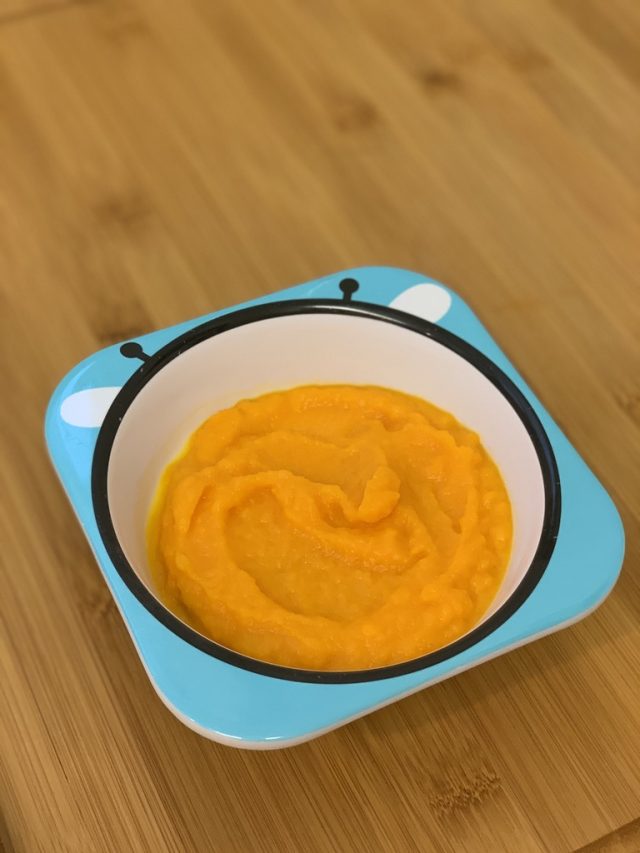
The Baby Edition: Homemade Carrot Purée
Hey everyone! It has been a long time since I’ve posted new recipes. The past few years have been a crazy but joyful roller coaster, as my husband and I welcomed our first child into this world. So after a year and a half of broken sleep, I decided to take some more time off to catch up on all the shows and movies I missed and to just take a step back from my hobby. I never thought a Carrot Purée entry would ever be my comeback to posting! I’m also dabbling into creating YouTube video/tutorials for my recipes and this Carrot Purée recipe is gonna be the first (video below), cause you know, you gotta roll with the trend (though I might be too late since apparently Tik Tok is now a new place for stuff like these, and I’m too old for Tik Tok!).
So like most first time mums, I was one of those that wanted to make homemade baby food for my baby. As soon as my son’s paediatrician gave the green light to start solids, I immediately went online shopping (who has time and the energy to leave the house), got myself a Phillips Avent 4-in-1 baby food maker, baby food storage pots, some cute tableware and cutlery, bibs and of course, the fruits and vegetables itself.
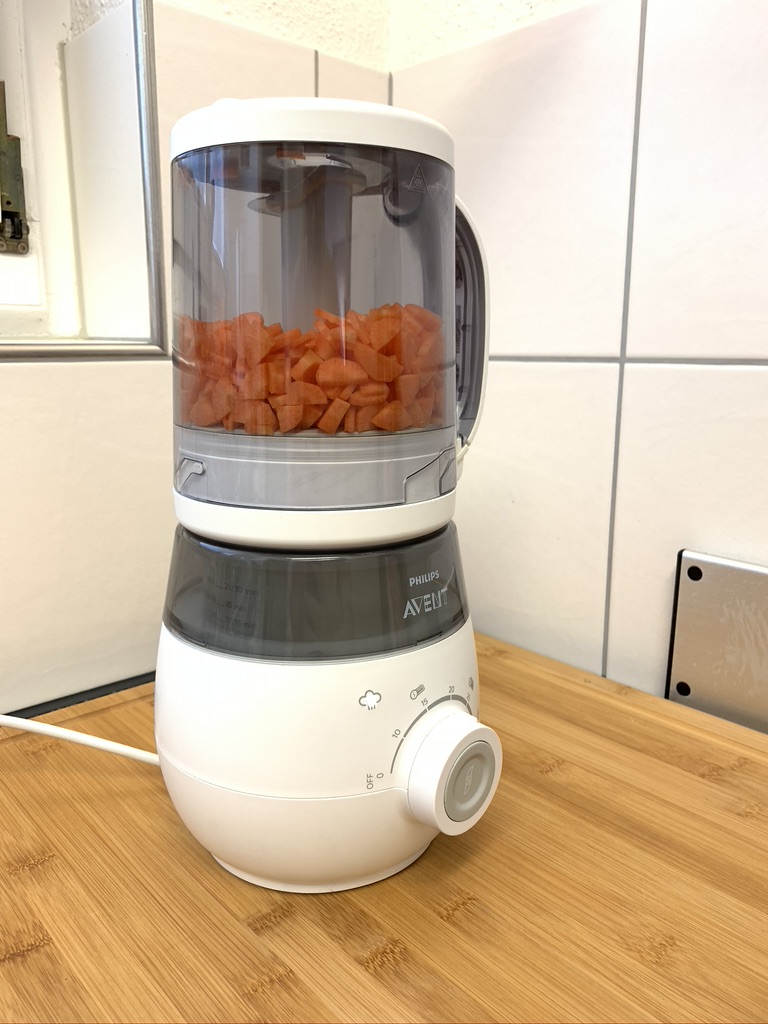
Philips Avent 4 in 1 Baby Food Maker
When the baby food maker arrived, I was SO excited that I immediately washed it and started cooking. I was a nervous wreck while preparing his first purée! Making sure that everything was perfect, from the produce to the consistency, and the taste. That afternoon, my husband and I gathered to feed our son his first solids. TOTAL FAIL.
Turns out, kiddo REALLY hates carrots, even till now at 3 years old – probably from the trauma of his first solids experience. He also was that baby who preferred store-bought baby food. I gave in, and accepted that he likes store-bought baby food and I kept the baby food maker away. After a bit, I tried again. Still nope. So when he started having stage 2 (basically over-boiled consistency) of baby food, I’d prepare it in the baby food maker. It’s still in use now as I still make carrot purée for him as he will tolerate it now.
If you are a new parent, I’d suggest you to read up about feeding/cooking for your baby. The Pediatrician’s Guide to Feeding Babies and Toddlers : Practical Answers To Your Questions on Nutrition, Starting Solids, Allergies, Picky Eating, and More (For Parents, By Parents) book helped me a lot.
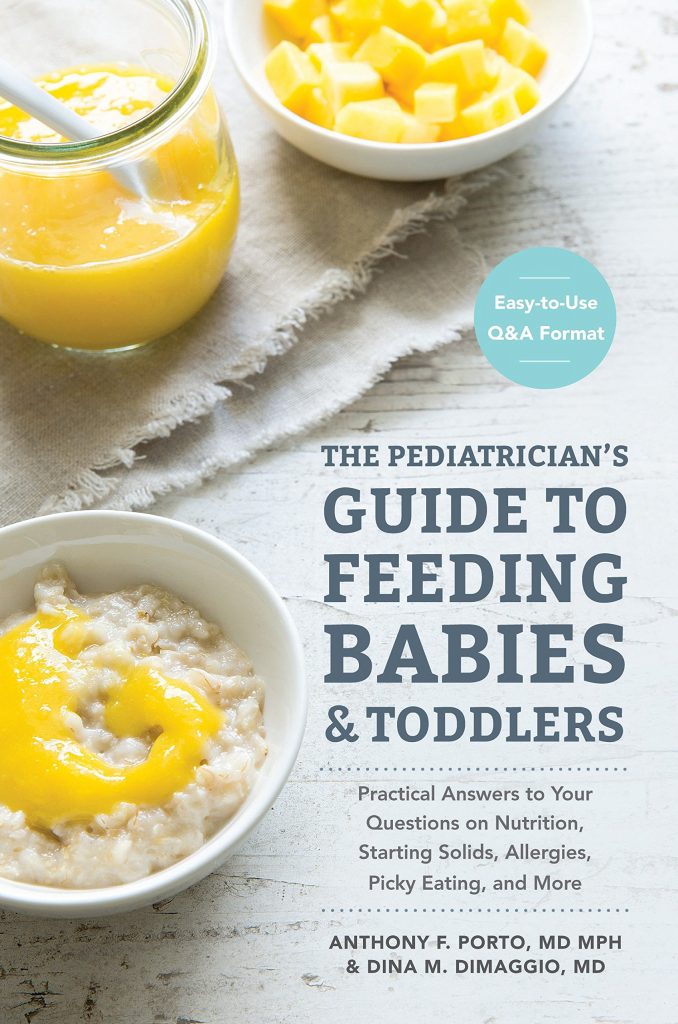
The Pediatrician’s Guide to Feeding Babies and Toddlers : Practical Answers To Your Questions on Nutrition, Starting Solids, Allergies, Picky Eating, and More (For Parents, By Parents)
Check out my first full recipe video here!
Ingredients
- Carrots
- Butter*
Directions:
I am using the Philips Avent 4 in 1 Baby Food Maker in this recipe. The directions in this recipe is per manual. If you are using a different steamer, please follow the instructions on the manual.
As you may have noticed, there’s no amount given with the list of ingredients. This is because I simply go according to the max line on the blending jar. I cook in bulk and freeze the rest for another day.
- Peel, rinse and cut carrots into small cubes. (according to the manufacturers manual, food should be cut into cubes no bigger than 1cm)
- Fill 200ml of filtered water* – or till it reaches the 20 minute mark
- Turn the dial to 20
- Once the steamer beeps, turn it to the blending function.
- Open carefully, discard some water for thicker purées, add butter**
- Blend in intervals till desired consistency.
- Serve
Tips:
- * Filtered water : Using filtered water will help reduce the chalk build up in your appliances where water is needed. Regular tap water is fine to use too.
- ** Butter : Add any healthy fats such as butter, olive oil (taste might be too overpowering), or avocado oil. This was the recommendation from my son’s paediatrician and can be omitted. Actually, the recommendation was to use rapeseed oil, but since learning and eating the keto way, I only use these 3 oils for my son.
- Make purées in bulk and freeze them. You can also add it to sauces and soups for an additional veggie boost.
Enjoy!

Batik Cake / Kek Batik
Edit 2024:
If you want to see a video tutorial on how to make this, please go to Emmymade on YouTube. It’s such a great honor that she adapted my recipe and I got to see it by chance on YouTube. I’ve been a follower of hers for a few years and, gosh it really made my day. Thanks Emmy!
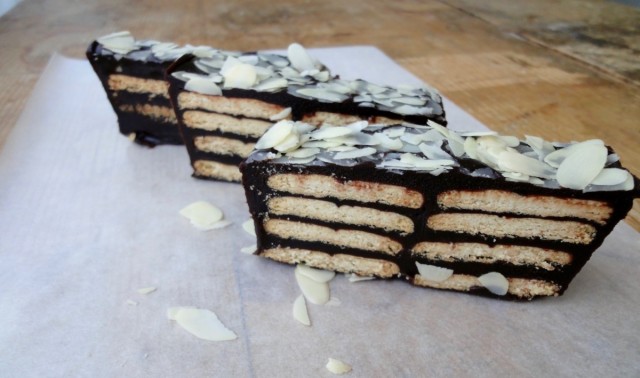
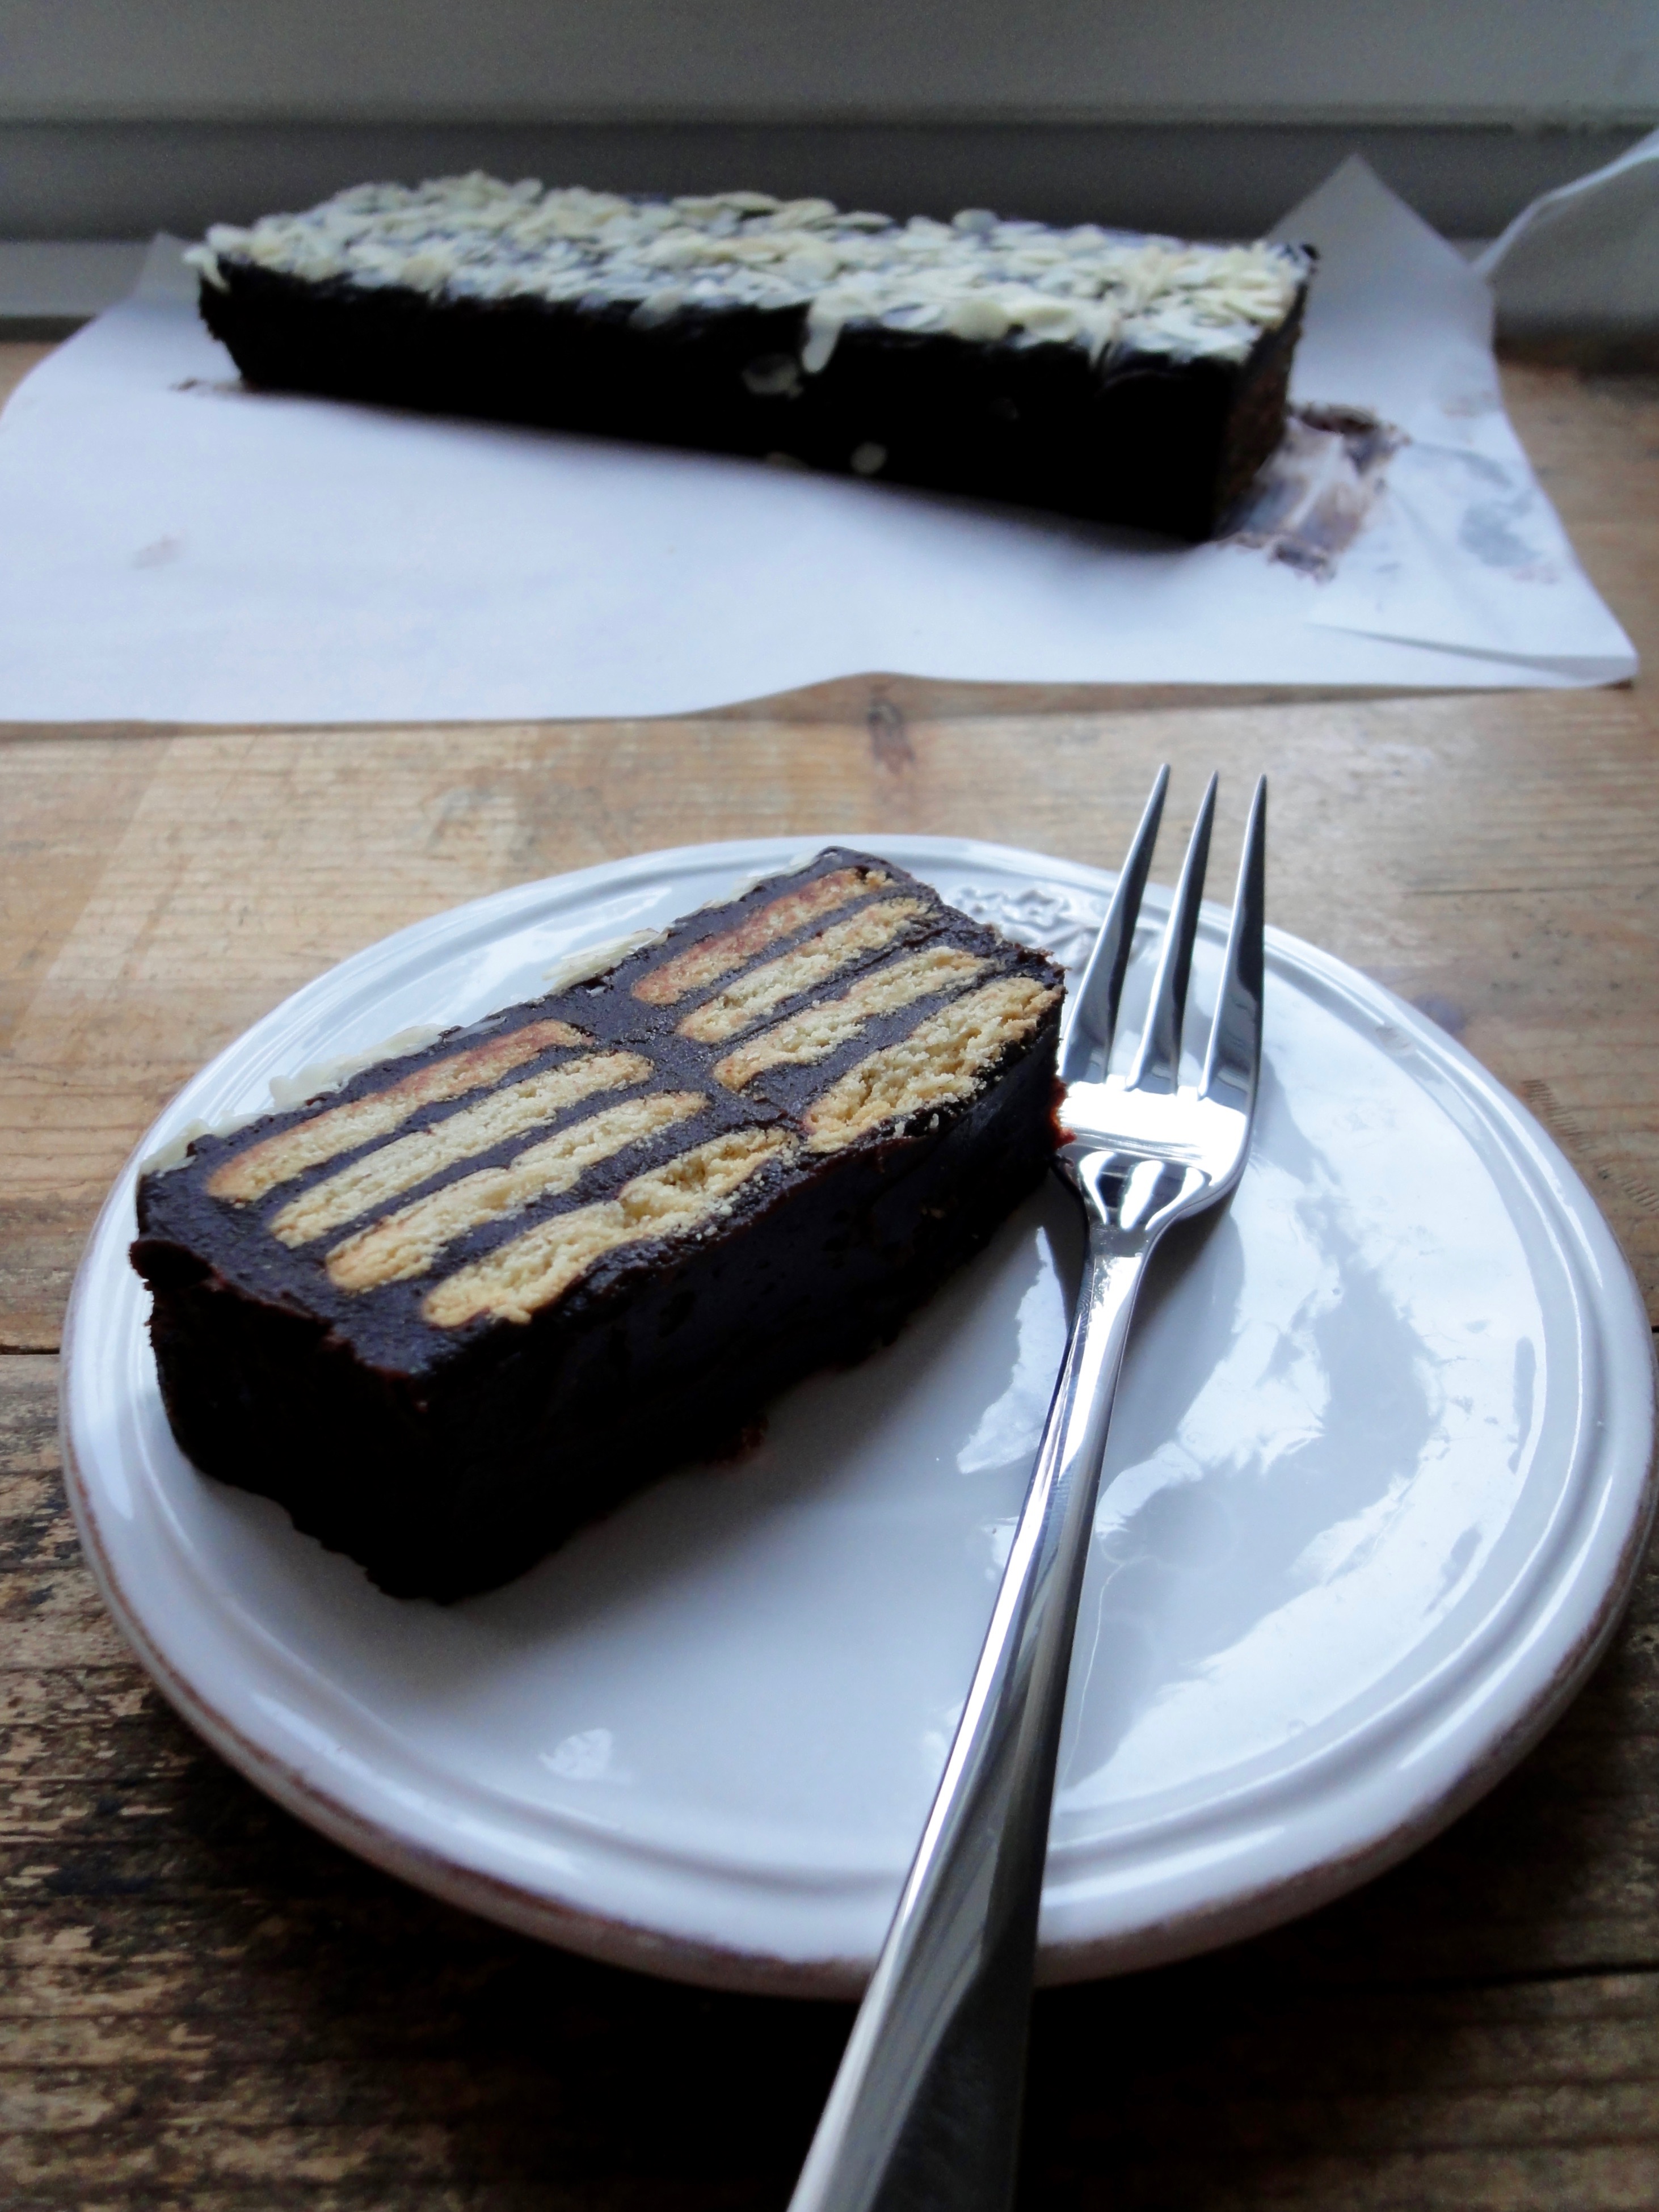
The origin of this cake is unknown or unclear. It bare’s similarities to Australia’s Hedgehog Slice and the English Chocolate Biscuit Cake which Prince William had as one of his wedding cakes. In Malaysia it’s called batik cake due to it having Batik-like patterns from the crushed biscuits. No to be confused with Sarawak’s batik cake which is colourful. This batik cake is made with chocolate fudge and tea biscuits such as Marie Biscuits or Petit Beurre (French butter biscuit).
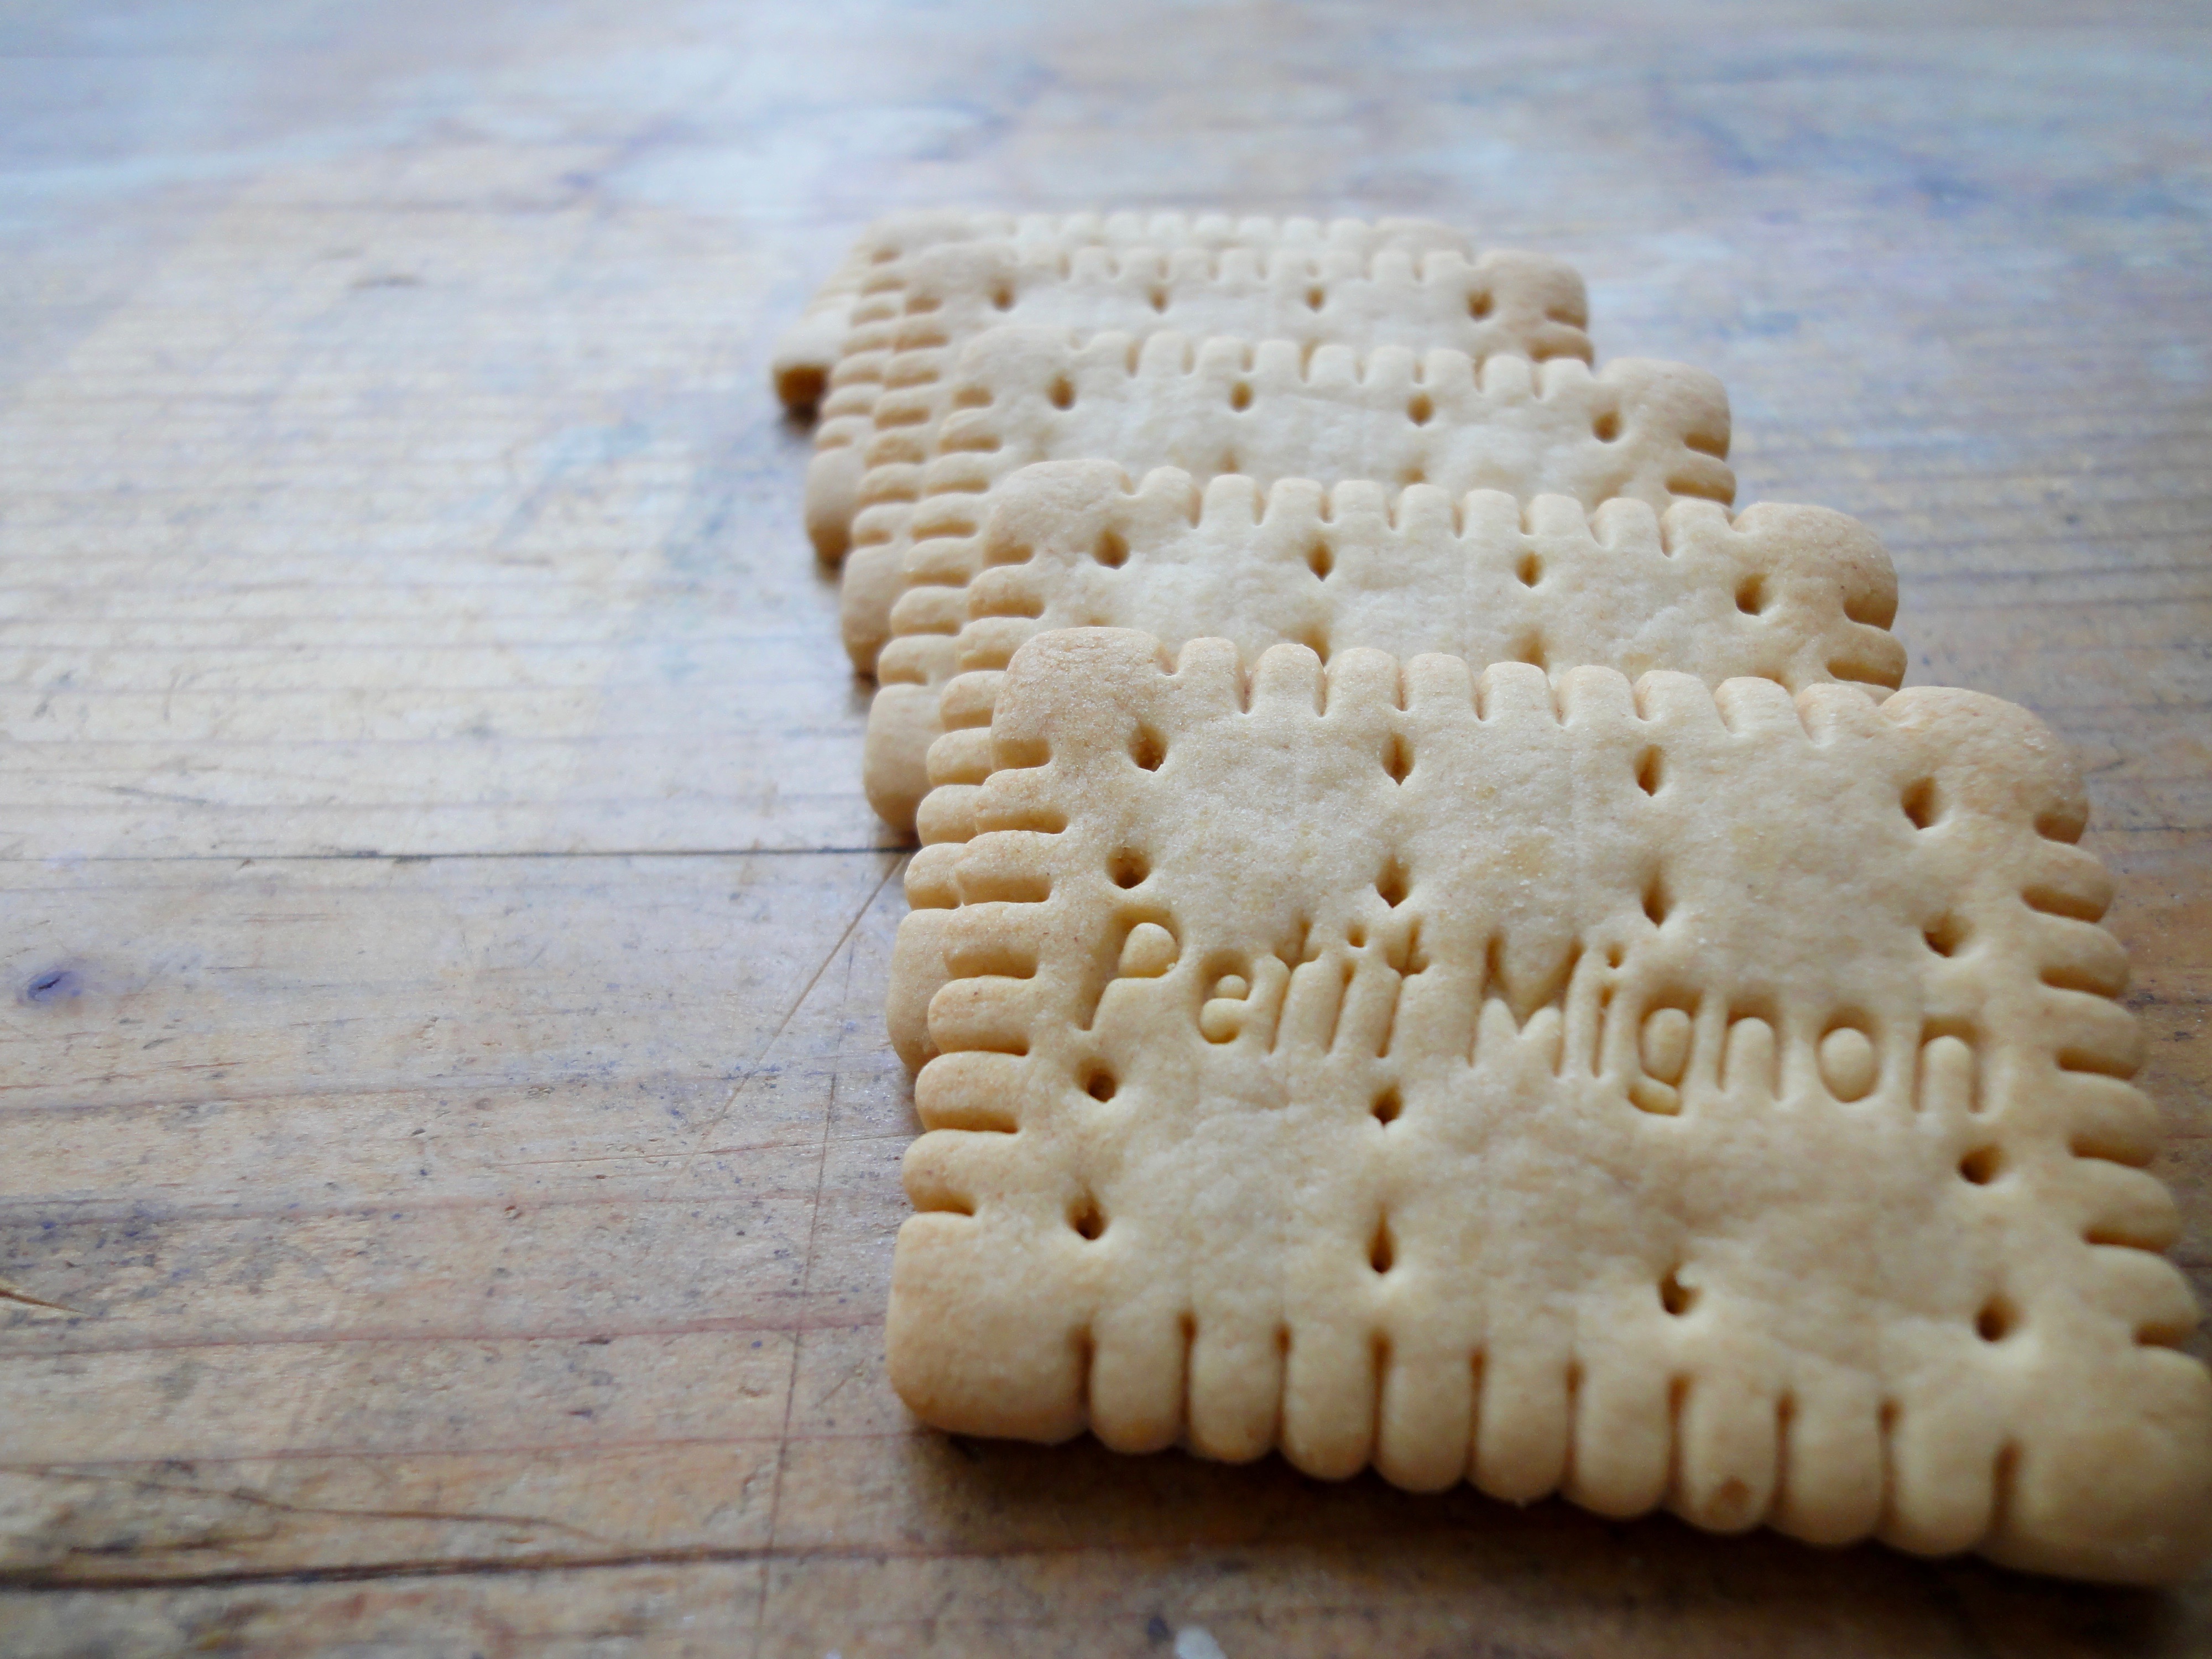
I used small petit beurre’s called petit mignon’s here.
When I had this cake the first time, I fell in love with it. Yes, you can call it love at first sight. The internet was still pretty new at that time so I could not just google for a recipe. Plus, the first time I made it myself, the hubby loved it! Probably the only cake he would eat without me begging him to.
It’s such an easy cake which doesn’t require baking, just make the fudge, combine wth biscuits and refrigerate. You don’t even need to use the highest quality of ingredients for it. The chocolate and malt powder I used here was a supermarket brand – CHF3.10 per kilo, the biscuits also a supermarket brand CHF 2.95 (650 grams)and butter was also a supermarket brand. The only thing I won’t use is Margarine for this…or for anything at all! Never was a fan of margarine. In Malaysia, you would typically use Milo, Vico or Ovaltine for this recipe. Of course any chocolate or cocoa drink powder would be fine, just like what I used since I can’t find Milo here and using Ovomaltine here is just waaaaay too expensive.
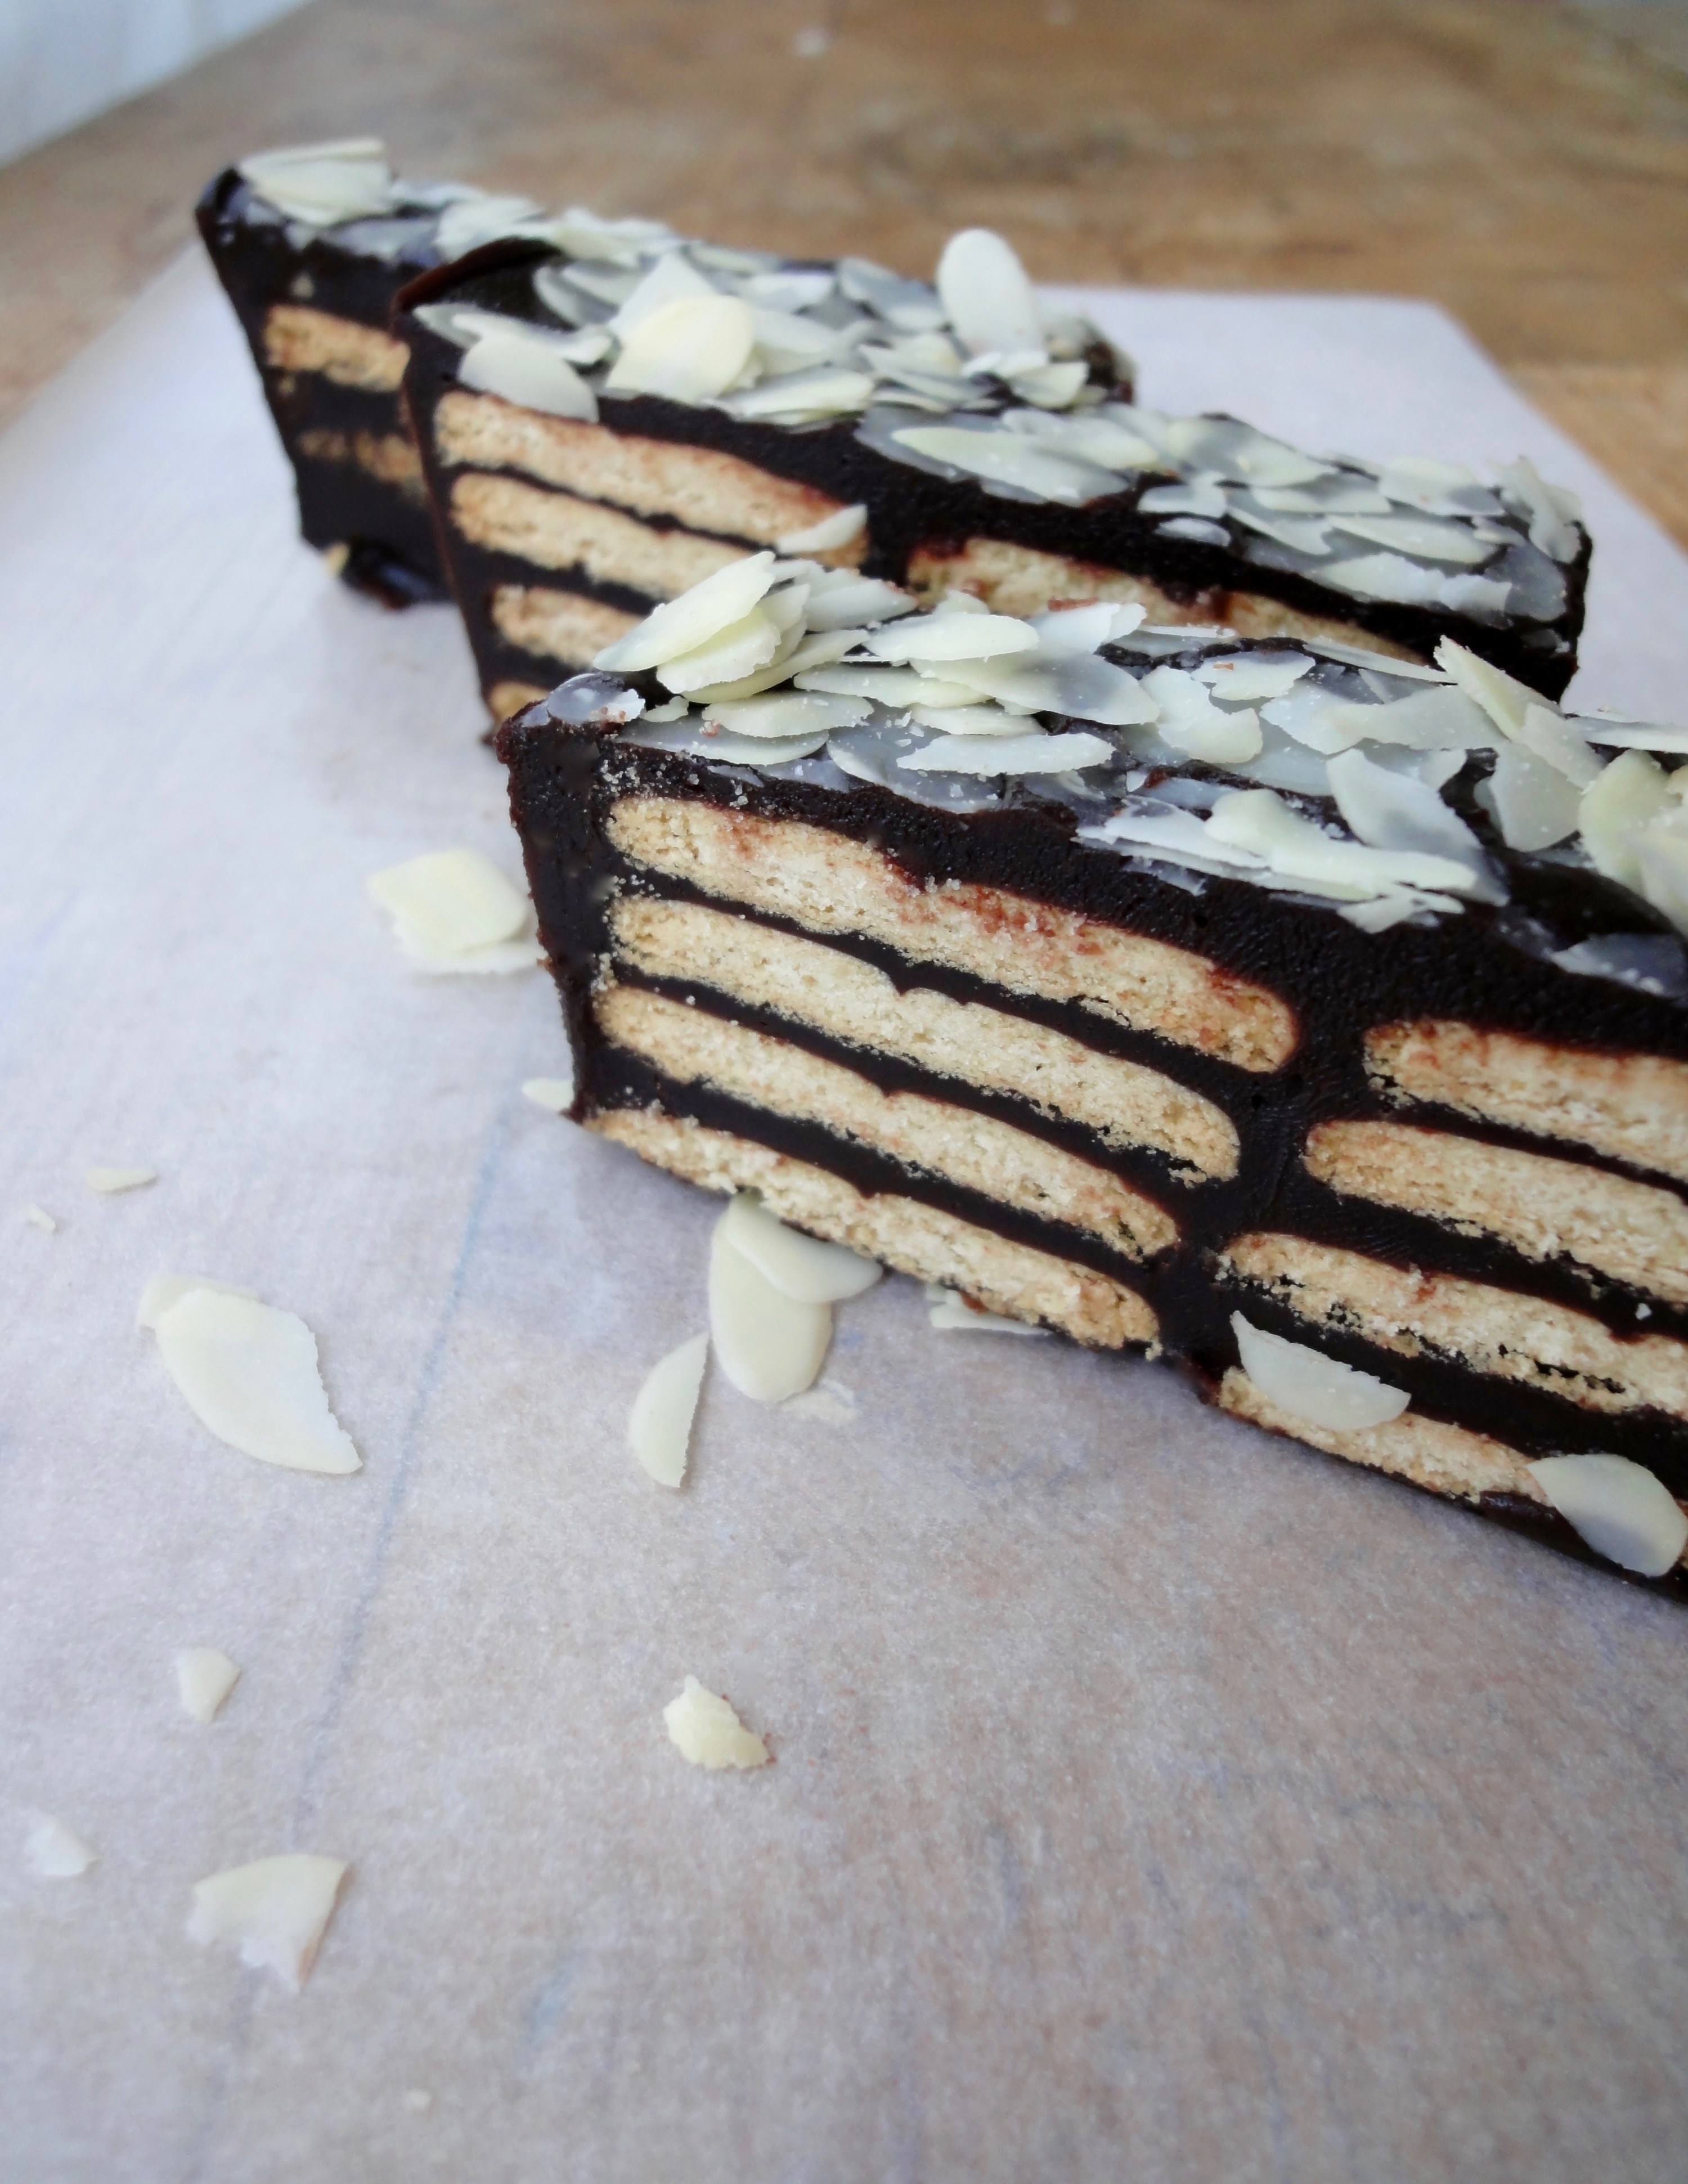
When making this cake, you can either crush the biscuits into quarters or just leave them whole and arrange it nicely. Be sure to make this a day before serving to the biscuits become soft. Cut it cold and leave it out for 5-10 minutes before serving. Great for tea time and dessert.
Ingredients
- 1 small can/397 ml/14 oz Condensed Milk*
- 1 ¾ cups Chocolate Milk Powder**
- ⅔ cup Butter
- 4 Eggs
- 1 Tablespoon Vanilla Extract
- 250 - 300 grams Petit Beurre / Marie Biscuits
- For Garnish Sliced Almonds (optional)
Directions:
- Crush biscuits into quarters (optional). Set aside.
- Prepare a cake pan (round, loaf, square – up to you) by lining it with foil or parchment paper and grease well with cooking spray or butter. I used a 35cm x 9cm loaf pan for this.
- In a medium large pot or wok, gently melt butter on medium heat.
- Mix in condensed milk and chocolate malt powder. Stir till combined.
- Add in eggs and stir continuously on medium to medium high till it thickens to the consistency of hot fudge. Or till it reaches the soft ball stage on a candy thermometer. 118°C to 120°C (235°F to 240°F).
- Once it has thickened, add in vanilla extract. Stir to mix.
- Stir in biscuits is using it crushed. Pour into cane pan and flatten the top.
- If you choose not to crush the biscuits : Spread a layer of fudge into cake pan and layer it with biscuits. Repeat till you run out of fudge.
- Garnish with sliced almonds (optional).
- Leave cake to cool for an hour then cover and refrigerate overnight.
Tips:
- *You can reduce the amount of condensed milk if it’s too sweet for your taste. I’ve tried reducing it to 350 ml’s and still had great results.
- ** Use any chocolate drink powder such as Ovomaltine, Nesquick, or Milo. You can use chocolate bar’s as well, but I can’t vouch for results. You can also reduce the amount of chocolate drink powder to 1¼ cup.
- Do not stir the fudge on high as the egg’s in it will curdle. You might end up with sweet chocolate scrambled eggs.
- Conversion Table
Enjoy!

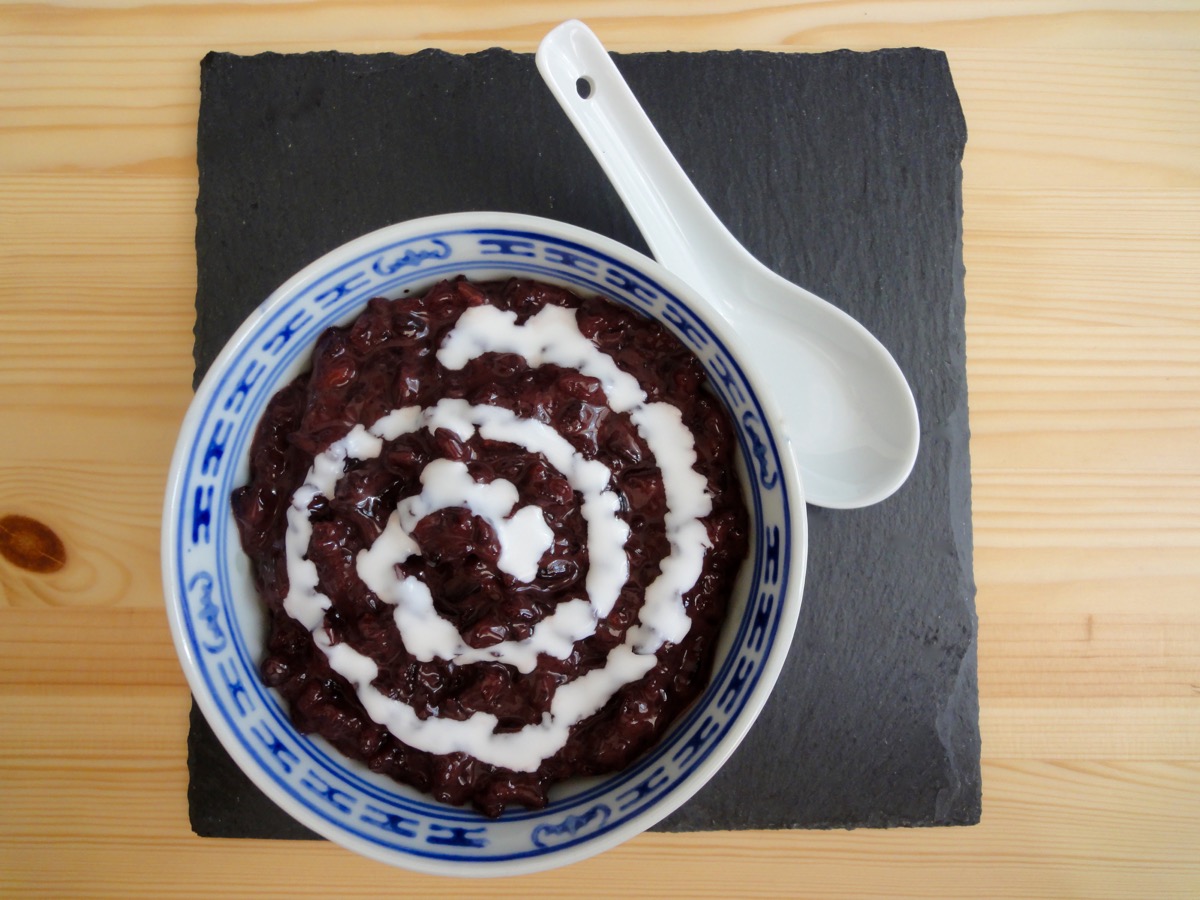
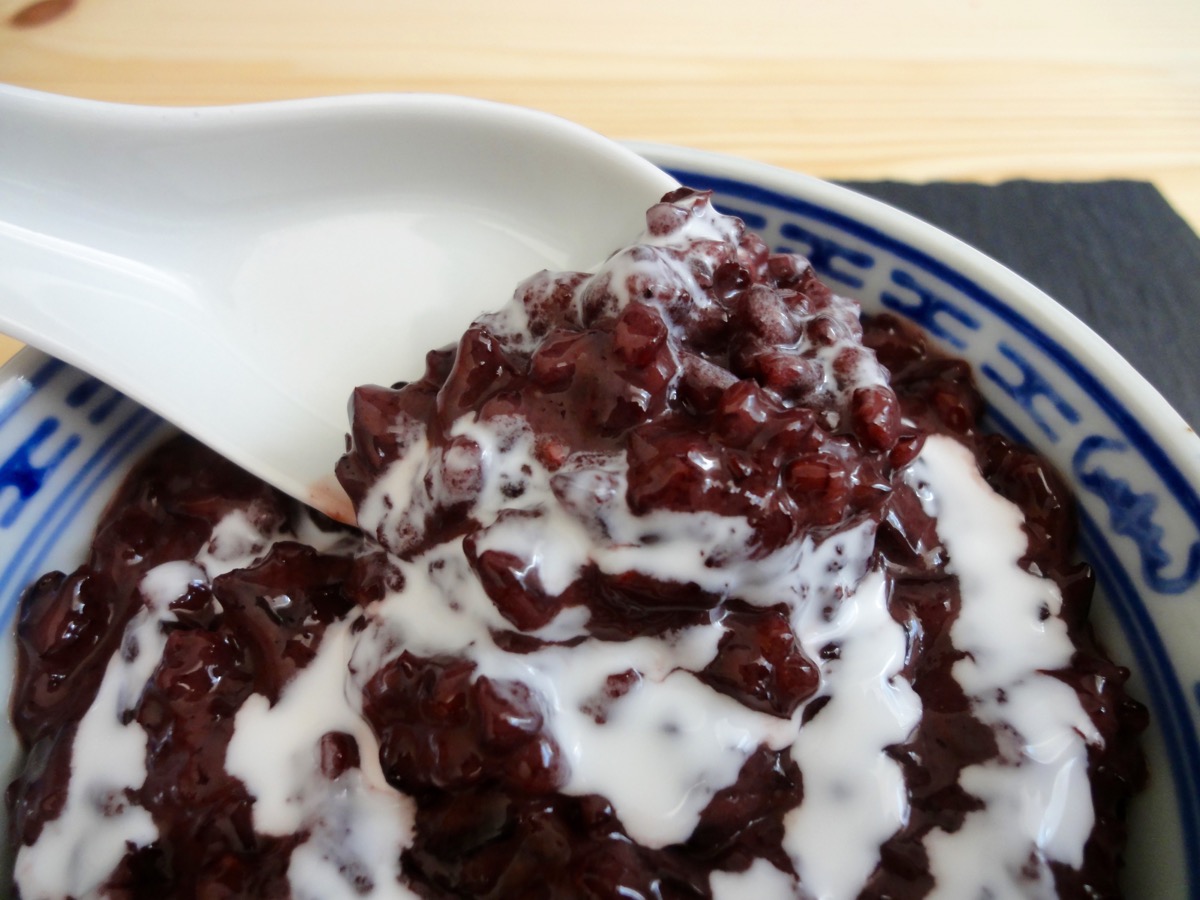
Bubur Pulut Hitam / Black Glutinous Rice Porridge
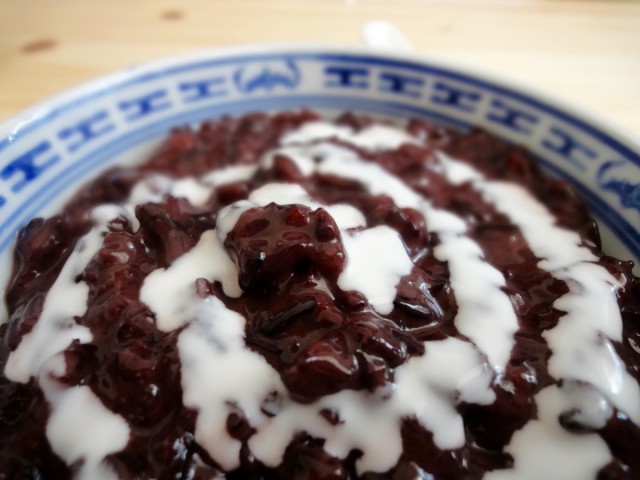
My siblings and I grew up eating this dessert cooked by our mother. It’s one of my favourite local desserts. I can’t find much information on where this dessert originates from, but it’s eaten in many South East Asian countries. There are many variations of this dessert, depending on which country you have it in. But in Malaysia, it’s prepared with just a simple mixture of pulut hitam (black glutinous rice), coconut milk, pandan leaves (screwpine) and gula melaka (coconut palm sugar).
For the longest time, I have been looking for black glutinous rice in Switzerland. Little did I know, it’s more known as black sticky rice here…because it comes from Thailand and there, they call it black sticky rice. Silly of me to not ask or search thoroughly.
So what is this black glutinous rice? It is an unpolished sticky rice, meaning the bran has not been removed, is purplish black in colour and has a chewy texture. It has a nutty flavour and naturally sweet. This black glutinous rice also contains a lot of fiber and antioxidants. It takes some time to cook compared to regular rice, so some soaking in advance is advised. Otherwise just cook it longer.
Ingredients
- 1 cup (182 grams) Black Glutinous Rice
- 5 cups Water
- 1 small block Gula Melaka (Palm Sugar) *
- 4 Pandan Leaves, tied into knots
- ¾ cup Coconut Milk
- ¼ teaspoon Salt
Directions:
- Spread the rice on a bright surface. Check for any impurities such as small pebbles, wood, and so on. This step is optional if you are confident the rice you have is clean.
- Wash rice thoroughly – till the water runs clear. Water will have a slightly purple tint.
- Add water, rice, pandan leaves, salt and sugar into a pot and bring it to boil for 60 minutes or till the rice splits on medium high heat. Stir occasionally to prevent rice from sticking to the pot. You can add more water if the porridge is dry and the rice has not split yet.
- Once the porridge is done, add coconut milk. You can add more if you want the porridge creamier.
- Serve with some coconut milk. It can be eaten warm or cold.
Tips:
- It’s always tastes better the next day.
- Keep refrigerated
- 1 Cup glutinous rice = 182 grams
- Cups to Grams conversions
* if you can’t find coconut palm sugar, you can substitute with regular sugar. Add according to preferred sweetness.
Enjoy!
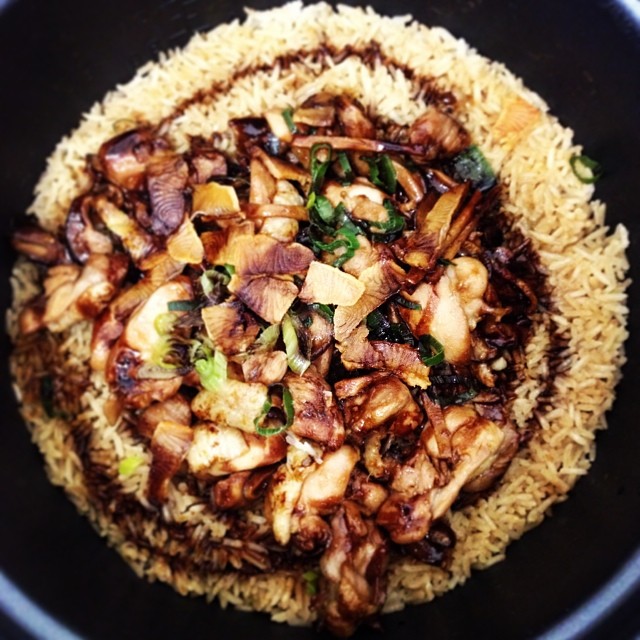
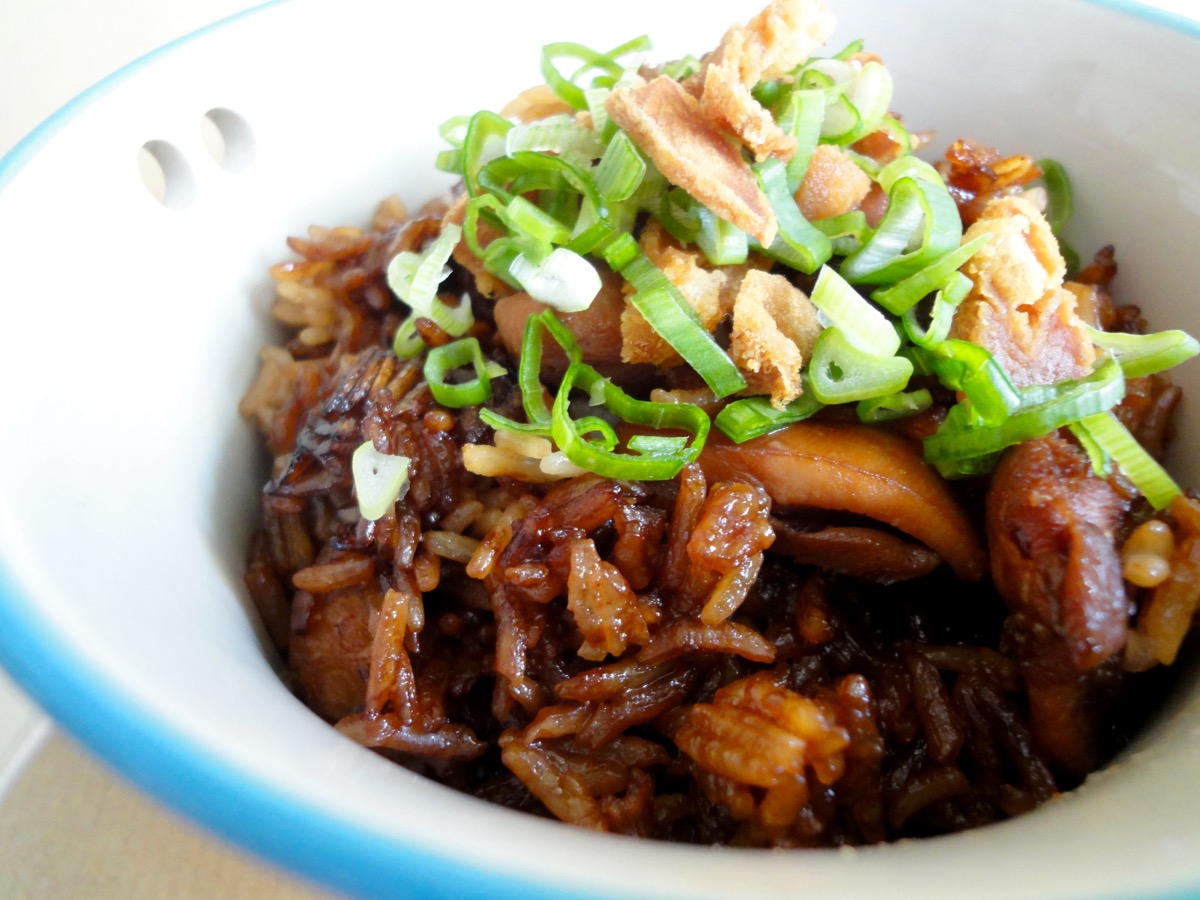
Claypot Chicken Rice, without claypot
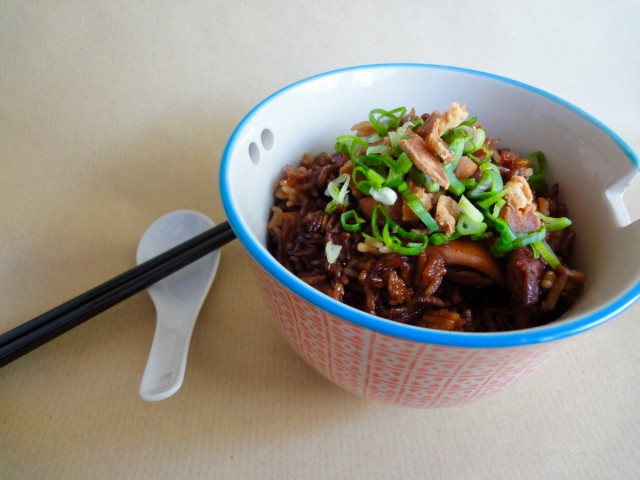
Confusing title? Originally, claypot chicken rice is cooked using a claypot. But since I do not own one and it does not seem useful if I do own one because I do not have a gas stove at home. So in order to make this dish, I use my rice cooker. What’s missing is just the lovely, crunchy rice crust at the bottom but with some tricks, I am able to pull it off. This dish is popular in food courts. Growing up, I remember my sister eating this most of the time while I had fried noodles.

This is how an original claypot chicken rice dish looks like – Photo from makansutra
I have been cooking this at home for a few years now, and the last time I was back in Malaysia, the hubby and I had the real claypot chicken rice at a food court. Sadly, I’ve gotten to accustom to the one I make at home and the food court’s one did not taste nice. Even the hubby said mine was better (probably buttering me up, so I still cook for him). It also could be because I add a massive amount of dark soy sauce and sesame oil that it really makes the dish tastier and the colour is fabulous. The colour part is mostly because of my mother, because she loves her food to be really dark/black (especially when it comes to soy sauce being the main ingredient). For example if she orders KL Hokkien Mee, she wants it reaaaaaalllyyyy black. If not, she looses her appetite. So when it came to me cooking claypot chicken rice, I got put off when it first turned out very pale…so I added more dark soy sauce after it was cooked and it turned out perfect.
This was the first claypot chicken rice I cooked, see how pale it is!
Another thing that’s missing in my dish is, Lap Cheong or dried Chinese sausage. It always slips my mind to search for it at the Asian shop, though I’m not too sure if they even have it – to the ones I go to. The most important part of the dish to have is the fried salted fish. The taste of the salted fish is just so perfect with the dish. My salted fish comes from my hometown, Sabah and that’s probably the only salted fish I will ever buy. Folks from Sabah take pride in their seafood 😀
Recipe adapted from Rasa Malaysia .
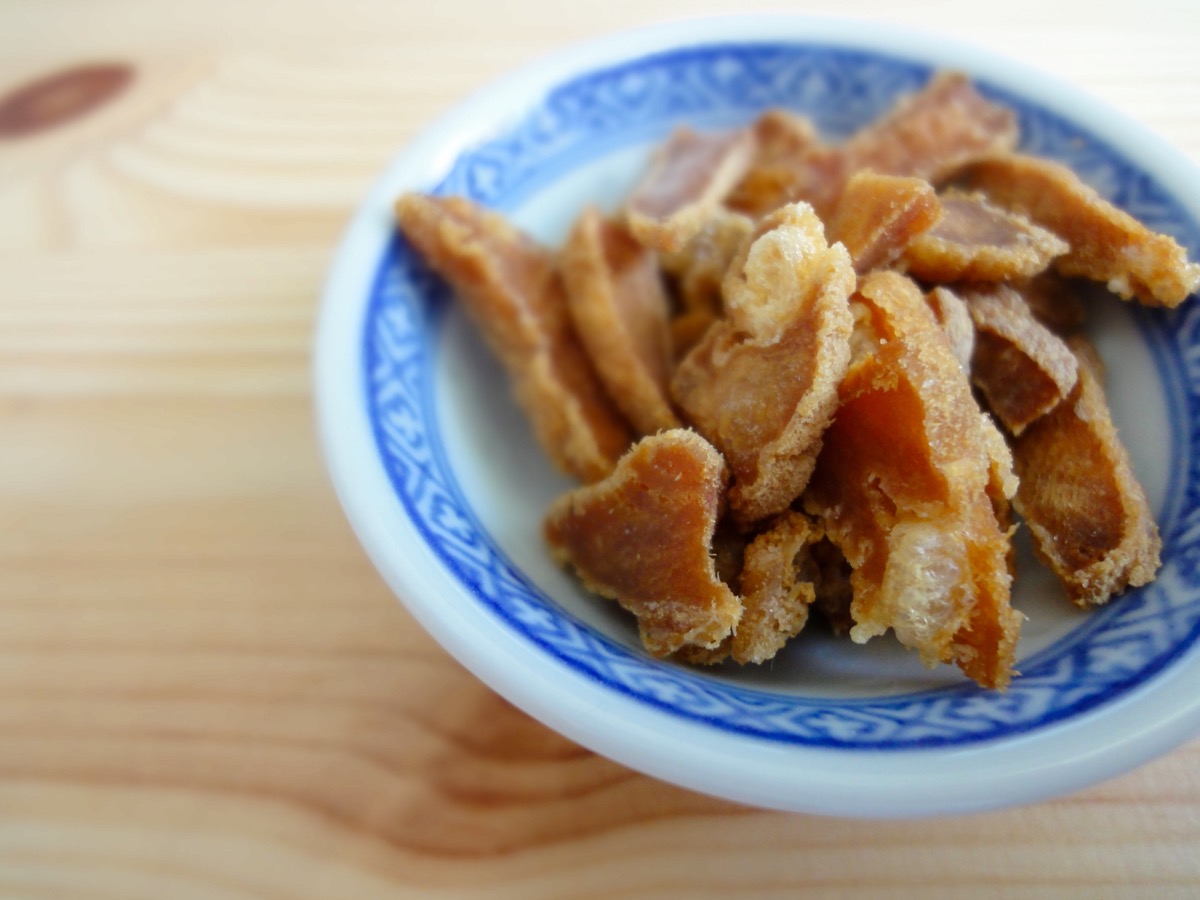
Fried salted fish pieces
Ingredients
- 2 Chicken Thighs, deboned and cut into pieces
- 3 inch piece, julienned Ginger
- 4 big pieces Shiitake Mushrooms (optional)
- 1 pair Lap Cheong / Dried Chinese Sausage, sliced (optional)
- 1 bunch Spring Onions
- 1 - 2 inches Salted Fish, sliced
Chicken Marinade
- 2 tablespoons Oyster Sauce
- 2 tablespoons Shaoxing Cooking Wine
- 1½ tablespoons Light Soy Sauce
- 1½ tablespoons Dark Soy Sauce
- 1 teaspoon Sesame Oil
- 4 dashes White Pepper, powder
- To taste Salt
Rice
- 1½ cups Rice, uncooked
- 1½ cups Water
- 2 tablespoons Light Soy Sauce
- 1½ tablespoon + 1½ tablespoons (for after cooking) Dark Soy Sauce
- 2 teaspoons + 1 teaspoon (for after cooking) Sesame Oil
- To Taste Salt
Directions:
- Salted Fish
- Wash salted fish and pat dry.
- Thinly slice it.
- Heat up a pan to medium heat with some oil.
- Fry salted fish till crispy.
- Chicken
- Clean chicken and marinade for at least 30 minutes before cooking.
- Once marinated, heat up a pan with some oil. Medium high heat.
- Fry ginger till aromatic.
- Add chicken and the marinade.
- Stir fry till 3/4 cooked. You can also fully cook it, but make sure you still have gravy left.
- Add chicken and gravy into half cooked rice.
- Rice (after chicken has been marinated and just before you begin cooking the chicken)
- Wash rice.
- Add rice, water and all ingredients under rice into rice pot.
- Mix well and press cook to start cooking the rice.
- Add cooked chicken and gravy into half cooked rice.
- Allow to cook until the rice cooker button pops to stay warm.
- Add extra dark soy sauce and sesame oil.
- Press cook again (sometimes it takes a while till you can press cook again – cooking it again will enable it to form a nice piece of rice crust, this should take a couple of minutes)
- Let the rice cooker be on stay warm for 15 minutes before serving.
- To serve : top with fried salted fish and spring onions.
- Dig in!!!!!!
Tips:
Enjoy!
Homemade Vanilla Extract
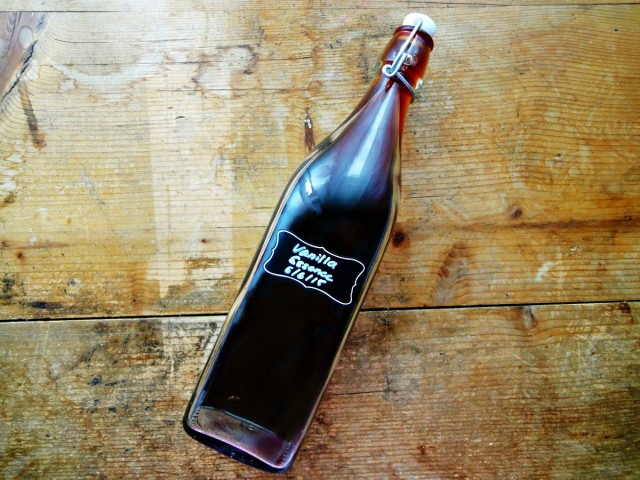
I have been using my own vanilla extract which I made in June and by the 8th week it was ready for using. Yes, the label on it is confusing. That’s because growing up we used vanilla essence as it was widely available in stores. So, for the longest time I’ve called it essence even though for the past 3 years I have been using extract. Making it a habit to start calling it by it’s true name.
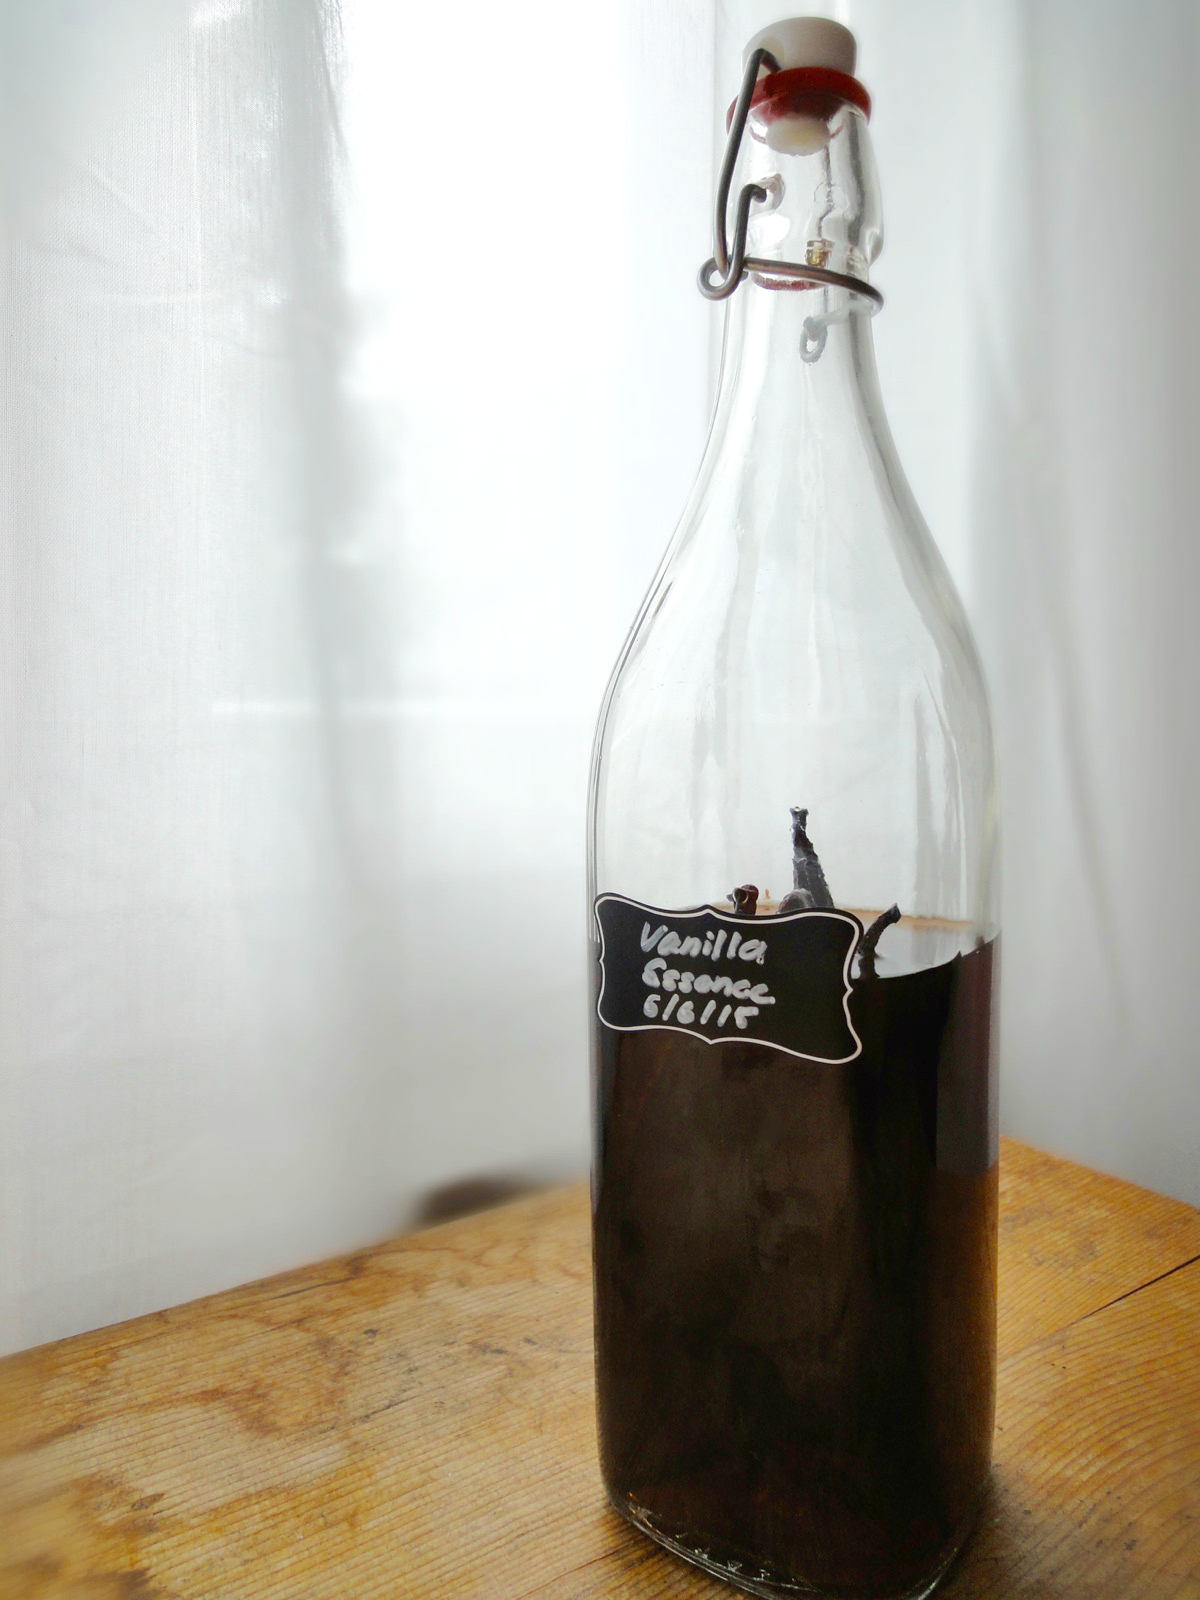
Wrongly labeled by me. :/
What’s the difference between extract and essence?
Extract:
- Made from real vanilla beans and alcohol like vodka. Rum or brandy can be used as well.
- More expensive
- Stronger and fuller vanilla flavour
Essence:
- Synthetic (chemically produced)
- Cheaper
Where I’m at, you can’t easily get vanilla extract in general grocery stores. It’s available at American and British online stores or at a high-end store called Globus. What is common is vanillin zucker (vanilla sugar) which does not give the same taste as using vanilla extract. There is also vanilla-butter flavouring which I find awesome for my soft chocolate chip cookies. Lastly, there’s of course vanilla beans and vanilla bean paste easily available. Except for vanilla sugar, I use all the above for various recipes.
So, after finishing a small bottle of vanilla extract (50ml) that cost me about CHF 16, I decided to use my googling powers and learnt how to make my own vanilla extract. All you need is a clean bottle, vanilla beans and vodka. I used a 750ml bottle of vodka and about 15-18 vanilla beans. According to the kitchn, use 3 to 5 vanilla beans per 8 ounces (240 ml/1 cup) of alcohol and multiply accordingly if making more extract. You can add more vanilla beans of course.
Is it cheaper? Depends. The cost of vanilla beans vary depending on the quality and where it comes from. The one’s I get are CHF 2.30 for 3 beans. A bottle of vodka (750ml) cost’s me CHF 17. So, for me it’s cheaper compared to getting it from the high-end store. Plus, it’s really fun to see it change colour. It also makes a perfect gift for fellow home bakers.
And because I made my homemade vanilla extract before I started this blog, I did not bother to take photo’s of the stages of it and I just have a final product. The next time I make it, I will be sure to update this post.
Ingredients
- 3-5 Vanilla Beans
- 1 cup (240 ml / 8oz) Vodka
Directions:
- Prepare a clean bottle (preferably with a flip-top) by washing it and drying it properly.
- Slit vanilla beans into half lengthwise. You can also chop it up to fit a small bottle.
- Pour in vodka.
- Close the bottle.
- Store in a cool and dark place (your cupboard). Give it a little shake every now and then.
- After 8 weeks, your vanilla extract is ready to use. You can leave the vanilla beans in the bottle or you can strain it out. I left mine in so it get’s stronger with time. Plus, why waste the beans? It does look nicer when you can see the beans in it too.
Tips:
- After scraping vanilla beans for other recipes, throw in the bean into the extract.
- To have clear vanilla extract, simply strain it with a coffee filter.
- You can use brandy or rum instead of vodka. Vodka is commonly used because it does not have a strong taste.
- Conversion Table
- Make your own peppermint extract too at the same time!
Enjoy using your homemade vanilla extract with your homemade goodies!
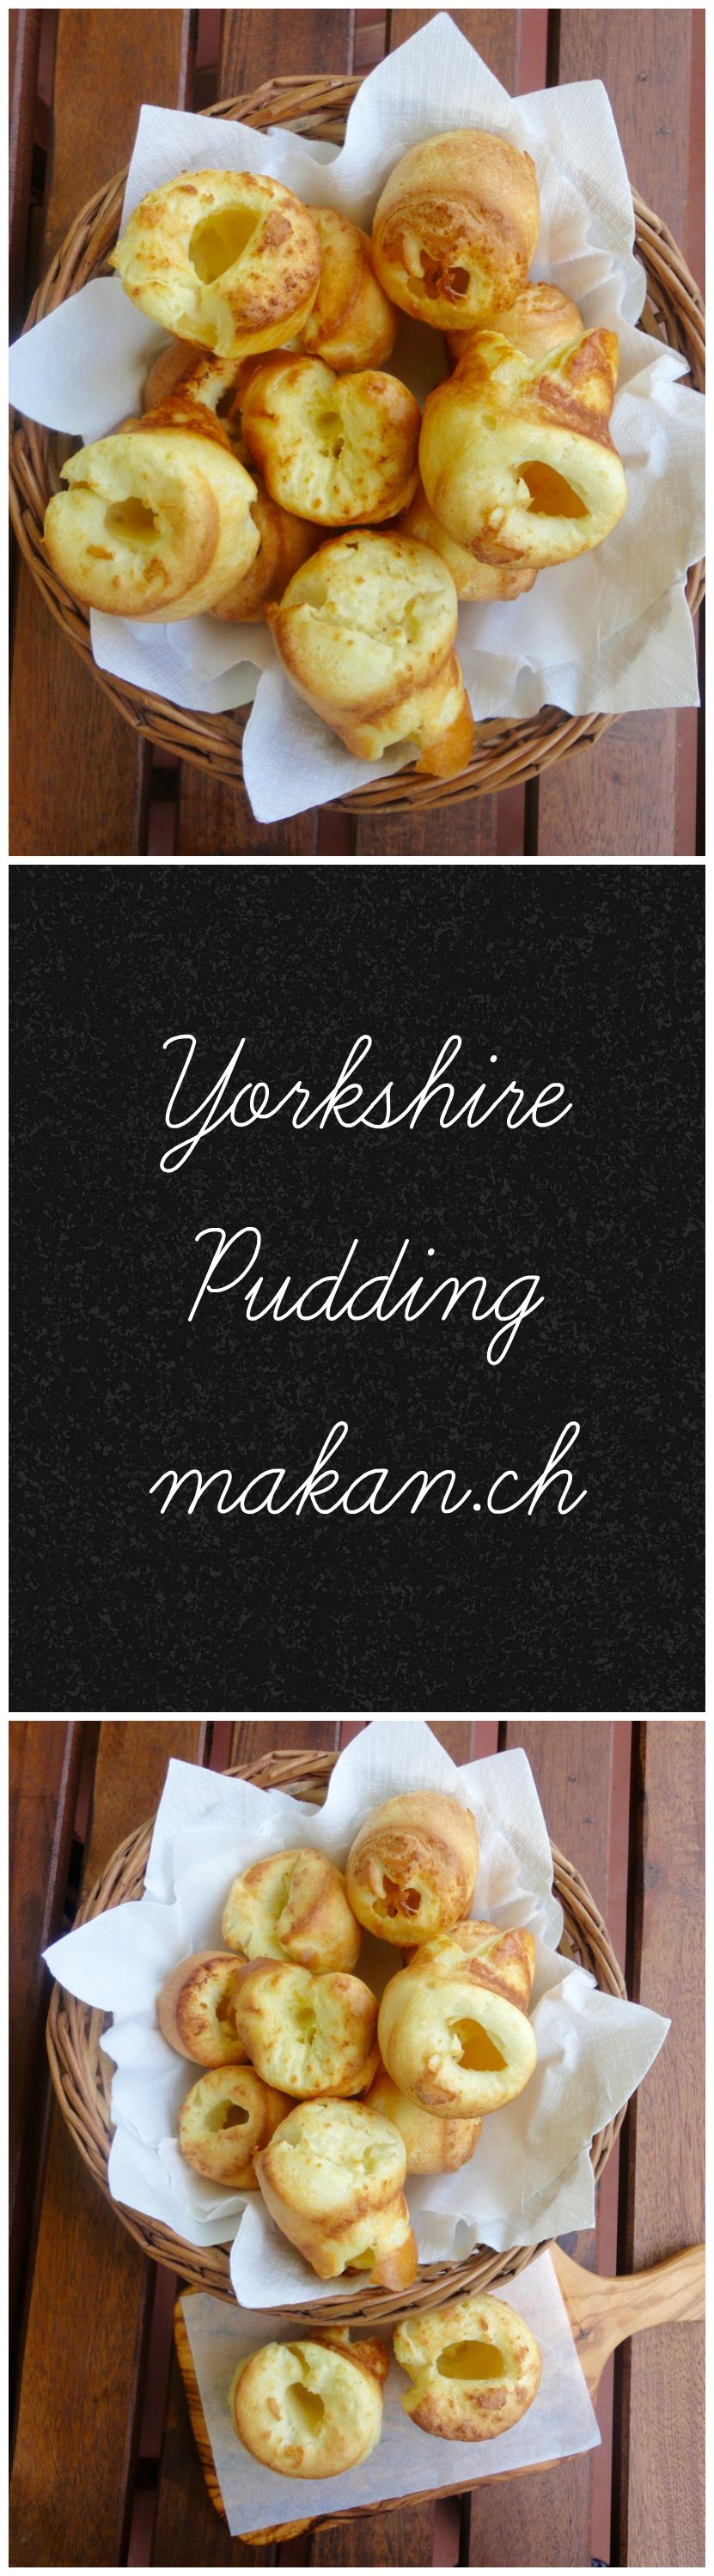
Yorkshire Pudding
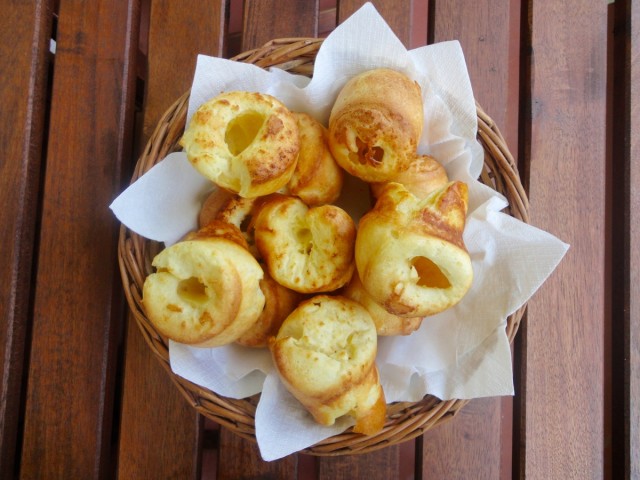
Yummy and easy, a traditional Sunday roast companion. But I’m no rich woman to have red meat on a weekly basis. I really wanted to try these out, so I went on Google mode and I was finally happy with one (after 3 times of baking horrible ones). I make these as my ‘quick’ lunch and eat it with some brown gravy.
Adapted from Nanna’s Yorkshire Pudding Recipe. There are only 2 things I have tweaked in this recipe which is using butter instead of shortening because I simply love butter, and instead of using hot water at the end, I use ice cold water. Keep a close eye when using butter as butter burns faster than shortening. I use a 12 hole muffin pan from IKEA (drömmar). You can use a regular muffin pan or of course, a Yorkshire pudding pan.
Ingredients
- ¾ cup Milk, cold
- ¾ cup All-Purpose Flour
- 1 nos Egg
- ½ teaspoon Salt
- 1 tablespoon Cold Water
For Baking
- 1-2 teaspoons per muffin cup Butter or Shortening
Directions:
- Preheat oven to 220°C.
- In a big measuring cup, whisk together egg and milk together till frothy. Add salt and flour slowly while whisking. Try to incorporate as much air as you can. Keep in the fridge till ready to use.
- Add butter to muffin pan and put it in the preheated oven. Keep a close eye on it as butter burns fast.
- While it’s in the oven, take out the batter and add the ice cold water. Whisk vigorously.
- Just as the butter is smoking a little – about 3 minutes, take it out and immediately pour the batter equally (about half full) into the muffin pan.
- Return to oven and bake for 20 minutes or till golden brown.
- Serve immediately.
Tips:
Enjoy!

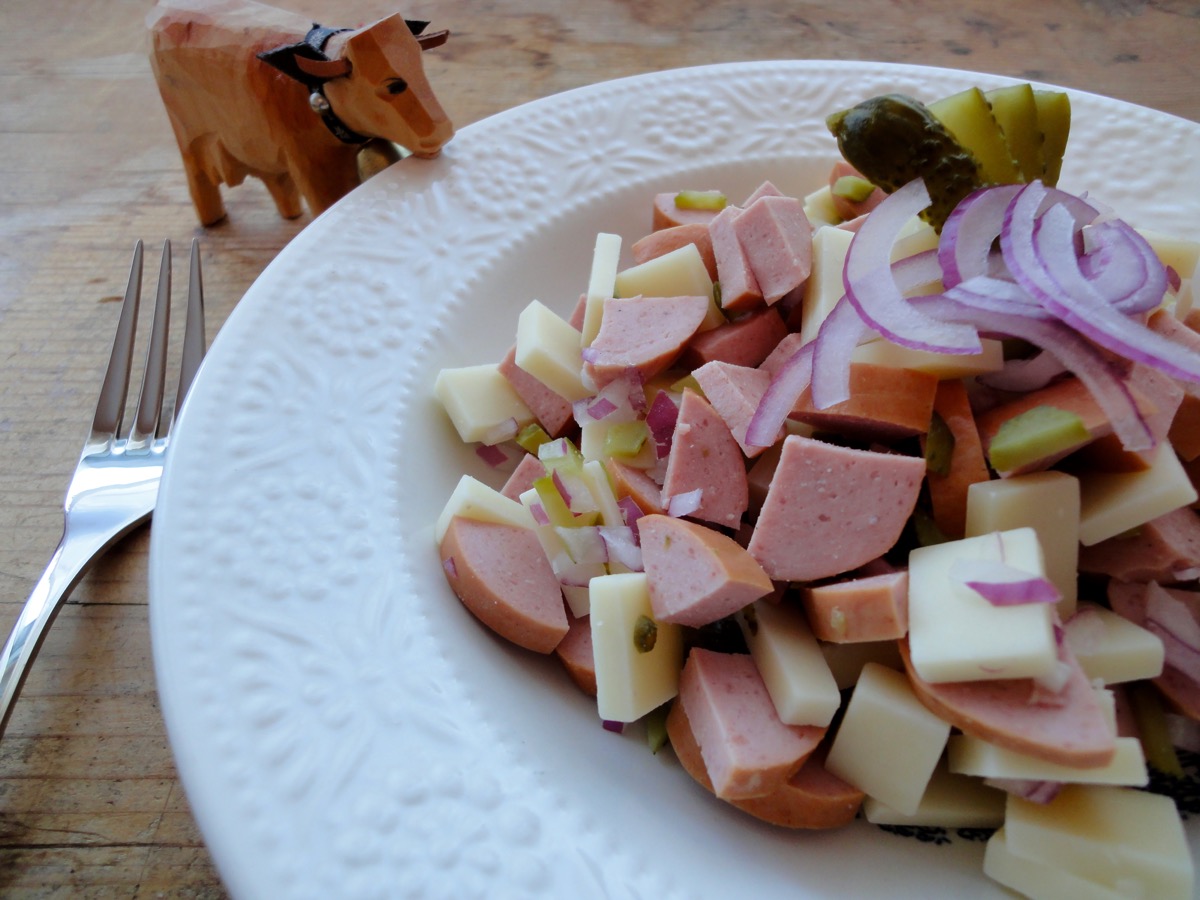
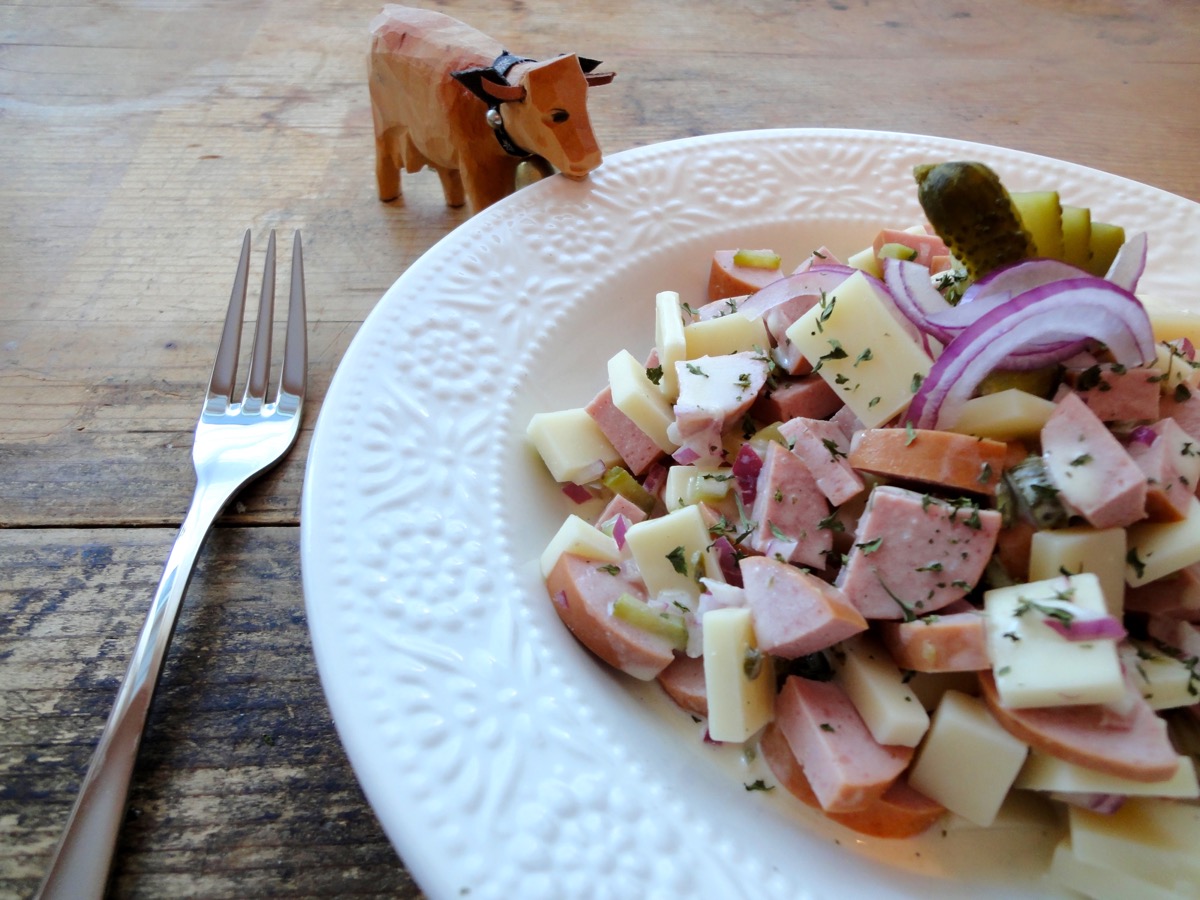
Wurst-Käse Salat / Sausage & Cheese Salad
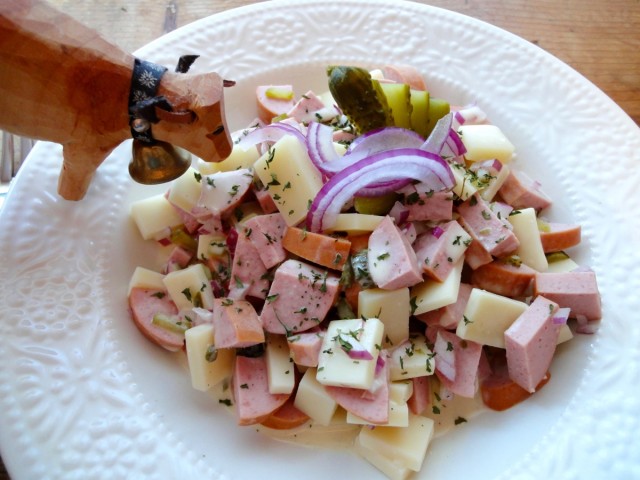
Grüezi! My first entry for Swiss cuisine. A Swiss salad… but not your typical salad. I don’t know why it’s called a salad, but it is. The first time I was introduced to this salad, I asked the chef “so where does the salad go?” and he replied, “that’s it…that’s the salad”. Till today, it still bugs me that there is actually no green in it. This is one of the hubby’s favourite and he probably eats it once a week and sneakily tells me he had salad for lunch.
This salad is made from cervelats. The No.1 sausage in Switzerland. Do not, I repeat, DO NOT ever diss cervelats. You’d probably get thrown out from the country and friendships would get ruined because of it. The Swiss love their cervelats so much, that there was once a threat that there was a shortage of it and people were outraged. Google it. I think if there really is none of it anymore, Switzerland would not function. I’m just joking…or am I? 😉
So here it is, go impress your Swiss friend with this classic.
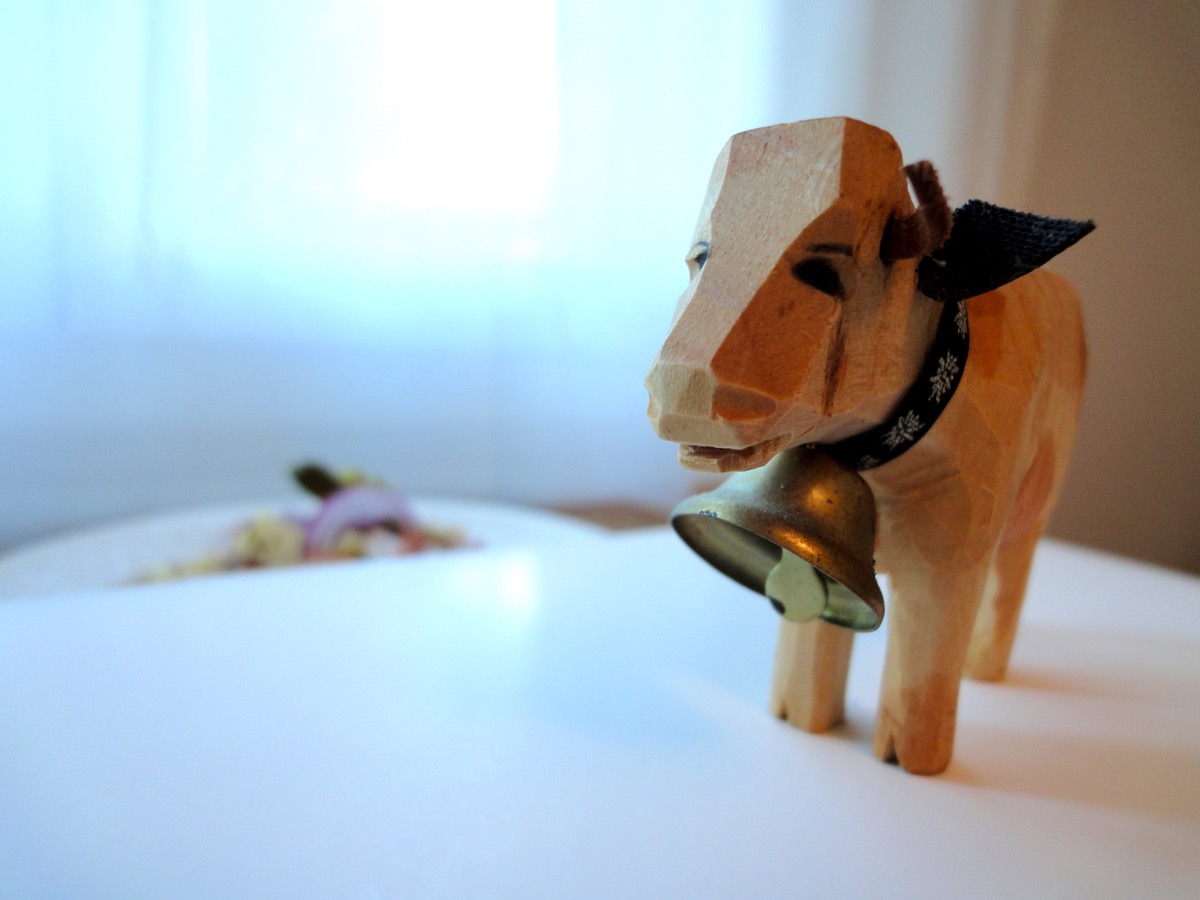
Moo, the cow watching over her wurstkäse salat. I hand carved this in 2010 at Ballenberg – Swiss Open Air Museum
Before the dressing. Moo, the cow is watching patiently.
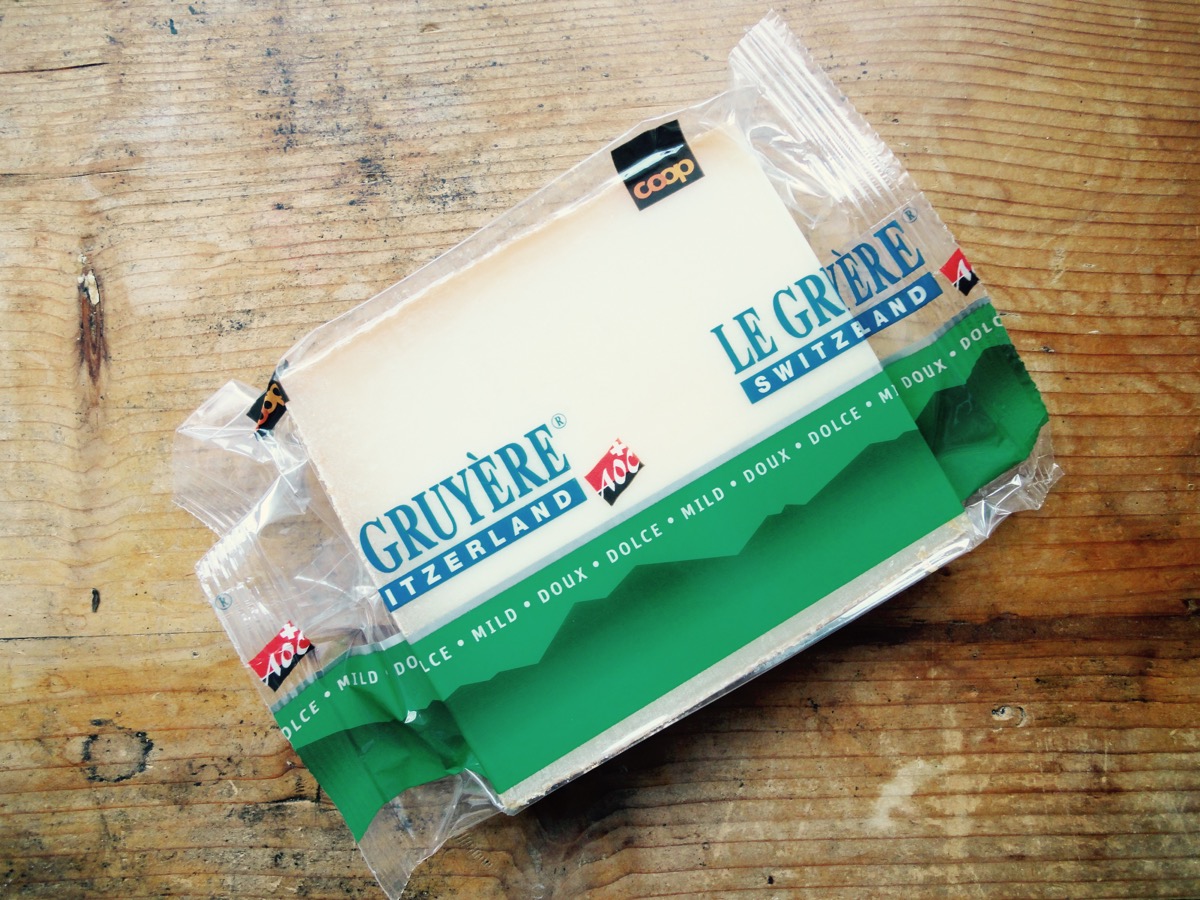
Le Gruyère Switzerland (Mild) because I’m still not a fan of smelly cheese.
Salad Sauce
- 3 Tablespoons White Wine Vinegar
- 1 Tablespoon Red Wine Vinegar
- 3 Tablespoons Rapeseed Oil
- 1 Tablespoon Mustard
- 2 Tablespoons Mayonnaise
- To Taste Salt
- To Taste Black Pepper
Salad
- 4 pieces Cervelats
- 250 grams Gruyère or any hard cheese, cut into pieces
- 4 medium sized Gherkins, chopped
- ½ Red Onion, chopped
- 1 small bundle Chives, chopped
Directions:
- Salad Sauce
- Mix together all the ingredients in a bowl or in a jar.
- Chill it.
- Salad
- Remove casing from cervelats, cut cervelas into pieces.
- Mix ingredients in a large salad bowl.
- Add sauce just before serving and mix well.
- Serve
Tips:
- You can use store bough French or Italian dressing.
- Rapeseed Oil is used as it has a neutral taste. Sunflower oil or other neutral flavoured oil may be used.
- Use hard cheese such as Emmentaler and Appenzeller.
- Parmigiano-Reggiano is not suitable for this dish.
En Guete!
After the dressing and garnish. Moo, the cow is still patient.

Moo, the cow taking a dive for her salad.
Crispy Jalapeño Cream Cheese Wontons

Jalapeño and cream cheese? A match made on earth! I call these wontons as I use wontons wrappers, original wontons are filled with minced pork and prawns. These are such an easy and tasty appetiser or snack!
I would fry these not long before serving, as the wonton wrappers would get limp due to the cream cheese. You can make it a few hours before hand, but be sure to cover it with a damp paper towel to not dry out the wonton wrappers. The wrappers are sealed with a mixture of cornflour and water to ensure it does not open up while frying. Make sure that the wonton wrappers are gently held, to not make holes or tears.

Ingredients
- ½ cup Jalapeños, chopped
- 1 cup Cream Cheese
- To taste Salt
- 25 Wonton Wrappers
- For frying Peanut Oil
Directions:
- Mix cornflour and water. Set aside. This is used for sealing the wonton wrappers.
- Mix jalapeños with cream cheese and salt.
- Take one wonton wrapper and fill it with about 2 tsp of jalapeño cream cheese mixture.
- Dip a finger in cornflour mixture and run it across the wrapper. Fold to make a triangle or desired shape.
- Gently press out any air pockets from the inside to avoid it the wontons from bursting while frying.
- Deep fry till golden brown.
Tip:
- Keep a good eye on the wontons while frying. They tend to get bubbly inside even with pressing out air pockets.
- You can try to bake these but the one’s that I have tried so far have not produced good results as to frying them.
- Add bacon…lots of it.
- Cups to Grams conversions
Enjoy!

Cream Cheese & Cranberry Danish

Back when I worked at Starbucks, they sold cream cheese danish’s. It sold quite well and a lot of it landed in my belly too, resulting in high quality padding for my bones and organs 😛 Their’s were of course made with real danish dough, while I just use puff pastry. One day when I have the patiences, I will try my hand at danish dough. Anyways, the past few weeks I have been craving that cream cheese danish. But I was thinking too much about it that I got scared of the thought of making it. The one sold at Starbucks was fully covered, like McDonald’s apple pie. That would require me to use more puff pastry so I decided to make an open-faced one.

I was also feeling a little left behind seeing that many other bloggers were churning out pumpkin recipes (it’s the season) and I’ve got no pumpkin recipe to give. Mainly because cutting a whole pumpkin is scary and buying it sliced is expensive. Canned pumpkin is not much of an option because it’s also expensive and why should I buy canned pumpkin puree when I could ‘easily’ make my own. So, instead of joining the crowd of pumpkin recipe churners, I decided to go with Cranberries. It’s cranberry season too and my local grocery store sells cranberries! Last year, I made 4 – 500 ml jars of cranberry jam and I still have one more jar left in my pantry. The jam that I use here is from last years batch and I am going to make a new batch of jam soon. Only thing is, I used too little jam on it in the pictures here. If you want more jam, do add more than just a teaspoon. 🙂

Potato Quality Step 4
Ingredients
- 1 rectangle or square (320g) Puff Pastry
- 1 Egg
- 1 Tablespoon Water
- For dusting Powdered Sugar
Cream Cheese Filling
- ½ - ¾ cup Cream Cheese
- 2 Tablespoons Powdered Sugar
- 1 teaspoon Vanilla Extract
- 1 - 1½ teaspoon per Danish Cranberry Jam
Directions:
- Pre-heat oven to 190°C (375°F). Line a baking tray with parchment paper.
- Roll out puff pastry and cut into even squares or rectangles. (I got around 15)
- Transfer to baking tray.
- With a sharp knife, score an inner rectangle or square but do not cut all the way through. (See picture above. Helps puff pastry puff up without spilling the filling)
- With a fork, prick the centre of the puff pastry rectangle.
- In a small bowl, mix cream cheese, powdered sugar and vanilla extract.
- Place about 2 teaspoons (or as you see fit) in the centre of the puff pastry.
- Top cream cheese with 1 – 1½ teaspoon of cranberry jam (or any jam of your choice).
- In another small bowl, beat an egg with 1 Tablespoon of water.
- Brush the edges of the puff pastry .
- Bake for 15-18 minutes or till the pastry is golden brown and puffed up.
- Cool on a wire wrack and dust with powdered sugar once completely cooled.
Tips:
- Always work with cold puff pastry.
- Not a fan of sweet stuff? To make it savoury, simply omit the sugar, vanilla and jam. Instead add some salt, herbs, garlic granules to the cream cheese and top with gravlax after it’s baked.
- Conversion Table
Enjoy and happy baking!
P.S: Don’t know why, but my hubby actually ate 4-5 pieces of these Danishes. He ain’t a fan of sweet stuff. 😮


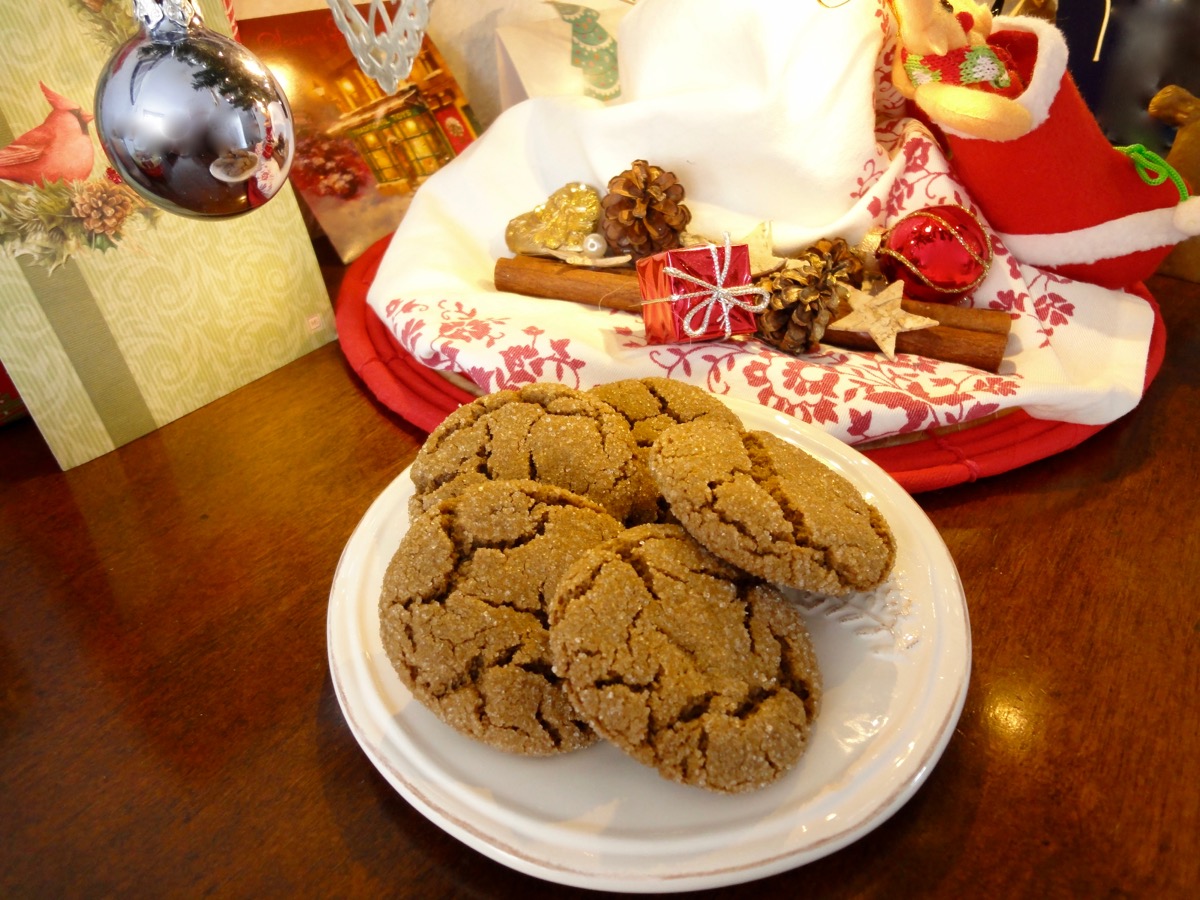
Christmas Edition: Ginger Cookies

Yay! The most wonderful time of the year is here! Christmas has always been my favourite holiday. The food, the decorations, the presents, the carols, and the heat… what? what heat? Why, Malaysian Christmas of course! I spent 21 years celebrating tropical Christmases, and now that I get to celebrate Christmas during winter makes me even love it more. I finally understand the carols where they roast chestnuts on an open fire, sip hot chocolate, that it’s actually cold outside, and most of all…a white Christmas. I had my first white Christmas in 2010. It was also my very first Christmas with my husband (then boyfriend).

Christmas Tree at a restaurant where I used to work back in 2010. My very first Christmas away from home. I cried when I saw this tree. I’m a little cry baby. 🙂
Christmas, has always been special to me. Lot’s of sadness and happiness all in one day. Being away for the most important holiday in my family has got to be one of the hardest days ever. But as I celebrate Christmas with my new family-just my husband and I, I am happy and get happier with each and every year I do with him. I get to annoy him by playing carols and watch corny Christmas movies. This year is particularly exciting as we are trying to set our own traditions. We already have 2 that we do each year, which is having Spaghetti à la Carbonara for our Christmas Eve dinner and on Christmas day, we stay home and watch my corny Christmas movies.

Our little Christmas tree. If it was up to me, I would have a 6 footer. 😀
Baking skills are often put to the test during the festive season. I tried to do a 12-day of Christmas Cookies for the blog but I started out a little too late to test out new cookies and having 12 types of cookies will certainly make my pants tighter! So instead, I shall give a few of my favourite treats during the holidays. First one being Ginger Cookies. Crunchy on the out and soft on the inside. These cookies are nice and spicy perfect for a cold cold winters day. These are thicker and soft cookies. If you want gingersnaps, you’d have to use shortening instead of butter. I never used to like ginger cookies, not until I had some from my mother’s close friend Aunty Emily. It’s been a long time since I had her ginger cookies but I fell in love with her cookies and the rest is history! Last year, instead of baking my own ginger cookies I got mine from Ikea. It’s not too bad, but it was too much for me to finish. I also thought that it required lots of work but it’s really easy!
So here it is…
Ingredients
- ¾ cup Butter
- 1 cup Sugar
- ¼ cup Molasses
- 1 Egg
- 2 cups All Purpose Flour
- 2 teaspoons Baking Soda
- 1 Tablespoon Ginger Powder
- 1 teaspoon Cinnamon Powder
- ¼ teaspoon Nutmeg Powder
- ½ teaspoon Salt
- ½ Cup Sugar, for coating
Directions:
- Preheat the oven to 175°C (350°F) and prepare baking trays with parchment paper.
- In a mixing bowl, cream butter and sugar till smooth.
- Add molasses and egg. Mix till combined.
- In another bowl, mix together ginger powder, cinnamon powder, nutmeg powder, flour, baking soda and salt.
- Add the dry ingredients into the wet ingredients and mix till it forms into a dough.
- Pour ½ cup of sugar into a bowl.
- Take 1 Tablespoon of dough and roll it into a ball. Drop the dough ball into the bowl of sugar and coat. Pop it in the fridge for 20 minutes if the dough gets warm.
- Place balls on prepared baking tray about 2 inches apart from each other. I would suggest 12 balls per tray.
- Bake for 10-12 minutes. *Please pay attention to the cookies 8 minutes in. Baking times may vary.
- Allow cookies to cool down on baking tray for 10 minutes before transferring to cooling rack.
- Store in an air tight container.
Tips:
- Conversion Table
- Dough is very soft, so you might need to pop it into the fridge for 30 minutes to make rolling easier. When I baked mine, my kitchen was very cold so I could roll and bake right away.
Enjoy and merry baking!