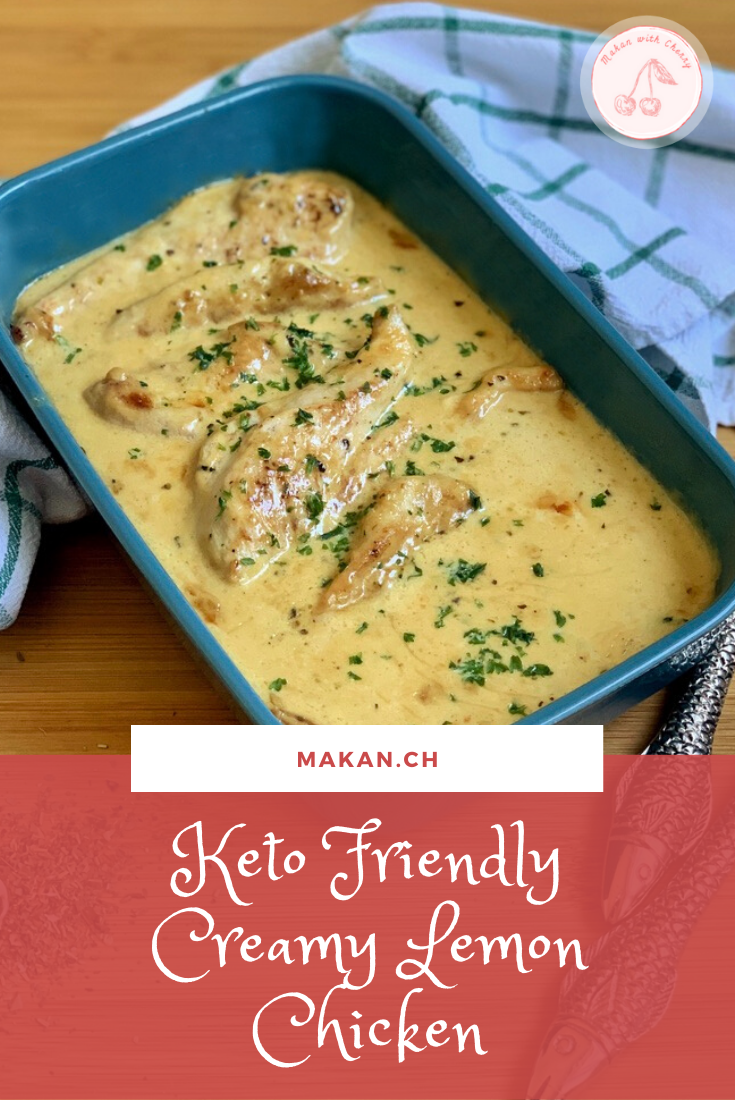
Creamy Lemon Chicken (Keto Friendly)

I’ve known about the ketogenic diet for about 4 years now. I can’t remember if I’ve shared this before, but I only came to know about it after I was diagnosed with PCOS. Thanks to many ladies with PCOS who have shared their journey, I decided to try eating the ketogenic way. It was difficult! As a carb loving person, taking away carbs from my meals willingly required a lot of will power. But I had two goals in mind, one was to lose weight, as I’ve been overweight since I hit puberty. The second was to increase my chances of getting pregnant as I read that the keto diet helps PCOS-ers.

Luck was on my side, and I achieved both! I had a keto baby, and as soon as I stopped expressing breastmilk, the weight started to pile on. I was not eating well at all. I had lots and lots of carbs, as it was the easiest to shove into my mouth while looking after a baby at home. But now, I’ve come back to it since baby has turned into a threenager, it has become way much more manageable to plan meals and give up carbs. Plus, one of my best friends is getting married in March and I’m part of the wedding party…and I told them to get me 2 sizes down of my bridesmaid dress!
So without realising, I’ve always cooked my Creamy Lemon Chicken this way – without any added carbs and I thought I’d share my version with you. There’s also a video below to show how it’s cooked. If you like what you see, please give it a thumbs up and subscribe to my channel. I promise to make more crappy videos and voice-overs for you 🙂
The dish is perfectly customisable to suit your own needs. I’m going to list a few things which you can substitute:
Chicken breast: Chicken thigh, chicken meatballs, or even fish!
Butter: olive oil, coconut oil, avocado oil, lard, clarified butter, etc.
Heavy cream: coconut cream – do expect a coconut-y taste
Thickening agent: you can use parmesan cheese, egg yolks, or xanthan gum.
Ingredients
- 2 pieces, cut into half Chicken Breast
- 1-2 Tablespoons Butter (or any oil for pan frying)
- 250ml / 1 cup Cream
- 1 Tbsp Lemon Juice
- 120ml / ½ cup Chicken Stock
- ¼ tsp Italian Herbs
- To taste Freshly ground black pepper
- To taste Salt
- 3 Tbsp Grated Parmigiano-Reggiano
Directions:
- Add some butter to a frying pan. Add chicken pieces and some garlic, fry till golden brown both sides of the chicken.
- Pour in heavy cream, cook till slightly thickened. Add in lemon juice.
- Sprinkle herbs and freshly ground black pepper. Then add chicken stock. Cook till slightly reduced.
- Add parmesan and mix thoroughly. Add more parmesan or any thickening agent to make the sauce thicker. If you do not wish to add any thickening agent, you can also continue cooking the sauce till it reduces even further. I like to finish it off in the oven at 180°C /360°F for about 10 minutes to free up space on my stove for other dishes.
- Serve with a side of vegetables.
Notes:
- Conversion Chart
- If you are using MyFitnessPal app to track your macros, first copy the recipe link/URL, then go to the MyFitnessPal app to Recipes, select Create a New Recipe, then Add from the Web. Paste the URL, match ingredients and that’s it!
- Always match ingredients to the ones you use. Ingredient nutritional facts differ depending on brand.
- Nutrition Facts (based on my ingredients) : Servings: 2
Amount per serving
519 kcal | Total Fat – 41 g | Protein – 33 g | Total Carbs – 5 g | Fiber – 2 g = NET Carbs – 3 g
Enjoy!

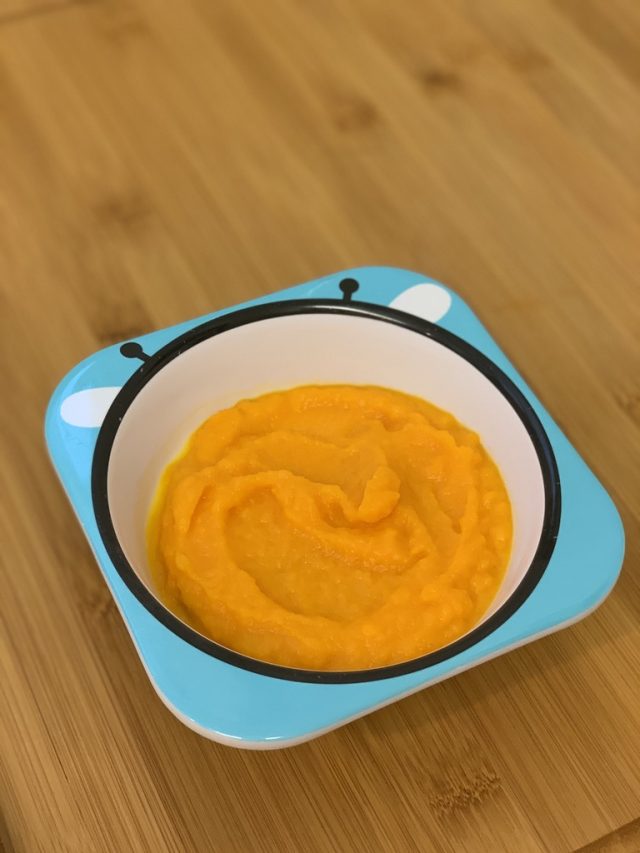
The Baby Edition: Homemade Carrot Purée
Hey everyone! It has been a long time since I’ve posted new recipes. The past few years have been a crazy but joyful roller coaster, as my husband and I welcomed our first child into this world. So after a year and a half of broken sleep, I decided to take some more time off to catch up on all the shows and movies I missed and to just take a step back from my hobby. I never thought a Carrot Purée entry would ever be my comeback to posting! I’m also dabbling into creating YouTube video/tutorials for my recipes and this Carrot Purée recipe is gonna be the first (video below), cause you know, you gotta roll with the trend (though I might be too late since apparently Tik Tok is now a new place for stuff like these, and I’m too old for Tik Tok!).
So like most first time mums, I was one of those that wanted to make homemade baby food for my baby. As soon as my son’s paediatrician gave the green light to start solids, I immediately went online shopping (who has time and the energy to leave the house), got myself a Phillips Avent 4-in-1 baby food maker, baby food storage pots, some cute tableware and cutlery, bibs and of course, the fruits and vegetables itself.
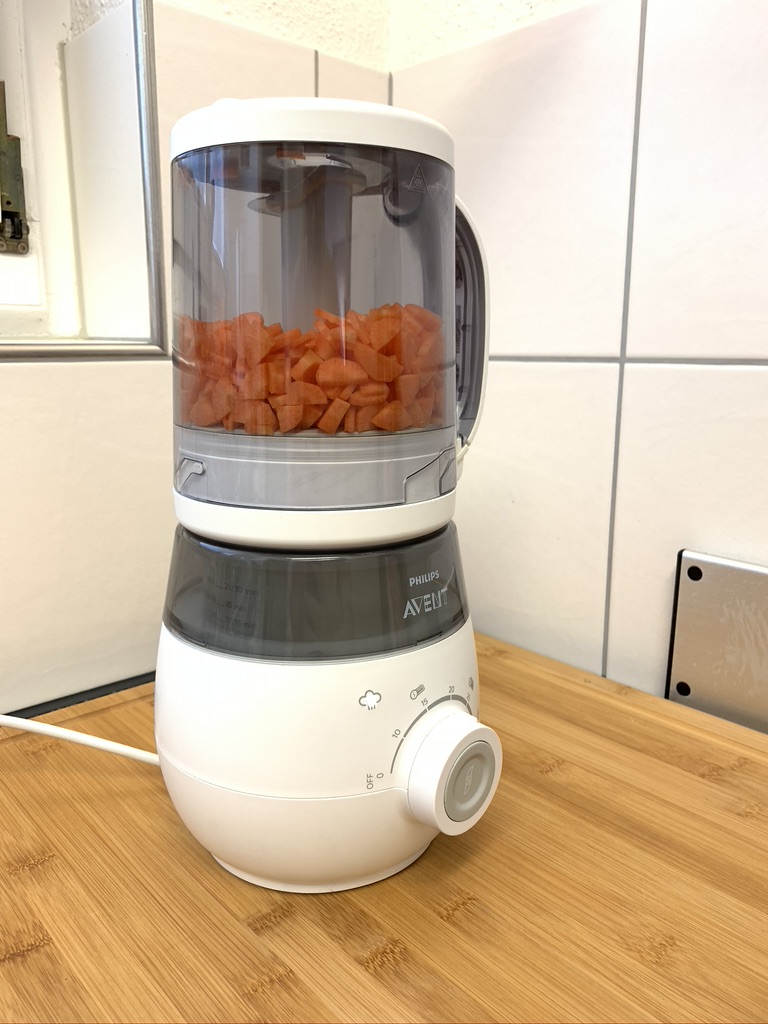
Philips Avent 4 in 1 Baby Food Maker
When the baby food maker arrived, I was SO excited that I immediately washed it and started cooking. I was a nervous wreck while preparing his first purée! Making sure that everything was perfect, from the produce to the consistency, and the taste. That afternoon, my husband and I gathered to feed our son his first solids. TOTAL FAIL.
Turns out, kiddo REALLY hates carrots, even till now at 3 years old – probably from the trauma of his first solids experience. He also was that baby who preferred store-bought baby food. I gave in, and accepted that he likes store-bought baby food and I kept the baby food maker away. After a bit, I tried again. Still nope. So when he started having stage 2 (basically over-boiled consistency) of baby food, I’d prepare it in the baby food maker. It’s still in use now as I still make carrot purée for him as he will tolerate it now.
If you are a new parent, I’d suggest you to read up about feeding/cooking for your baby. The Pediatrician’s Guide to Feeding Babies and Toddlers : Practical Answers To Your Questions on Nutrition, Starting Solids, Allergies, Picky Eating, and More (For Parents, By Parents) book helped me a lot.
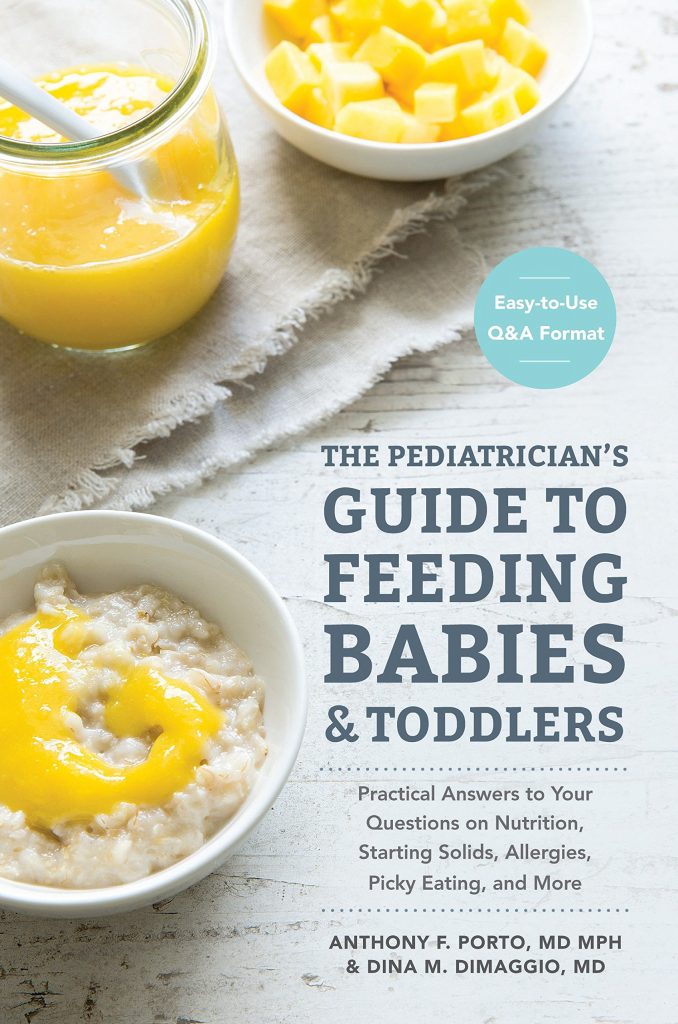
The Pediatrician’s Guide to Feeding Babies and Toddlers : Practical Answers To Your Questions on Nutrition, Starting Solids, Allergies, Picky Eating, and More (For Parents, By Parents)
Check out my first full recipe video here!
Ingredients
- Carrots
- Butter*
Directions:
I am using the Philips Avent 4 in 1 Baby Food Maker in this recipe. The directions in this recipe is per manual. If you are using a different steamer, please follow the instructions on the manual.
As you may have noticed, there’s no amount given with the list of ingredients. This is because I simply go according to the max line on the blending jar. I cook in bulk and freeze the rest for another day.
- Peel, rinse and cut carrots into small cubes. (according to the manufacturers manual, food should be cut into cubes no bigger than 1cm)
- Fill 200ml of filtered water* – or till it reaches the 20 minute mark
- Turn the dial to 20
- Once the steamer beeps, turn it to the blending function.
- Open carefully, discard some water for thicker purées, add butter**
- Blend in intervals till desired consistency.
- Serve
Tips:
- * Filtered water : Using filtered water will help reduce the chalk build up in your appliances where water is needed. Regular tap water is fine to use too.
- ** Butter : Add any healthy fats such as butter, olive oil (taste might be too overpowering), or avocado oil. This was the recommendation from my son’s paediatrician and can be omitted. Actually, the recommendation was to use rapeseed oil, but since learning and eating the keto way, I only use these 3 oils for my son.
- Make purées in bulk and freeze them. You can also add it to sauces and soups for an additional veggie boost.
Enjoy!
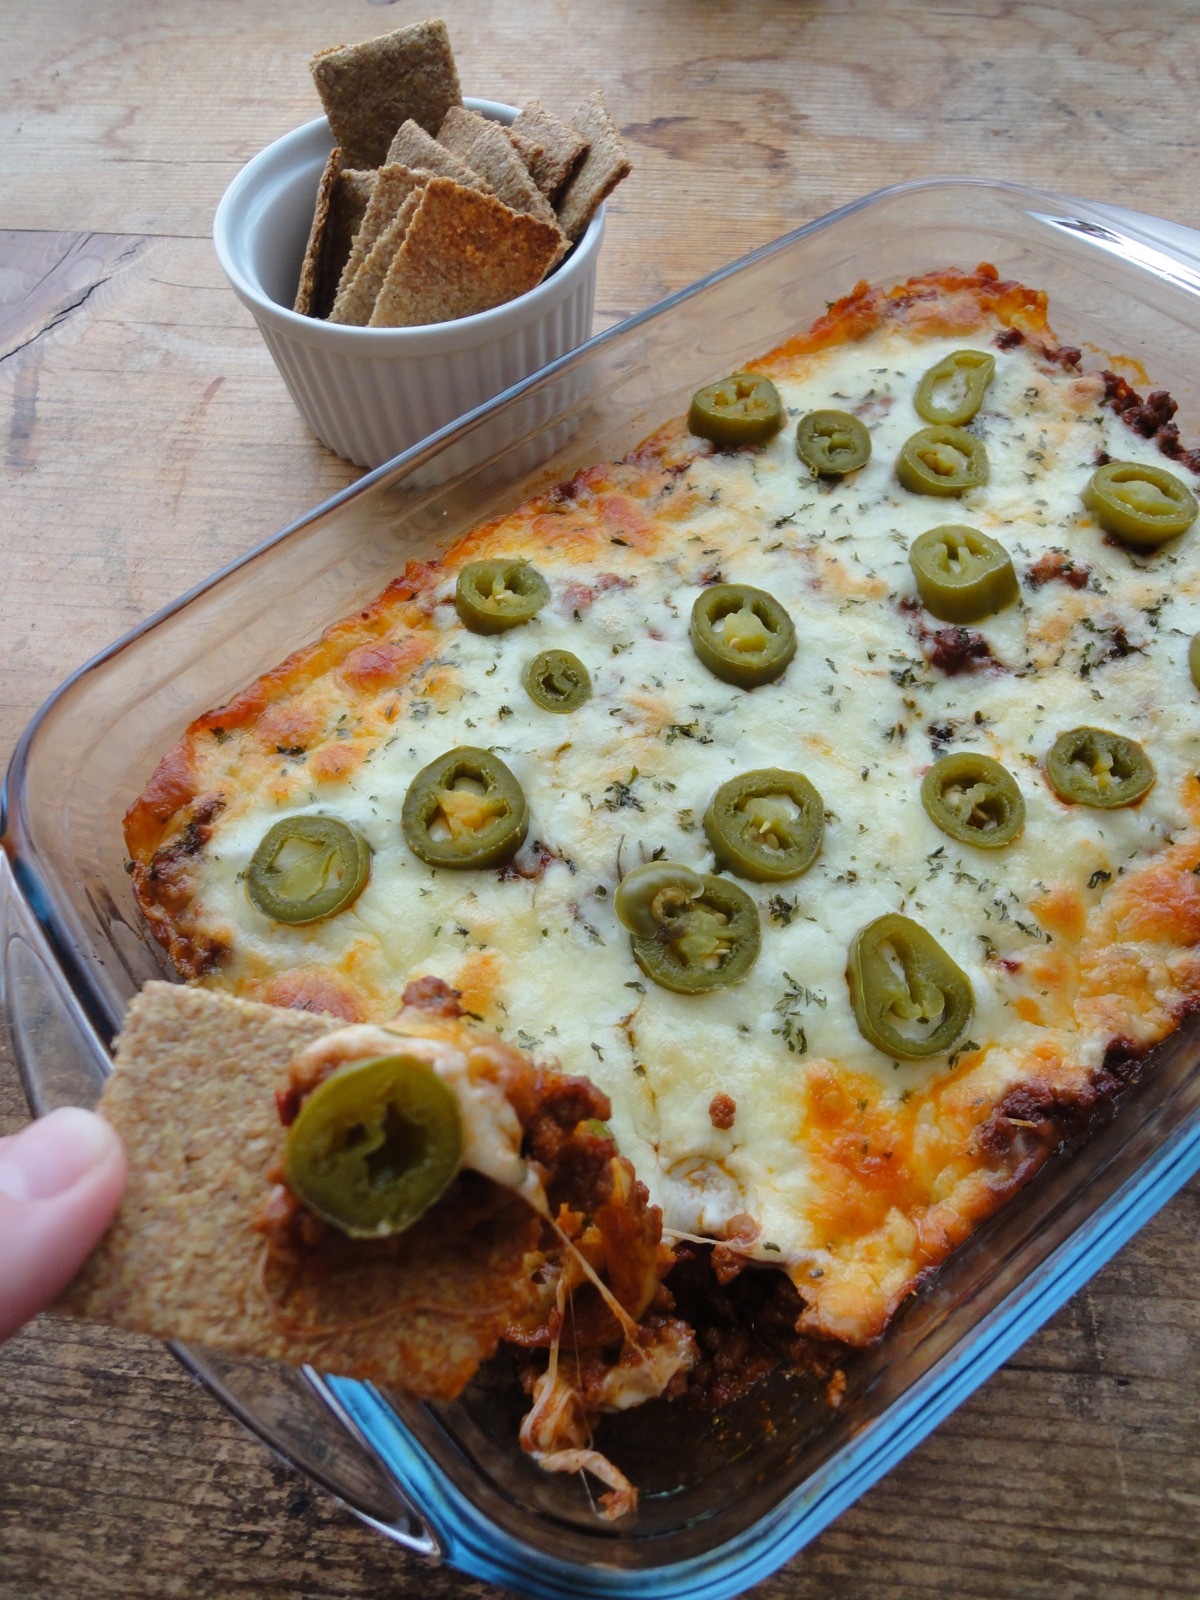
Spicy Cheeseburger Casserole (Keto-Friendly)
I’ve been slacking on my blog because I have been repeating my meals. Since I started Keto, I’ve actually had lots of ideas but often enough I repeat it and since it’s simple grilled meat with some veggies on the side, I didn’t think it would be worth a post for it.
The past month, I’ve been eating lots of naked burger’s. Why naked? Because it’s a regular burger sans the burger bun. Instead I use some lettuce or when I’m feeling a little ambitious, I would make some Oopsie Rolls to go with it. But after some time, I was actually getting sick of burgers. However, I still had lots of frozen burger patties left. I bought lots of it because hey! We love burgers! And since I just got a new freezer with lots of space and the burger patties were selling half price at my local grocery store so, why not! So I gladly stocked up on burger patties. Double score!
Since I started getting sick of it, I just minced it up, mixed together some spices, topped it with cheese and jalapeños, baked it and Voilà.! A new dish from burger patties. But when I ran out of burger patties, I started using minced meat for this dish. I can get minced meat relatively cheap here because I buy it for half the price when it’s on sale (about once a month) and I buy at least 3 kg’s of it and freeze it or make it into homemade burgers, meatballs, salisbury steak or bolognese.
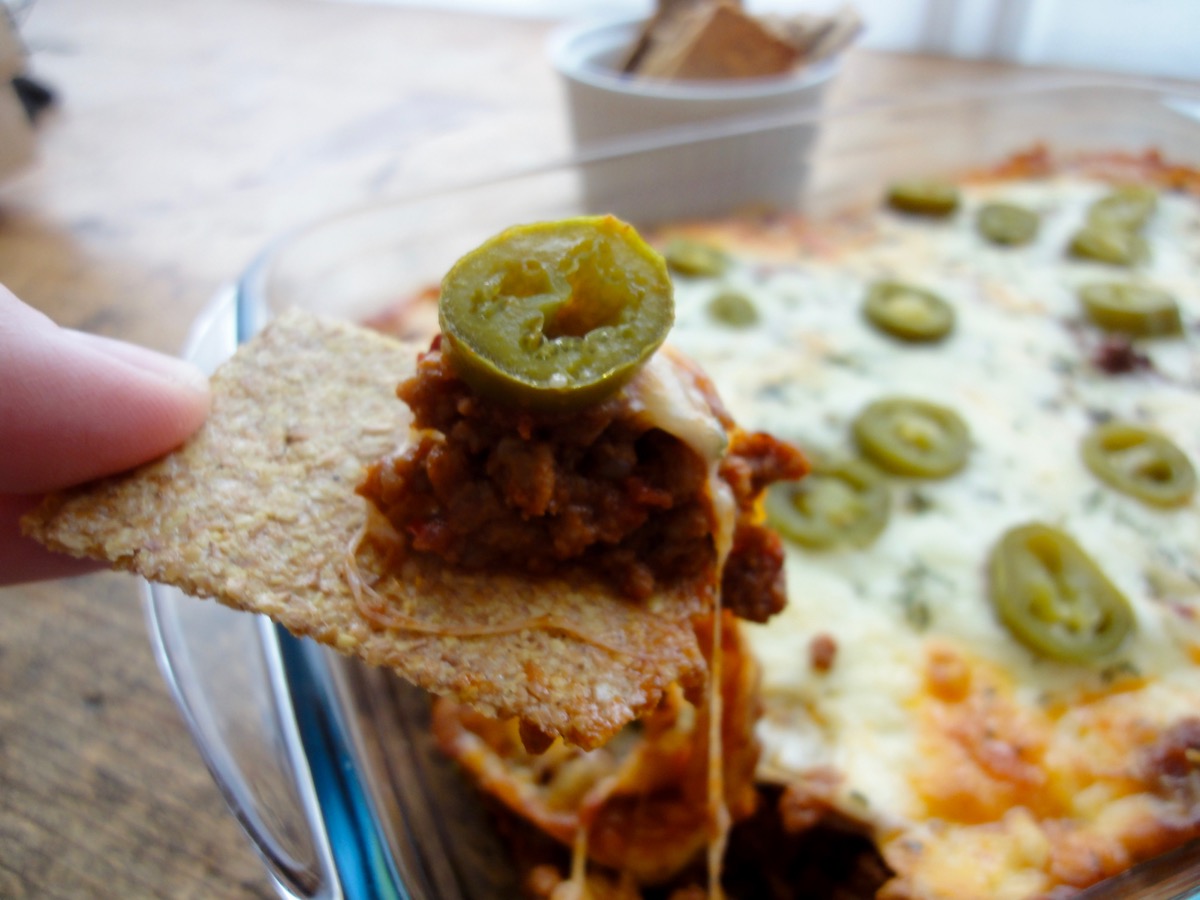
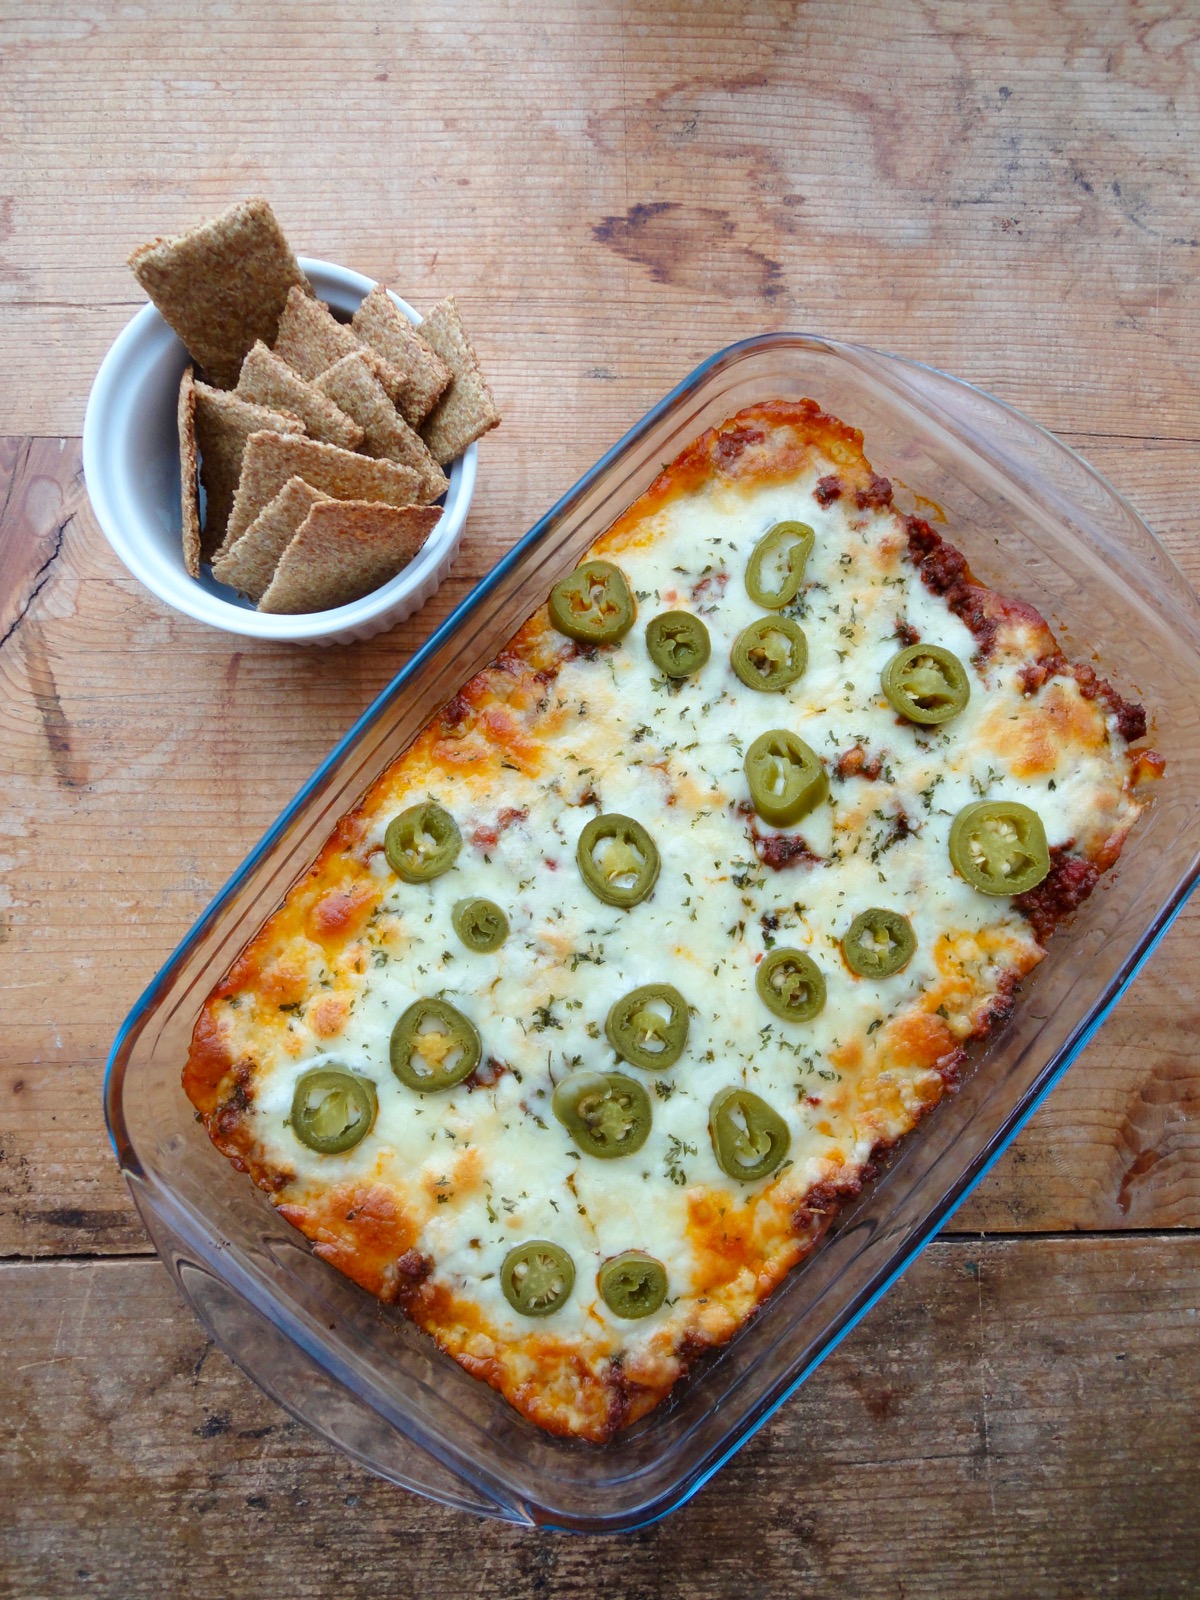
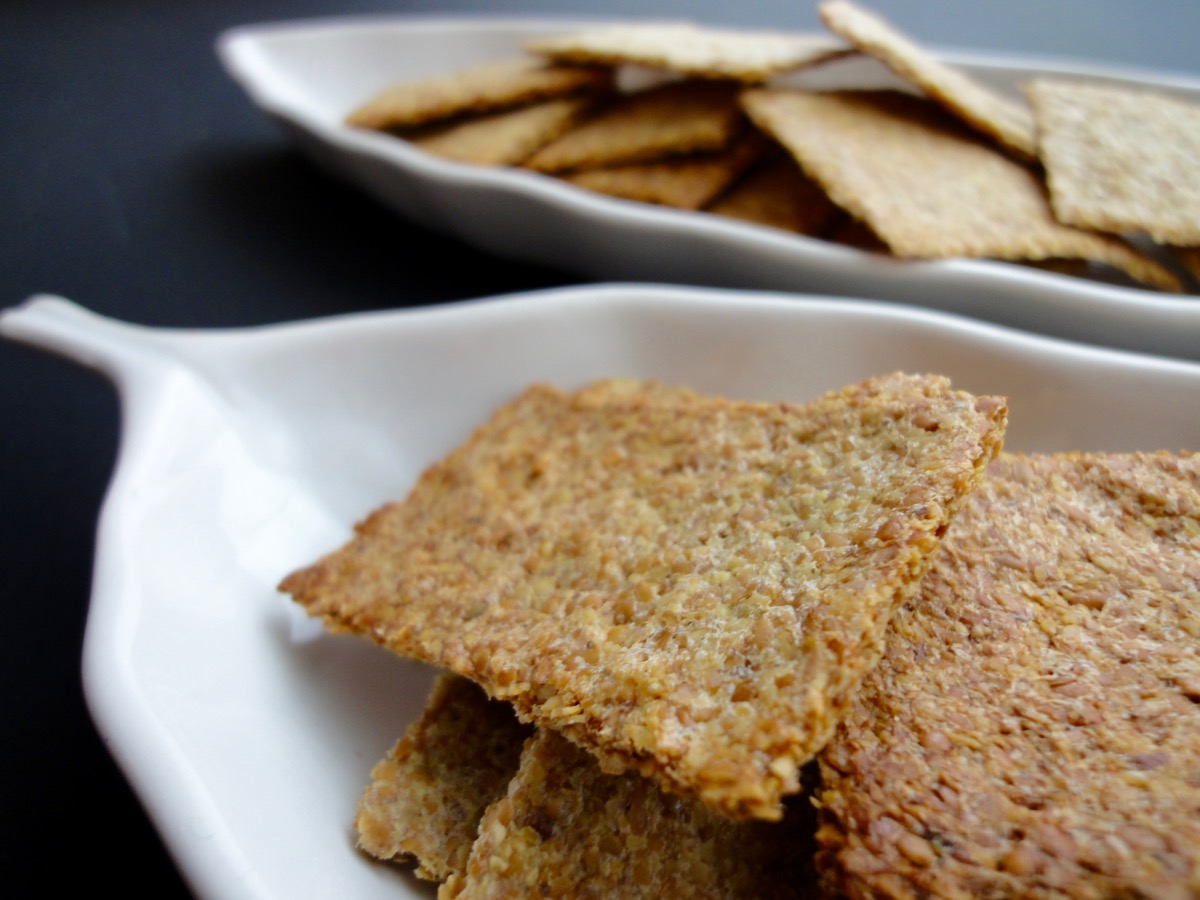
This has got to be one of my favourites! Fast, simple and easy to put together dinner. Plus, I get to make some Keto Flaxseed Chips to go with it. I like to eat it like a dip.
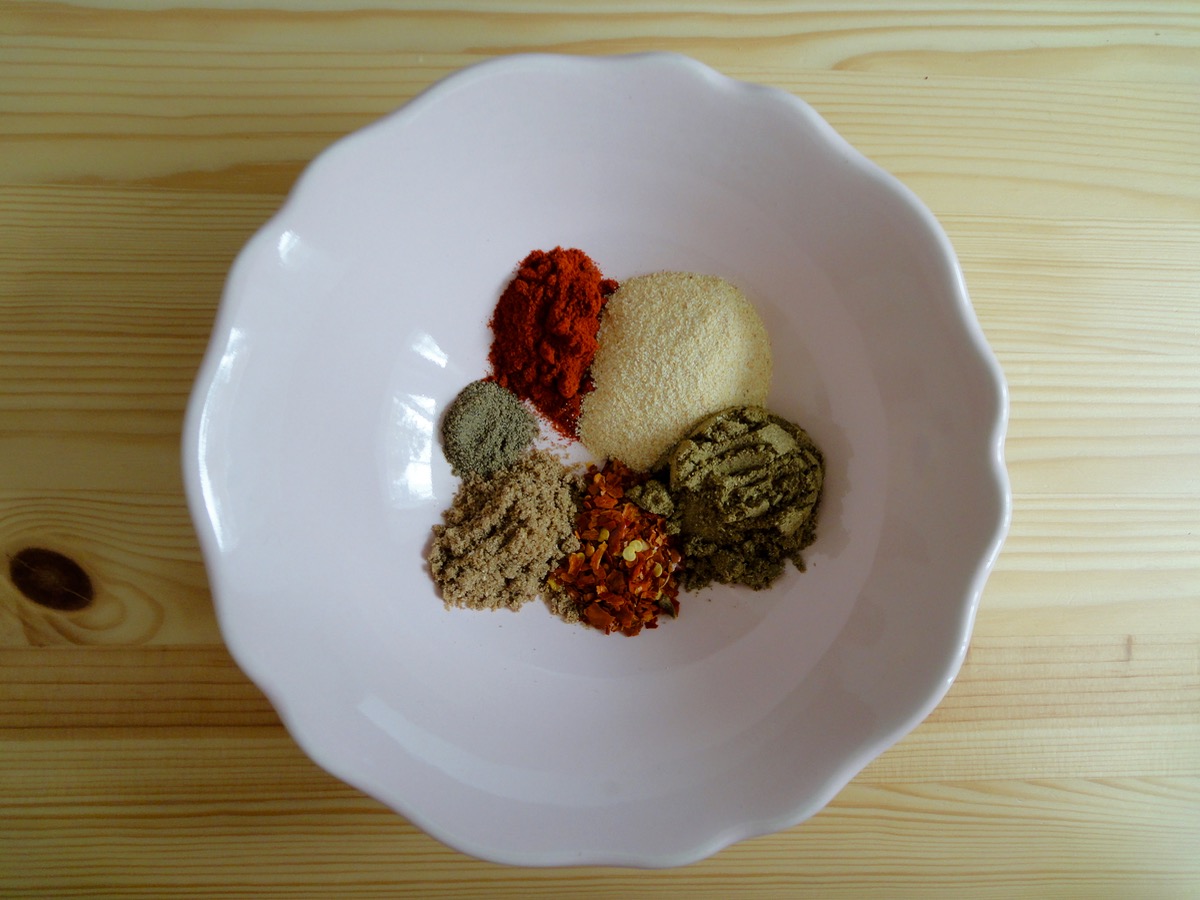
Seasoning Mix – Paprika Powder, Garlic Powder, Cumin Powder, Dried Chilli Flakes, Coriander Powder & Black Pepper Powder.
Seasoning Mix
- 2 teaspoons Cumin Powder
- 2 teaspoons Paprika Powder
- 1 teaspoon Dried Chilli Flakes
- 2 teaspoons Garlic Powder
- 1 teaspoon Coriander Powder
- ¼ teaspoon Black Pepper
- 1-2 teaspoons Himalayan Pink Salt
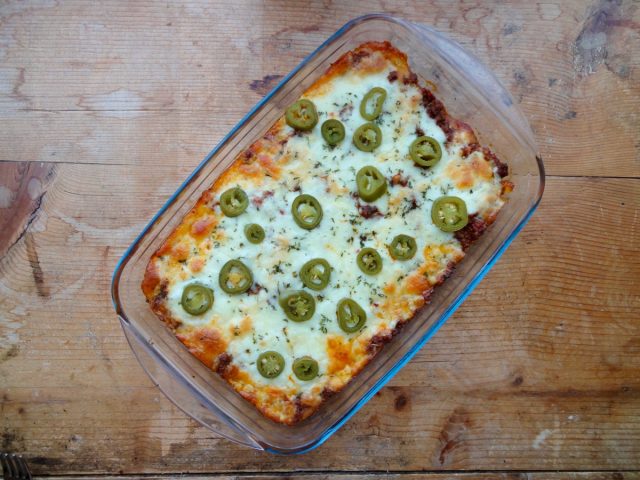
Cheeseburger Casserole
- 500 grams / 1 pound Minced Meat
- 200 grams / ½ can Chopped Tomatoes (sugar free/reduced sugar)
- 2 Tablespoons Tomato Paste (sugar free/reduced sugar)
- 2 cups Mozzarella Cheese, shredded
- For Garnish Jalapeño Slices
Directions:
- Seasoning Mix
- Mix ingredients together and set aside.
- Cheeseburger Casserole
- In a medium non-stick pan, heat up coconut fat and brown minced meat.
- Add tomato paste, chopped tomatoes and seasoning mix.
- Stir and cook through.
- Transfer cooked meat into a greased dish.
- Top with mozzarella and jalapeños.
- Bake for 20 minutes at 180’C or till cheese has melted and turned golden brown.
- Serve with a side of sour cream, salad and keto flaxseed chips.
Tips:
- Conversion Chart
- You can adjust seasoning according to what you like. I like mine a little spicy so I add a chili powder mix of cayenne, chili, cumin, and paprika.
- If you are using MyFitnessPal app to count calories, first copy the recipe URL then go to MyFitnessPal app to Recipes, select Create a New Recipe, then Add from the Web. Paste the URL, match ingredients and that’s it!
- Always match ingredients to the ones you use. Ingredient nutritional facts differ depending on brand.
- Nutrition Facts (based on my ingredients) : Per serving (1/4) 443 kcal, Total Fat – 28 g, Total Carbs – 9 g, Fiber – 2 g = NET Carbs – 7 g, Protein – 39 g.
- If you find that there’s too much meat in the dish, simply load up on the cheese or fat and increase serving size or simply reduce amount of meat.
Enjoy!

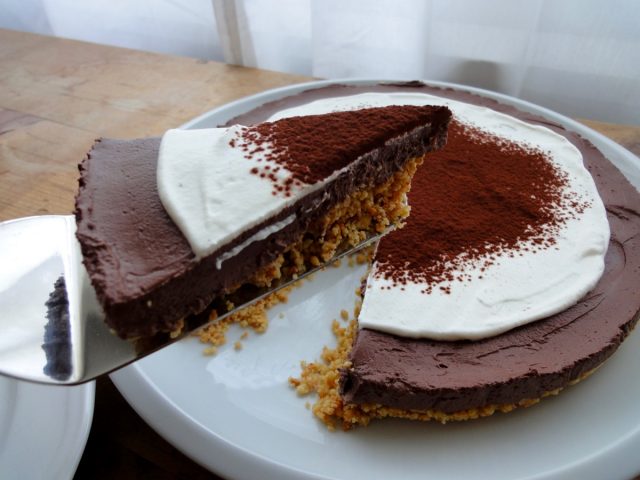
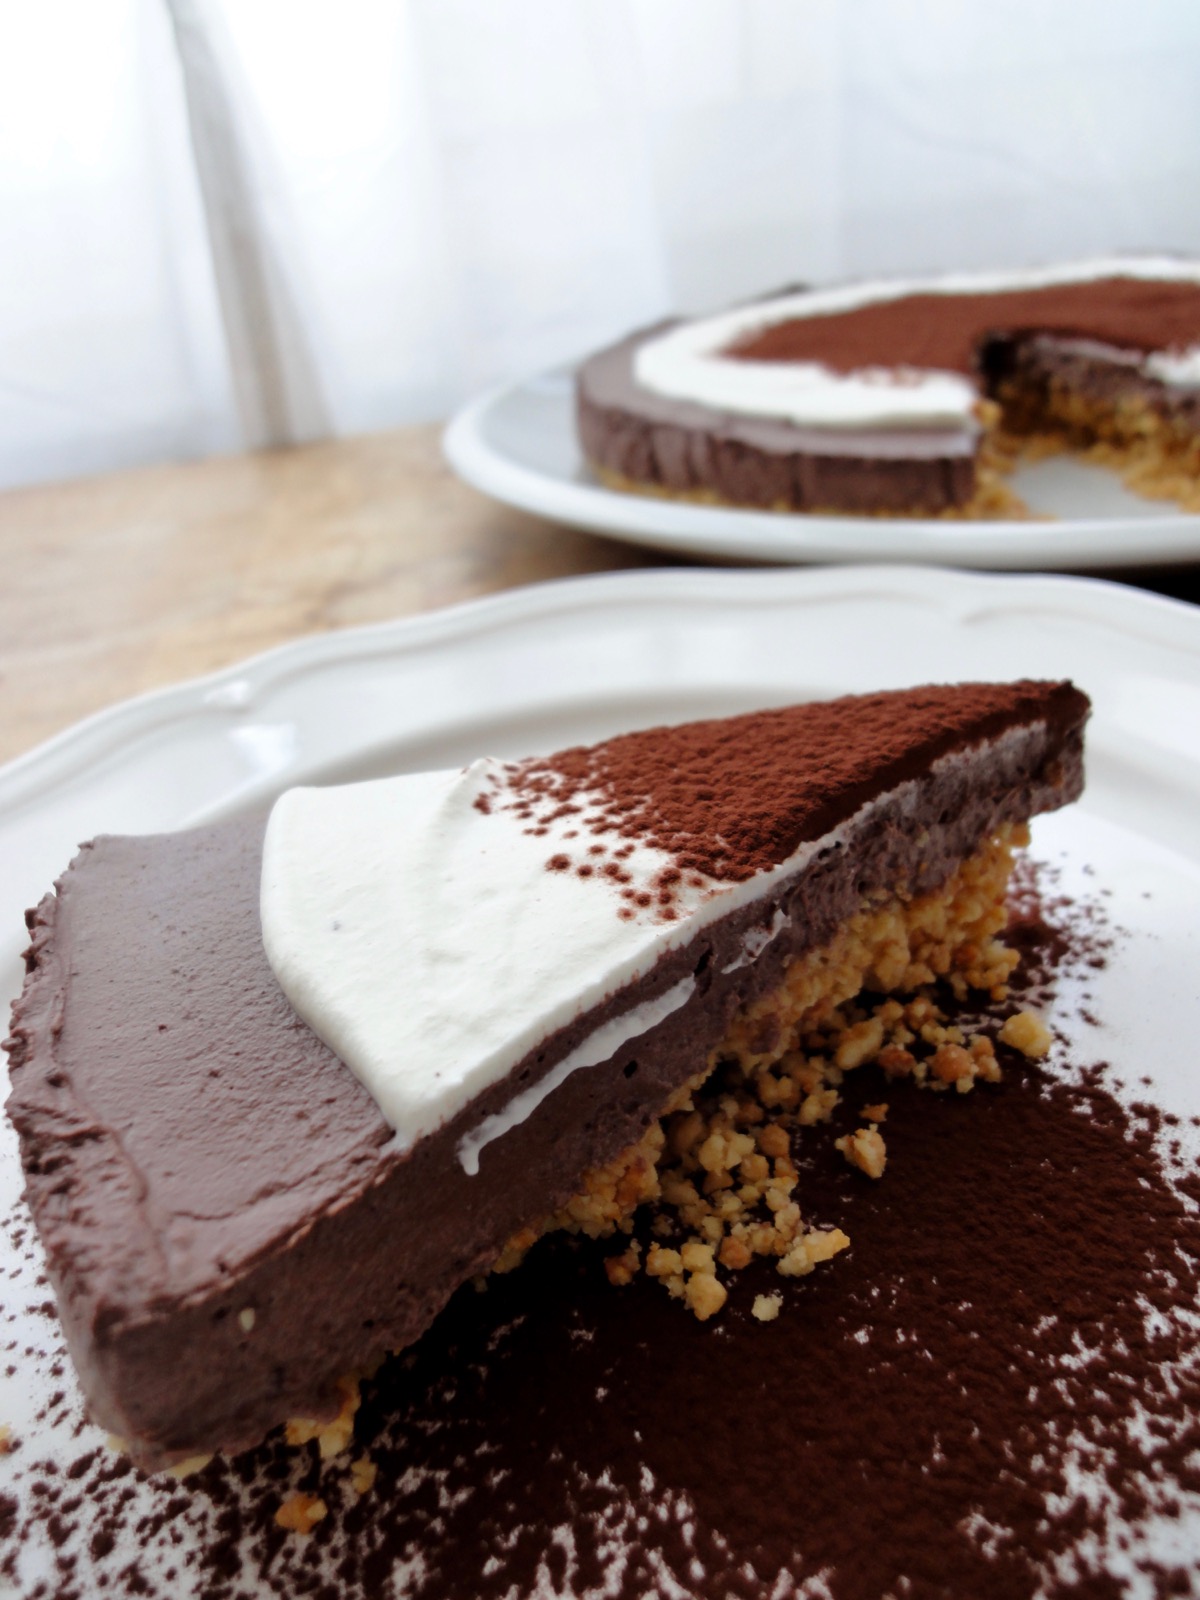
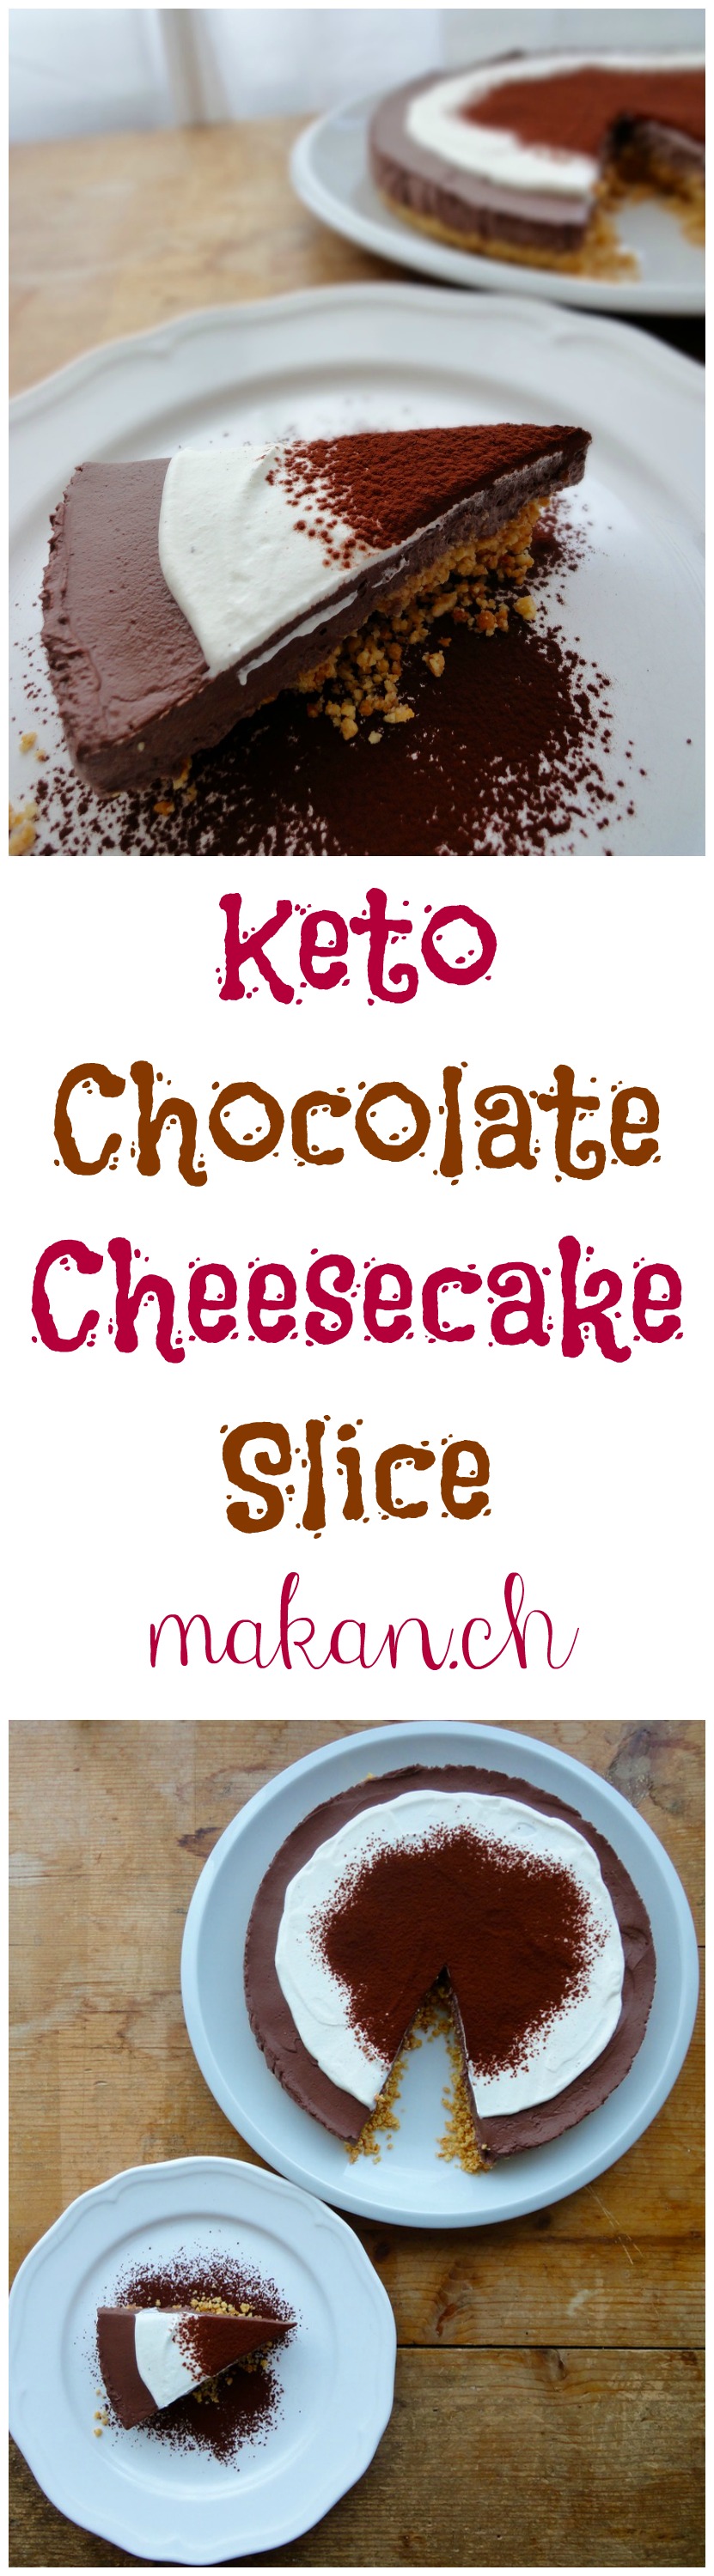
Keto Chocolate Cheesecake Slice
I like cheesecake. I just suck at making them. I’ve tried regular cheesecakes, keto cheesecakes, vegan cheesecakes…I’ve baked it, steamed it, waited hours and hours just for a meh cheesecake. Finally, I decided to make a no-bake cheesecake. Cus, I hate waiting long.
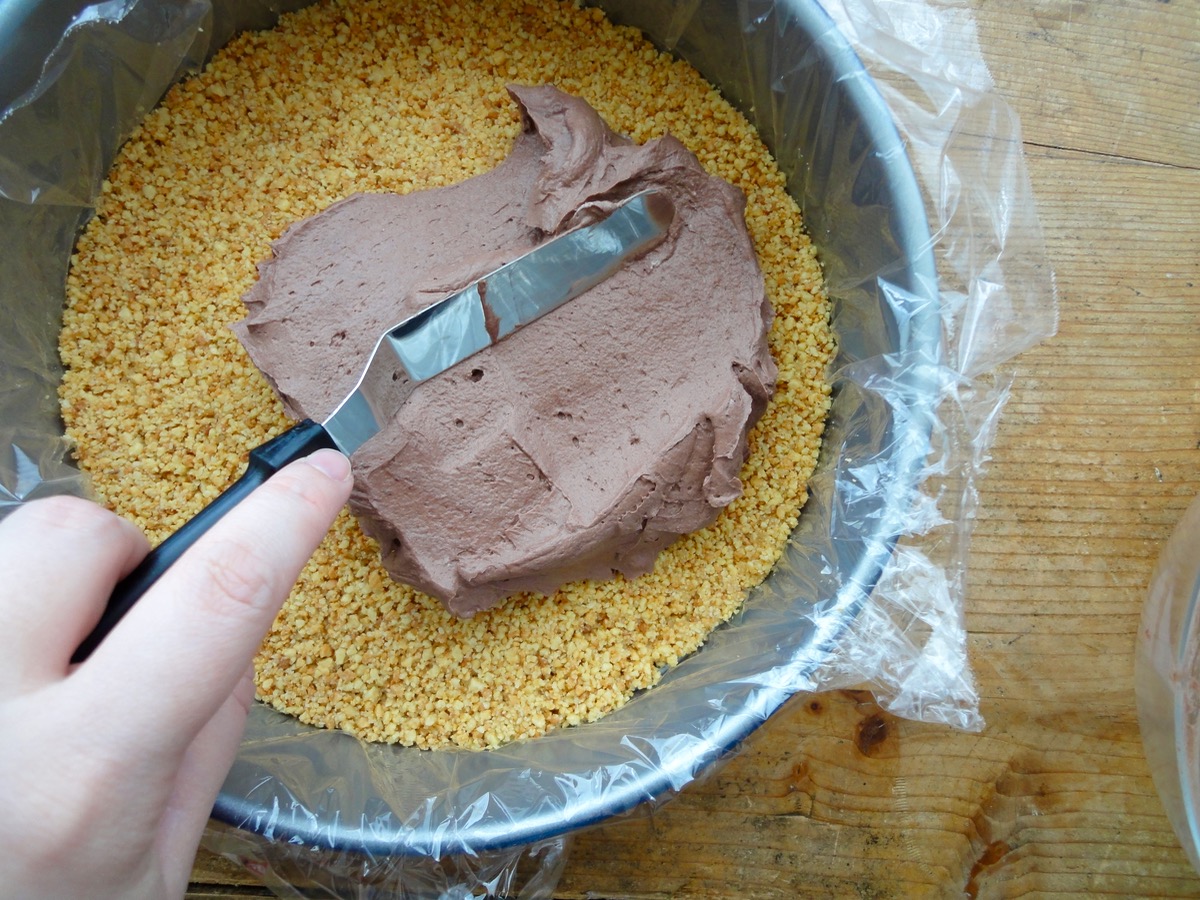
It started with searching for the base. I can’t use graham crackers or petit beurre – which I love as a base, so I found a keto friendly sweet crust pastry from the KetoDietApp. I had lots of almond flour/meal that needed to be used up by the end of May, score! The crust tasted perfect! But being me, I decided to crush the crust up after it was baked to make the cheesecake base. What I should have done was just to leave it in it’s pie base form and top it with the cheesecake filling. The crushed crust did not stick even after adding 5 tablespoons of melted butter. It still turned out fine, just that the base does not hold much. So it’s not completely a no-bake cheesecake since I did bake a crust for it. If you have some keto cookies around, grind it up and use it.
This cheesecake started out as just a regular no bake cheesecake. What I wanted was a 2 layer cheesecake, cocoa and vanilla.Then I took half the filling out to mix it with unsweetened cocoa powder and it tasted better and got thicker which held better compared to the one without. So I mixed both with cocoa powder. All in all, I spent 2 1/2 hours before I was ready to cut myself a slice. AWESOME! But honestly, it does taste better after 12 hours of chilling. ?
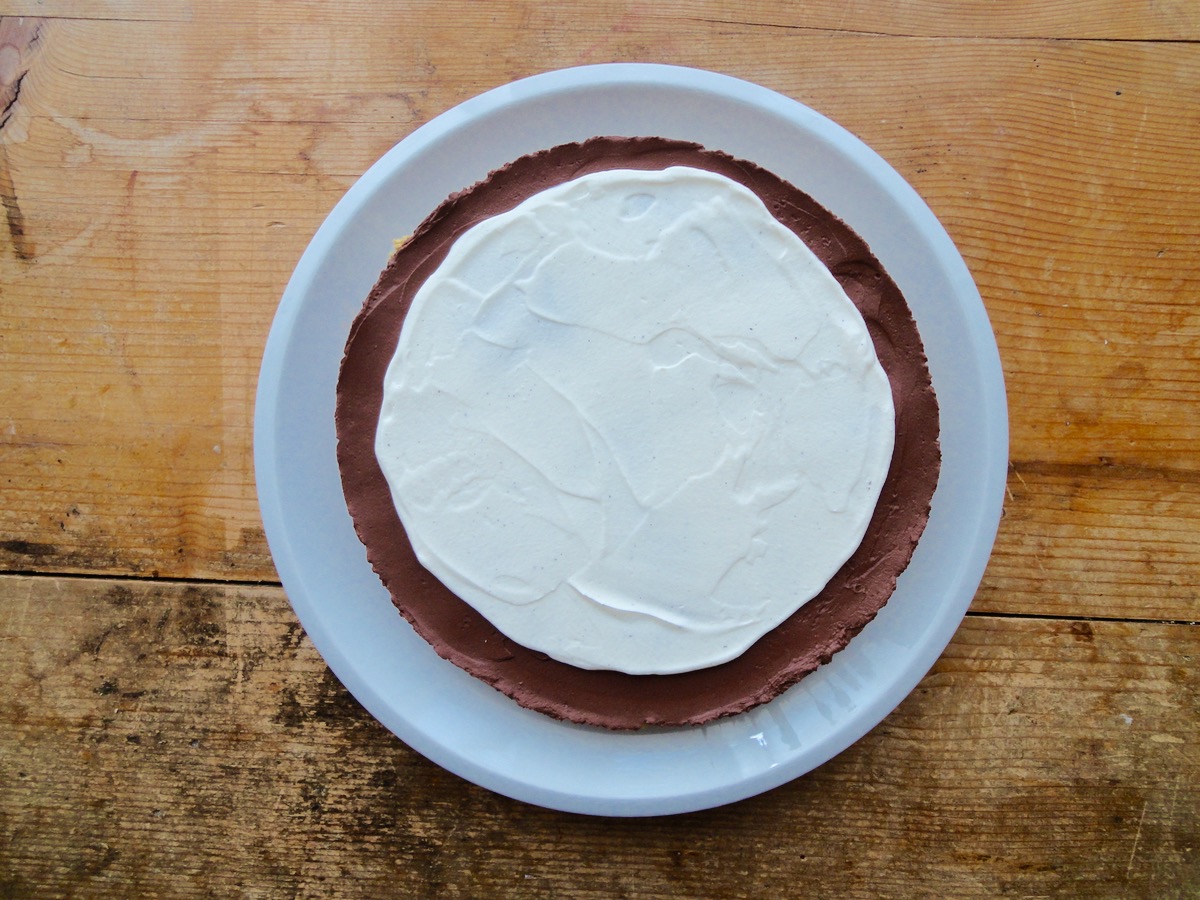
Before cocoa dusting.
Almond Crust
- 1¾ cup Almond Flour/Meal
- ¼ cup Whey Protein (Vanilla/Unflavoured)
- 4 Tablespoons Keto Friendly Sweetener (Erythritol, Stevia...)
- ¼ teaspoon Salt
- 1 Egg
- 2 Tablespoons Butter, melted or Coconut Oil
Chocolate Cheesecake Filling
- 1 cup Heavy Whipping Cream
- 250 grams (one 8 ounce package) Cream Cheese
- 1 teaspoon Lemon Juice
- 4 Tablespoons Unsweetened Cocoa Powder
- 30 grams / 1 scoop Whey Protein (Vanilla/Unflavoured) *optional
- 2-3 Tablespoons Keto Friendly Sweetener (Erythritol, Stevia...)
- 1 Tablespoon Vanilla Extract
Topping
- ¼ cup Heavy Whipping Cream
- 1 pod Vanilla Beans
- 2 teaspoons Keto Friendly Sweetener (Erythritol, Stevia...) * optional
Directions:
- Almond Crust
- Preheat oven to 175°C (350°F). Grease a nonstick round (I used a 9-inch) cake pan or place parchment paper in a round cake pan. Set aside.
- Mix all the almond crust ingredients in a food processor or by hand till it forms a dough.
- Place dough into prepared cake pan. Evenly flatten the dough. Alternatively, roll the dough out between 2 parchment papers before placing it in cake pan.
- Prick some holes in the dough. Bake for 13-15 minutes or till golden brown and cooked through.
- Remove from oven and allow to cool completely.
- If you want to crumble the crust up like what I did, just add 5-6 Tablespoons of melted butter to the crumble and press into cake pan. Chill for 10 minutes before use. I would not recommend this method though.
- Chocolate Cheesecake Filling
While your crust is cooling, you can make the filling for the chocolate cheesecake. I like to use cream cheese out of the fridge to quicken the chilling process.
- In a large bowl, whip heavy whipping cream and sweetener till stiff.
- Add cream cheese, lemon juice, cocoa powder, whey protein*optional and vanilla extract. Mix till well combined.
- Refrigerate till crust is completely cool
- Topping
- In a medium bowl, whip heavy whipping cream, sweetener *optional and vanilla beans till stiff.
- Chill in fridge until needed.
- Assembling cheesecake
- Once the almond crust is completely cool, loosen the crust from the pan.
- Spread chocolate cheesecake filling with a spatula onto almond crust.
- Allow the chocolate cheesecake to set in the fridge for an hour.
- Once set, thinly spread the whipped cream for topping.
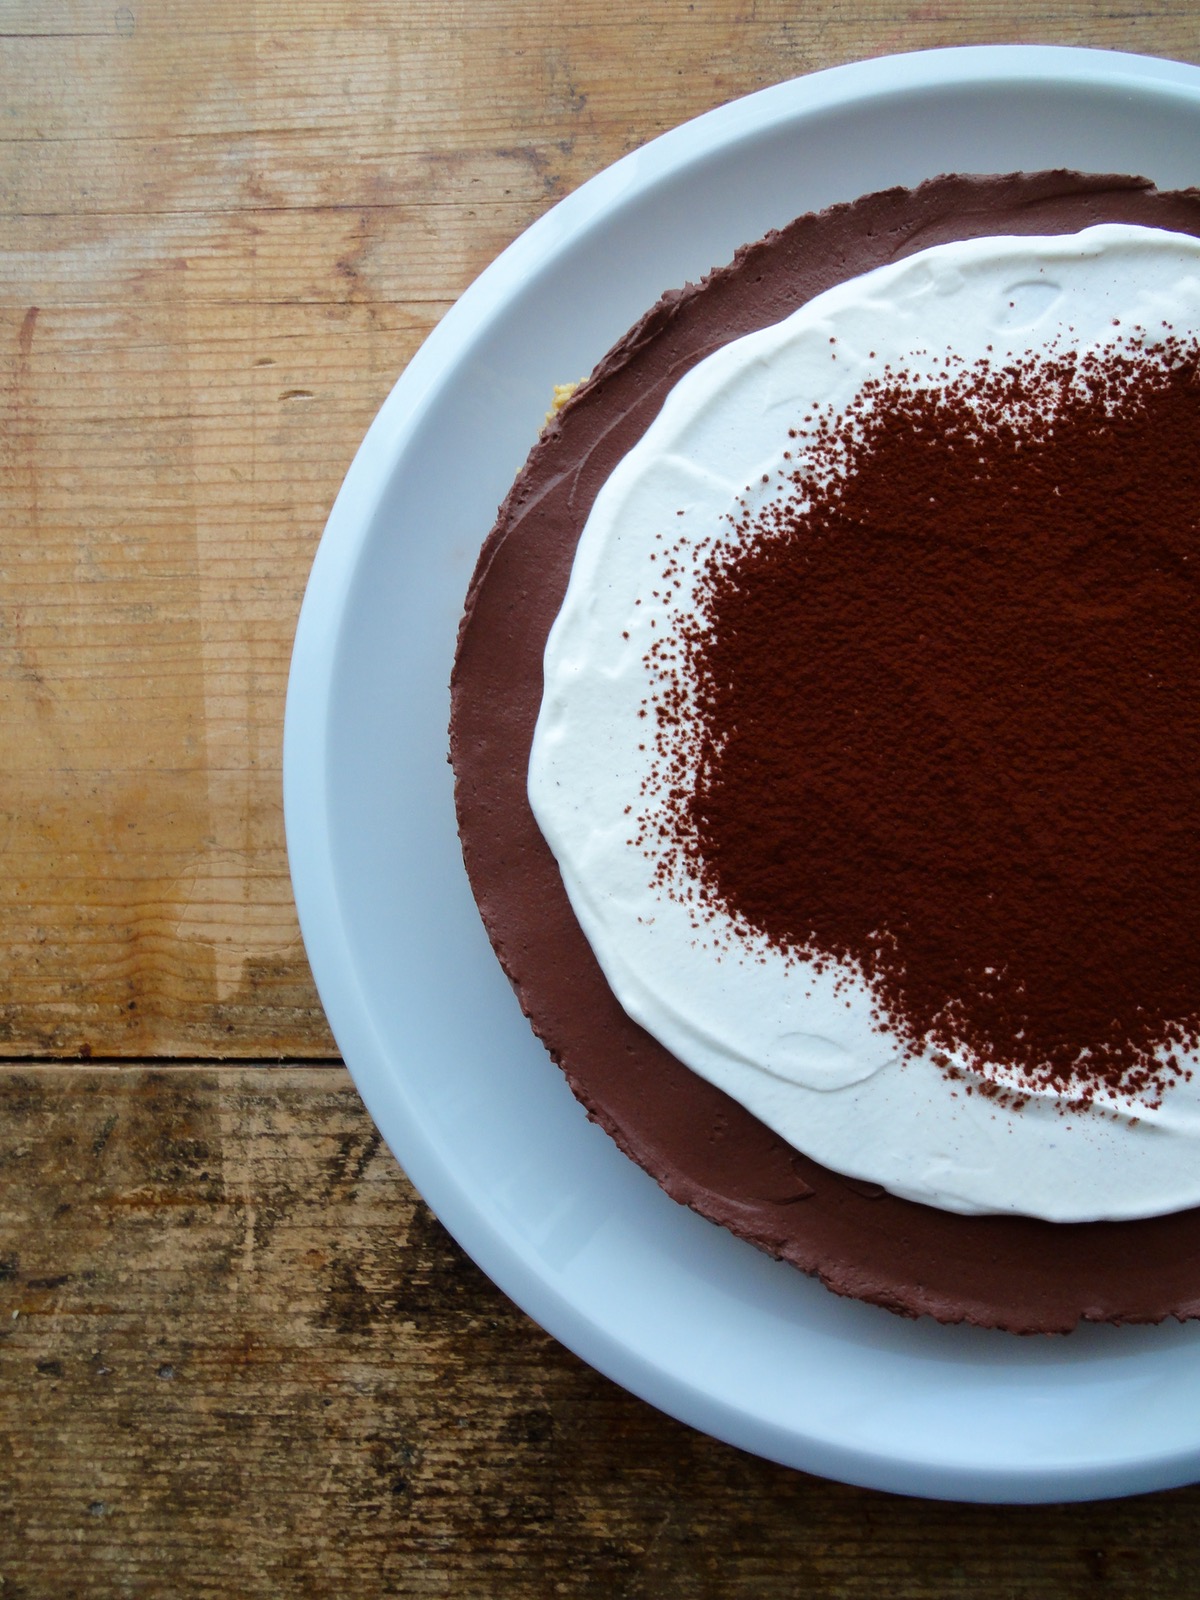
- Dust with cocoa powder and serve!
Tips:
- Conversion Chart
- If you have some keto cookies around, grind it up and use it as the base.
- If you want a thinner crust, simply half the almond crust recipe.
- I added a scoop of whey protein into my cheesecake filling just to give it a protein bump. This is completely optional.
- Honestly, it tastes better after 12 hours of chilling. ?
- If you are using MyFitnessPal app to count calories, first copy the recipe URL then go to MyFitnessPal app to Recipes, select Create a New Recipe, then Add from the Web. Paste the URL, match ingredients and that’s it!Always match ingredients to the ones you use. Ingredient nutritional facts differ depending on brand.
- Nutrition Facts (based on my ingredients) : Per serving (1/12) 231 kcal, Total Fat – 17 g, Total Carbs – 3 g, Protein – 9 g.
Enjoy!
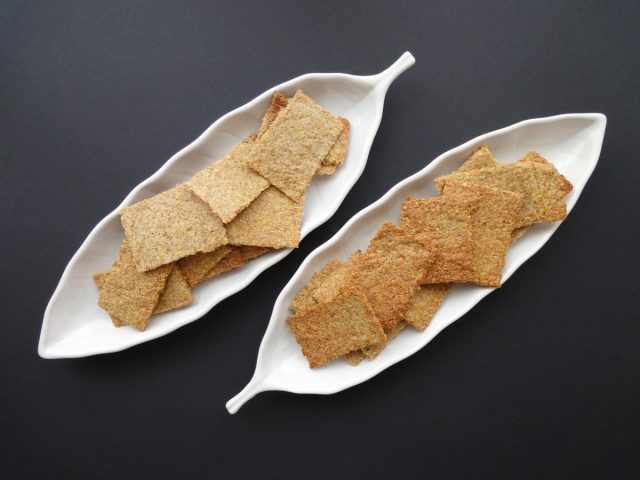
Keto Flaxseed Chips
Hello, hello! I’ve not been spending time on my blog for the past month! Honestly, I’m running out of ideas and I’ve been eating simple meals which I think don’t need to be on the blog. Anyways, I’m getting my groove back and certainly meal ideas for those who are on the keto way of eating.
Most chips sold in supermarkets are made from either potatoes or flour, which are obviously high in carbs. There’s reduced fat, fat free, sodium free and gluten free, but no low carb. So I was looking for something crunchy to snack on or have as dips and I came across this Low Carb Flaxseed Chips from Low Carb Recipe Ideas. I tried it out and got hooked. Hooked so much, I would make it at least once a week.
You can adjust seasoning according to what you like. I like mine a little spicy so I add a chili powder mix of cayenne, chili, cumin, and paprika. These chips are perfect as a dip or a high fiber snack.
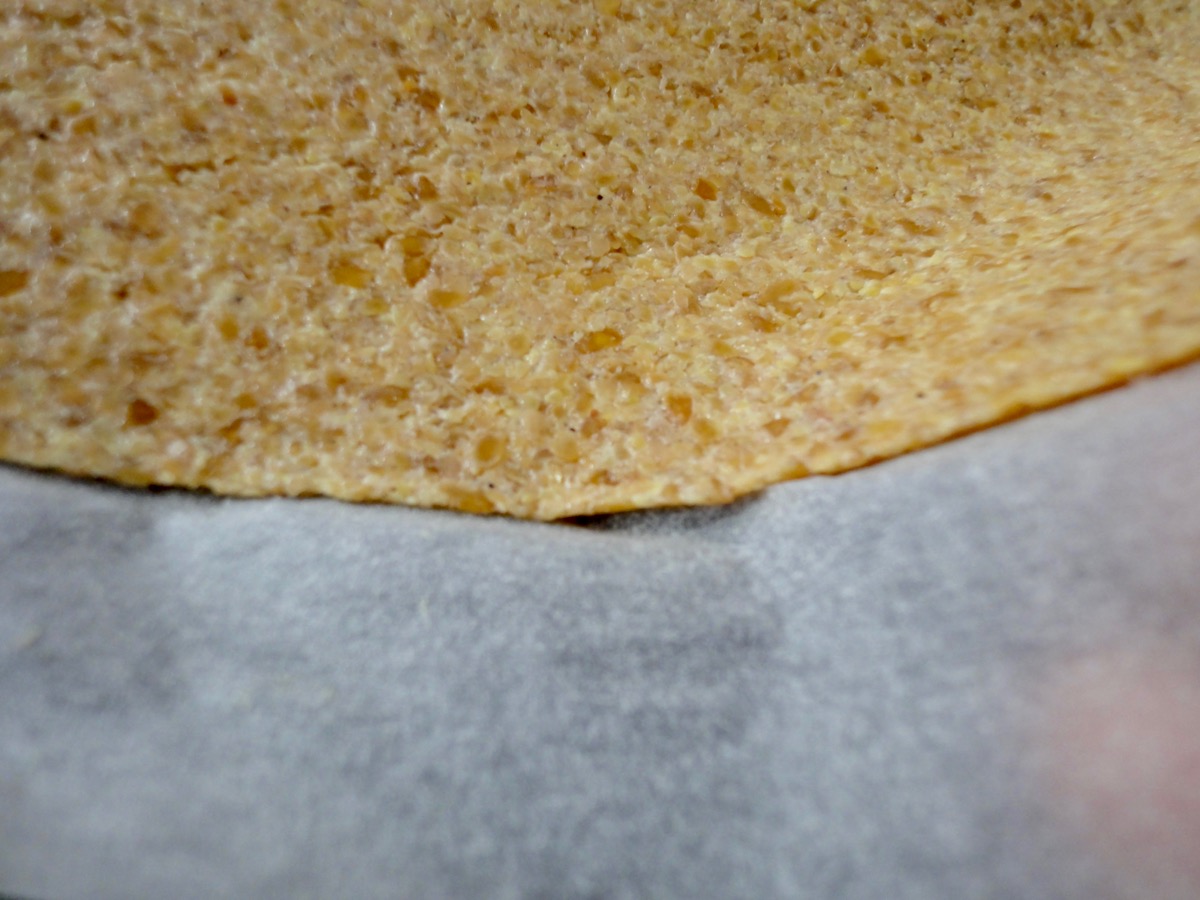
Roll it out as thin as you can between 2 parchment papers.
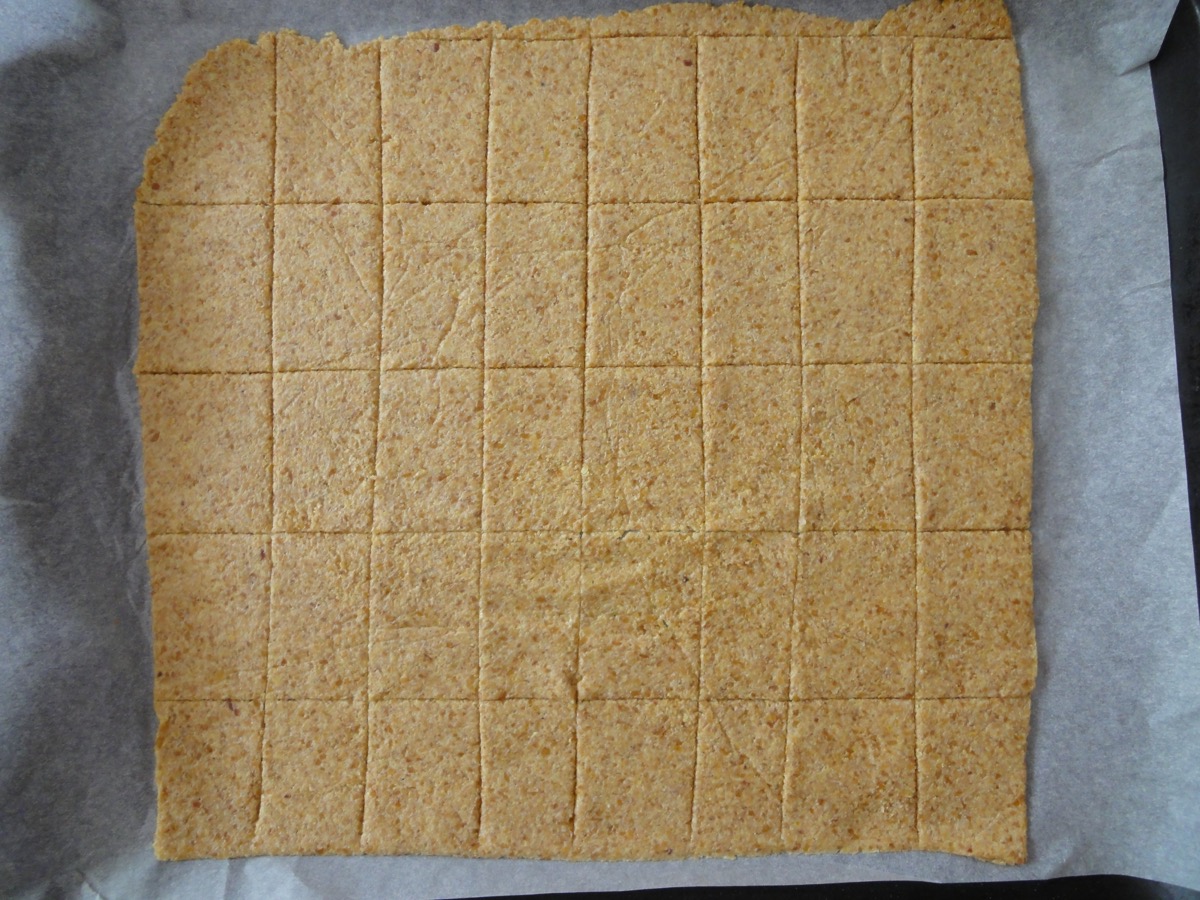
Cut it with a pizza cutter before baking.
Ingredients
- 1 cup Flaxseed Meal (Golden or Brown)
- 2 teaspoons Garlic Powder
- 2 teaspoons Onion Powder
- 2 teaspoons Chilli Powder Mix (Cayenne, Paprika, Chilli) *optional
- ½ cup Water
Directions:
- In a bowl, mix ground flax meal and seasonings well.
- Add water and mix till combined with a spatula.
- Cover and set the dough aside for 10 minutes.
- Pre heat oven to 200°c (400°F).
- Once dough is ready, roll it out between 2 parchment papers as thin as you like. (cooking times will vary according to thickness)
- Gently pull apart parchment paper from each side of the rolled dough onto the other (this is to make sure it does not stick to the paper while baking)
- Place the rolled dough with parchment paper onto a baking sheet and use a pizza cutter to cut into cracker sized pieces.
- Bake chips for 10-15 minutes (longer if thicker).
- Once chips are baked, turn off the oven, remove and break the crackers. Spread the crackers on the baking tray and return to the oven for another 10 minutes with the oven door slightly opened. (this is to dry it out so it gets crispy)
- Allow crackers to cool completely before storing.
Tips:
- Conversion Chart
- You can adjust seasoning according to what you like. I like mine a little spicy so I add a chili powder mix of cayenne, chili, cumin, and paprika. These chips are perfect as a dip or a high fiber snack.
- If you are using MyFitnessPal app to count calories, first copy the recipe URL then go to MyFitnessPal app to Recipes, select Create a New Recipe, then Add from the Web. Paste the URL, match ingredients and that’s it!
- Always match ingredients to the ones you use. Ingredient nutritional facts differ depending on brand.
- Nutrition Facts (based on my ingredients) : Per serving (8 pieces) 124 kcal, Total Fat – 9 g, Total Carbs – 7 g, Fiber – 6 g = NET Carbs – 1 g, Protein – 4 g.
Enjoy!
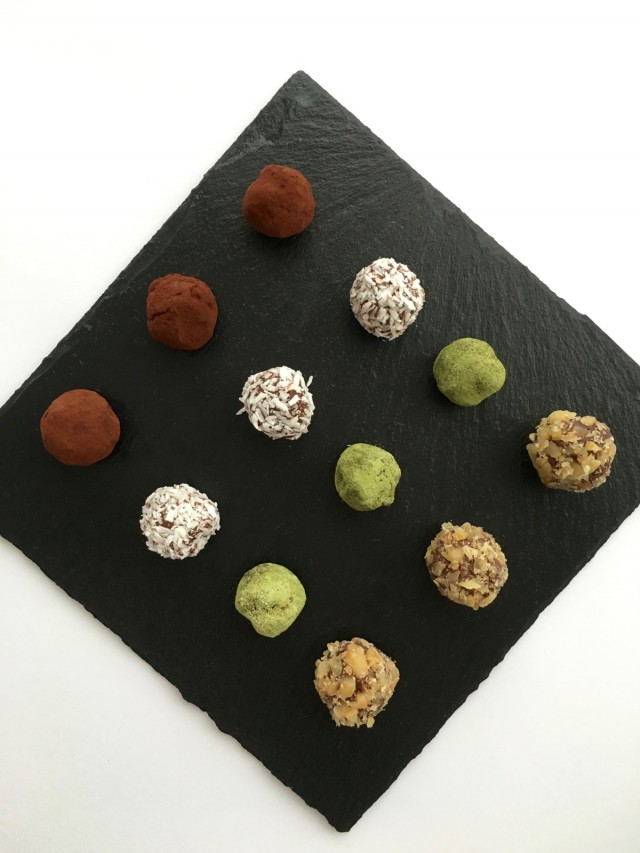
Assorted Keto Coconut Chocolate Truffles
Though living in Switzerland, I don’t eat chocolate every day. But on this way of life, I have at least 1 small chocolate treat a day. As you may already know, there are many types of chocolate. My favourite? None. I will eat all types of chocolate. Yes, I even like compound chocolates which in some countries do not even qualify as chocolate. Heck, I like chocolate so much that I even took a chocolate course and wrote my thesis on chocolate! My thesis was a rush job so there was no proper research or let’s just say, no one will benefit from reading it. 🙂
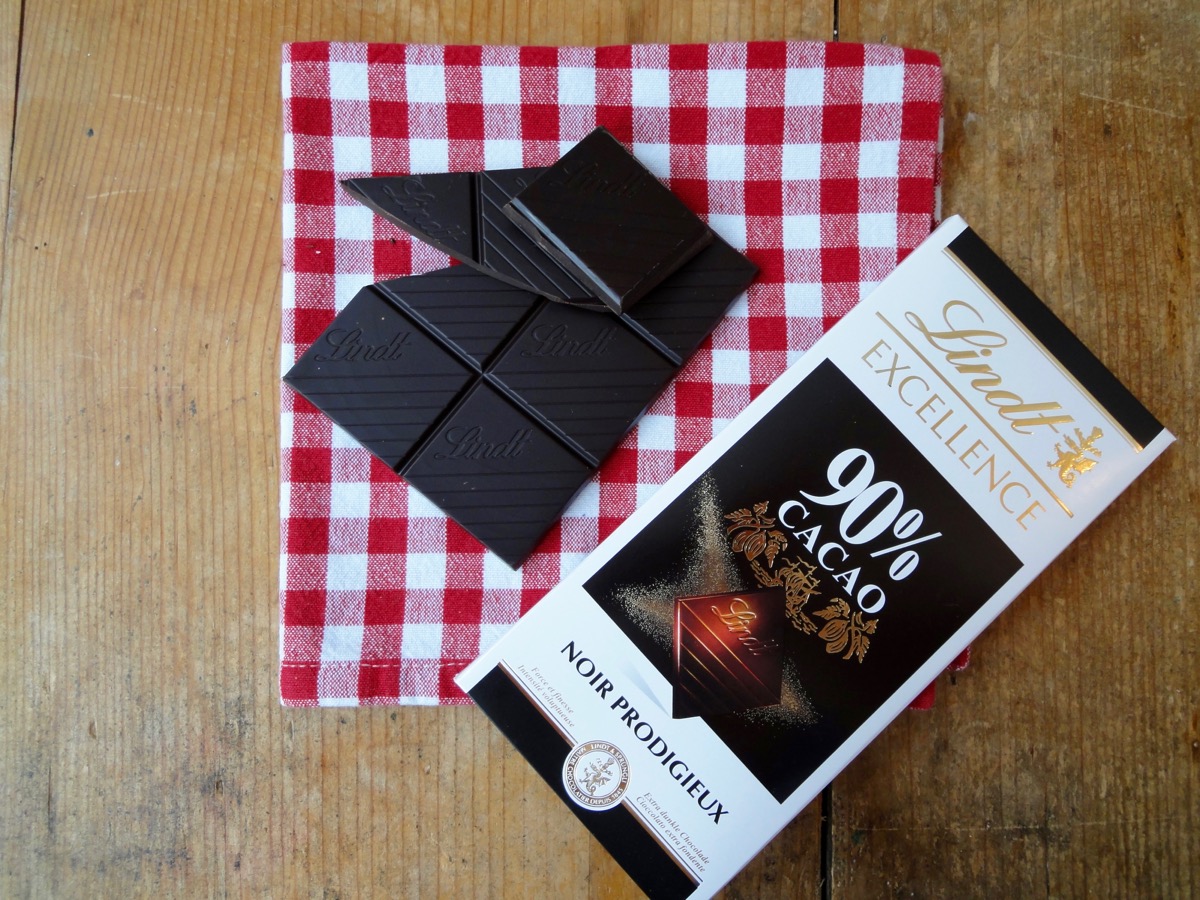
I don’t regularly consume dark chocolate, but on this way of life, dark is about the only way to go. So far I’ve been making treats with 90% cocoa bar. I would say it’s an acquired taste. But you can of course work your way up to it. But 90% is not the highest. There’s a 99% cocoa bar from Lindt that I’ve not tried yet as they don’t sell it at my local grocery store. Have to pay a visit to the Lindt shop one day to get it.
These truffles were made because I was really craving something chocolaty and soft. I was at the grocery store earlier on and there was a full display of easter chocolates as I entered. So I grabbed 2 bars of 90% cocoa bars instead and made these. Cravings satisfied.
Truffles
- 150 grams / 5 oz Dark Chocolate (85% and above)
- 1½ Tablespoons Coconut Oil
- ½ cup Coconut Milk
- 1 teaspoon Vanilla Extract
Topping/Coating
- Walnuts, toasted & chopped
- Matcha Powder
- Coconut Flakes
- Cocoa Powder
Directions:
- In a saucepan, add coconut milk and allow to simmer. Once it starts simmering, remove from heat.
- Add dark chocolate, coconut oil and vanilla extract into the saucepan and stir with a spatula till completely melted and incorporated.
- Transfer coconut chocolate mixture into a container and allow to chill in the fridge for about 4 hours.
- Once completely chilled and hardened, use a melon baller or ½ tablespoon spoon and scoop out chocolate. Shape as desired.
- Coat each truffle in choice of coating.
- Serve!
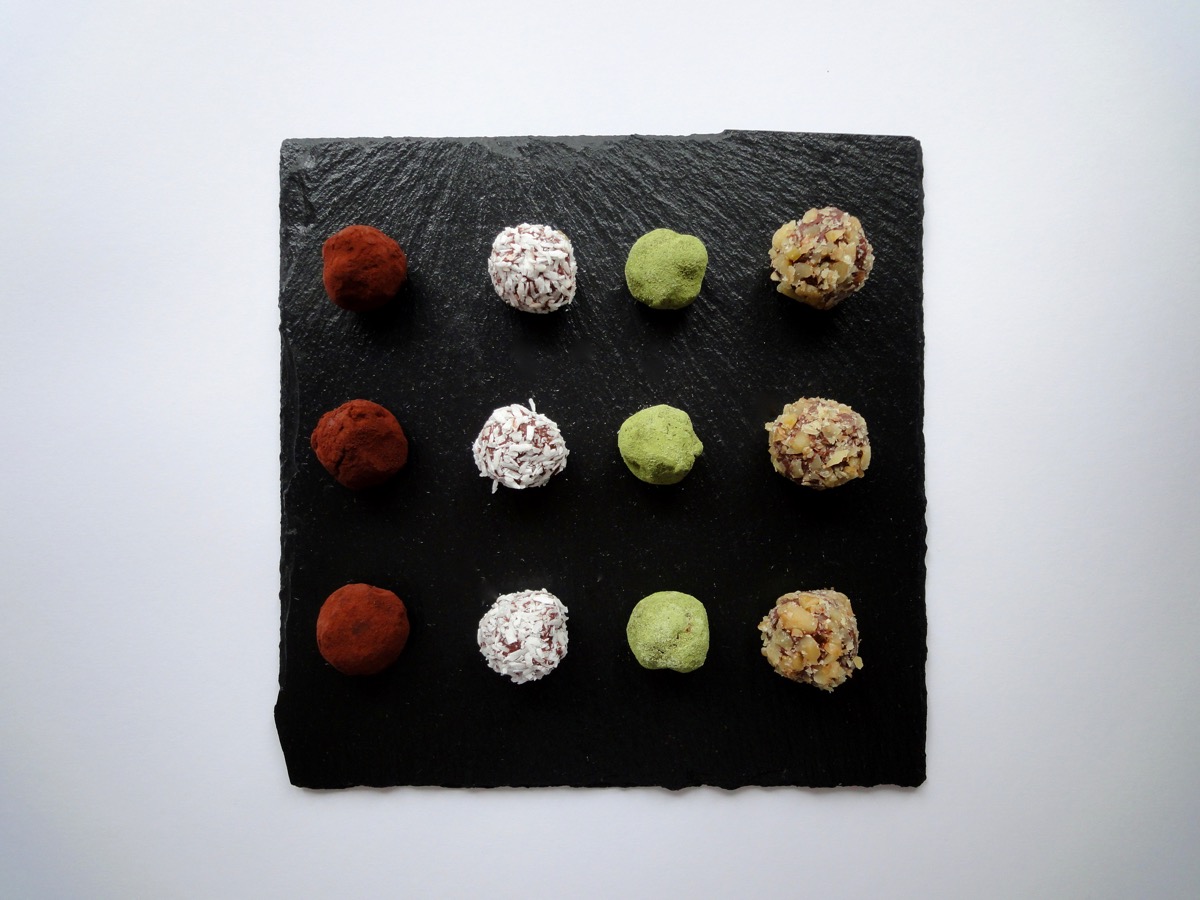
(L-R) Cocoa, Coconut, Matcha, Walnuts
Tips:
- Conversion Chart
- For even less carbs, find the highest content of cocoa bar. I use 90% cocoa bars for this recipe. Soon, I would test it out with 99% cocoa.
- Since this recipe does not have any added sugar or sugar alcohol in it, the sweetness comes from the coconut milk and dark chocolate. However, if you wish to add any sweeteners to it, feel free to do so.
- I got 34 pieces of truffles with 1/2 tablespoon per truffle.
- If you are using MyFitnessPal app to count calories, first copy the recipe URL then go to MyFitnessPal app to Recipes, select Create a New Recipe, then Add from the Web. Paste the URL, match ingredients and that’s it!
- Always match ingredients to the ones you use. Ingredient nutritional facts differ depending on brand.
- Nutrition Facts (based on my ingredients) : Per serving (2 plain truffles) 75 kcal, Total Fat – 7 g, Total Carbs – 3 g, Protein – 1 g.
Enjoy!

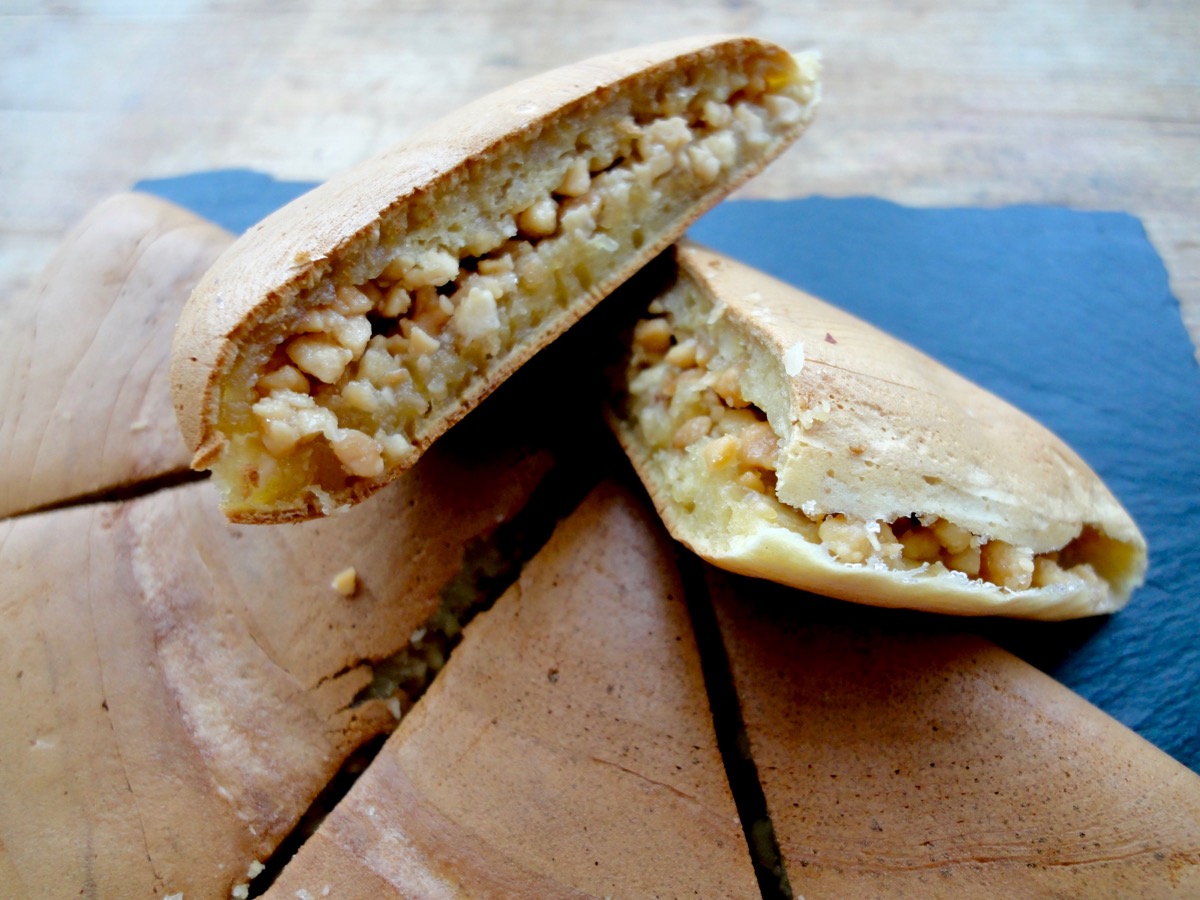
Apam Balik
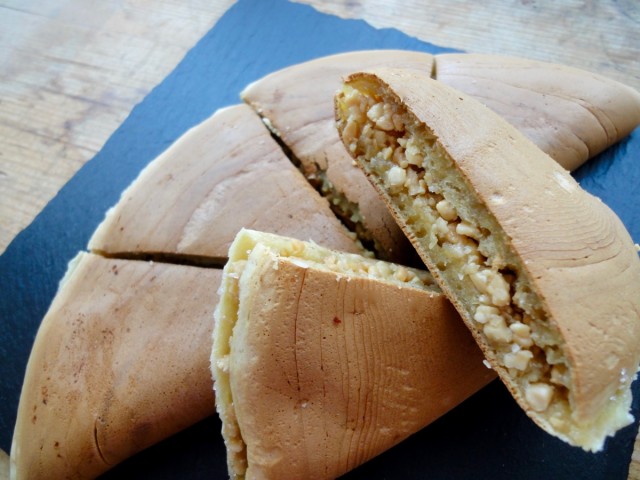
Sometimes, it’s the most simplest thing you miss when you are away. Like, the way the wifi automatically connects and is super fast when you come home from a holiday, or those soft toys that have always been your sleeping companion, or the smell of freshly made pancakes. This week, I was missing this, Apam Balik. It’s a simple yeast pancake filled with peanuts and sugar. I remember waiting at the Saturday night market for these hot peanut pancakes and taking small bites in the car while no one is looking… which you can get away with when eating the thicker version of the pancake. Yes, there’s a thick and thin version. Both are equally good.
Apam Balik has many names. In English it would called a Pancake Turnover. It’s also called Martabak Manis, Terang Bulan, Apam Pulau Pinang, Kue Bandung, Kuih Haji, Min Chiang Kueh, Hok Lo Pan, Ban Jian Kuih or Chin Loong Pau. I honestly never knew there were so many names for it! It’s a typical street food which can be found in Malaysia, Singapore, Brunei and Indonesia.
Though I was missing this, I could not just whip it up like I normally would do. This one was made specially for a gathering with my lady friends here. In these potluck gatherings, we have Malaysian home cooked food. It’s a time where we reminisce eating family style with food we all grew up with. A time to chit chat in our mother-tongue and a time for the little kids to get together and play while the mommies enjoy their food. My contribution this time is Apam Balik and Batik Cake.
This recipe is adapted from one of my favourite Malaysian bloggers, Sea Salt with Food – Apam Balik
Pancake Batter
- 1¼ cups All-Purpose Flour
- ½ teaspoon Baking Soda
- ½ teaspoon Instant Yeast
- 1 Egg, large
- 3 Tablespoons Sugar
- A Pinch Salt
- 1 cup Water
Peanut Filling
- 1½ - 2 cups Roasted Peanuts, coarsely grounded
- ½ cup Sugar
- 4 thin slices ( 5-10 grams each) Butter/Margarine *
Directions:
- In a bowl, mix all pancake batter ingredients together till smooth.
- Cover bowl with cling wrap and refrigerate for 5 hours or overnight.
- Lightly oil a small non-stick pan on medium heat. (I did not need to oil mine, as my pan is fairly new).
- Once pan is hot, add ½ cup of pancake batter and evenly coat the pan. Cook till the batter starts forming little bubbles on top.
- Sprinkle some sugar and a generous amount of grounded peanuts. Cover with a lid and cook till the batter has set or has turned golden brown at the bottom.
- Add sliced butter or margarine onto one half of the apam balik.
- Loosen the edges and fold the apam balik into half. Transfer onto a cooling wrack and cook the rest.
- Slice into quarters. Best when served warm.
Tips:
- Conversion chart
- *I do not like using margarine as I’m a butter person, but with these, margarine is the way to go for an authentic taste.
- *Instead of adding butter or margarine in the apam balik, you can either oil the pan with it or brush it on once the apam balik is cooked.
- If you are using MyFitnessPal app to count calories DON’T FOR THIS RECIPE! (I’m kiddin’), first copy the recipe URL then go to MyFitnessPal app to Recipes, select Create a New Recipe, then Add from the Web. Paste the URL, match ingredients and that’s it!
- Always match ingredients to the ones you use. Ingredient nutritional facts differ depending on brand.
- Nutrition Facts (based on my ingredients) : Per serving (1 apam balik/4) 369 kcal, Total Fat – 9 g, Total Carbs – 64 g, Protein – 9 g.
Selamat Menjamu Selera!
Karipap Daging Keto/Atkins
Inti Karipap
- 400 gram Daging Kisar
- 2 sudu besar Minyak Kelapa
- 2-inci Halia, dihiris
- 2 bangkai Daun Kari
- 2 Kulit Kayu Manis
- 2 sudu kecil Jintan Manis
- 3 biji Bunga Lawang
- 3 biji Bunga Cengkih
- 3 biji Buah Pelaga
- 2 sudu kecil Serbuk Ketumbar/Biji
- 2 sudu kecil Biji Sawi
- 1 sudu kecil Serbuk Bawang & Bawang Putih (jika digunakan)
- 45 gram Serbuk Kari Daging
- 60 ml Santan (kalau tidak digunakan, tambah air)
- 60 ml Air
Doh Keju
- 525 gram Mozzarella
- 150 gram Tepung Badam (almond flour/meal)
- 3 biji Telur (besar)
- 1 biji Telur Kuning
- Secukup Rasa Garam
Cara-cara:
- Inti karipap (490 gram selepas masak / 12 gram saiz hidangan)
- Panaskan minyak kelapa dalam kuali.
- Tumis halia, daun kari, jintan putih, kayu main, bunga lawang, bunga cengkih dan buah pelaga hingga harum.
- Masukkan biji sawi and daging kisar. Masak atas api sederhana hingga daging empuk.
- Masukkan serbuk kari, serbuk ketumbar (atau biji), serbuk bawang dan serbuk bawang putih.
- Kemudian, tuangkan santan (jika digunakan) dan air.
- Setelah hampir kering, masukkan garam secukupnya.
- Matikan api and ketepikan. Keluarkan halia, kayu manis, bunga lawang, bunga cengkih, dan buah pelaga sebelum inti digunakan.
- Doh keju ( 792 gram 36 ketul / 22 grams seketul) :
- Panaskan ketuhar pada suhu 200°C dan letakkan baking paper atas loyang. Ketepikan.
- Cairkan mozarella (dalam microwave jika ada, kalau tak cairkan atas non stick pan)
- Dalam mangkuk, masukkan tepung badam, garam dan telur. Kacaukan sehingga sebati.
- Apabila keju telah dicairkan, biarkan sejuk sedikit (3 minit)
- Kemudian, dengan spatula atau guna tangan jak, uli keju dan tepung badam sehingga menjadi doh.
- Bahagikan doh kepada 36 ketul. (kira-kira 22 gram seketul)Leperkan doh, isikan dengan inti dan kelimkan. (12 gram / 1 sudu teh)
- Letakkan karipap atas loyang.
- Campurkan 1 biji telur kuning dengan 1 sudu besar air. Sapukan atas karipap.
- Bakar selama 15-20 minit.
Tips:
- Resipi ini juga sesuai untuk sesiapa yang mengikut diet Atkins (lepas fasa 1).
- Gunakan santan tanpa gula, kurang karbohidrat tetapi masih penuh lemak. Kalau tak mau gunakan santan pun tak pa.
- Maklumat Pemakanan (dengan ramuan yang saya guna) : Saiz Hidangan (1 karipap) 106 kcal, Lemak – 8 gram, Karbohidrat – 1 gram, Protein – 5 gram.
Selamat Menjamu Selera!

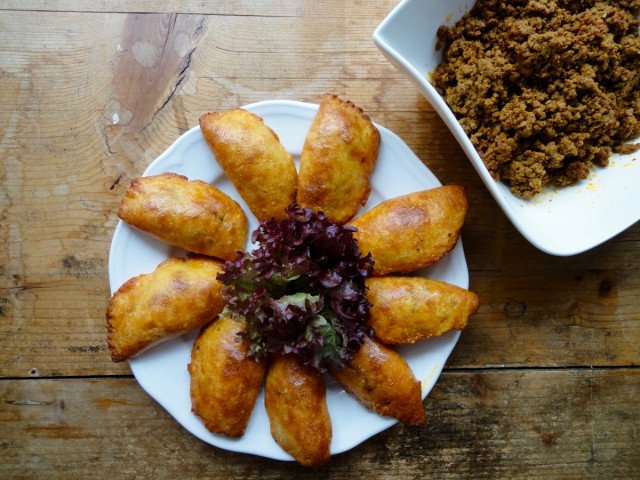
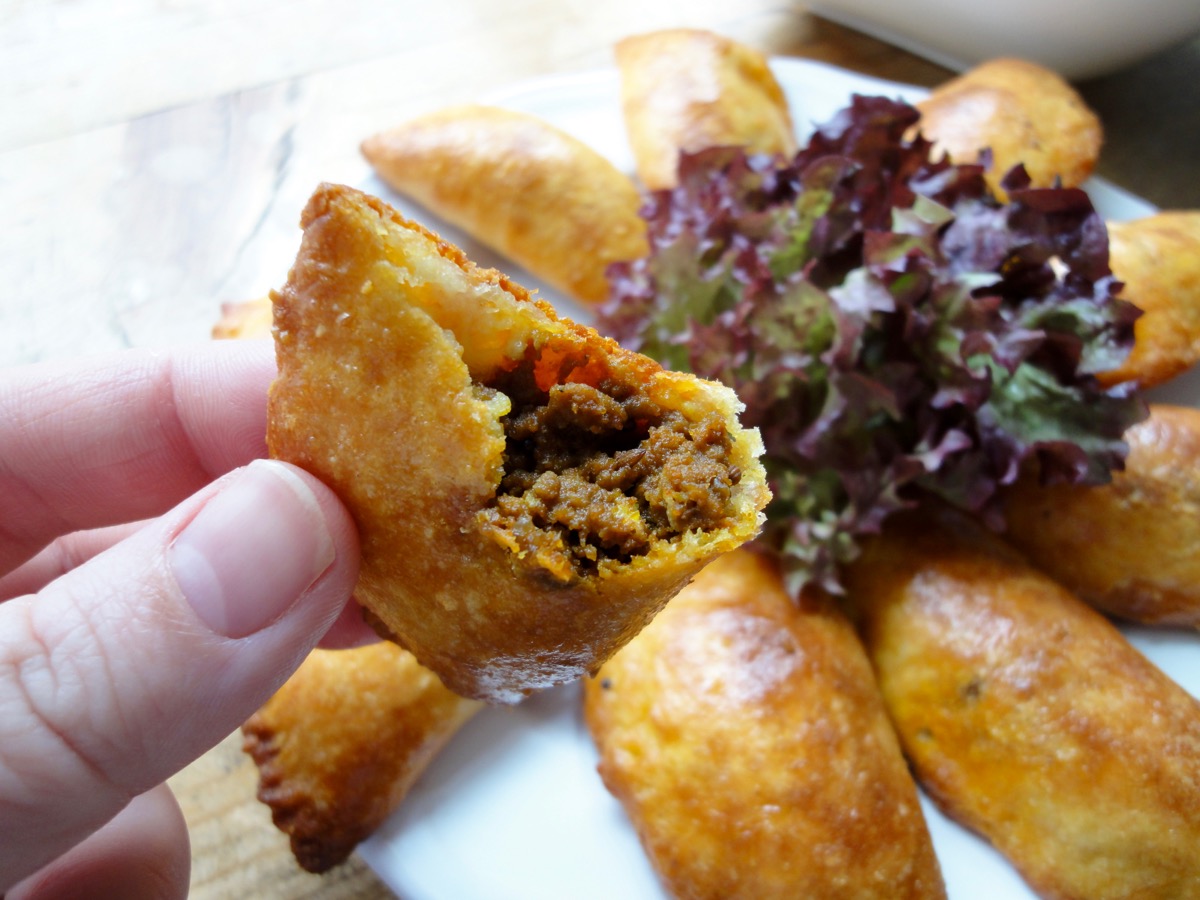
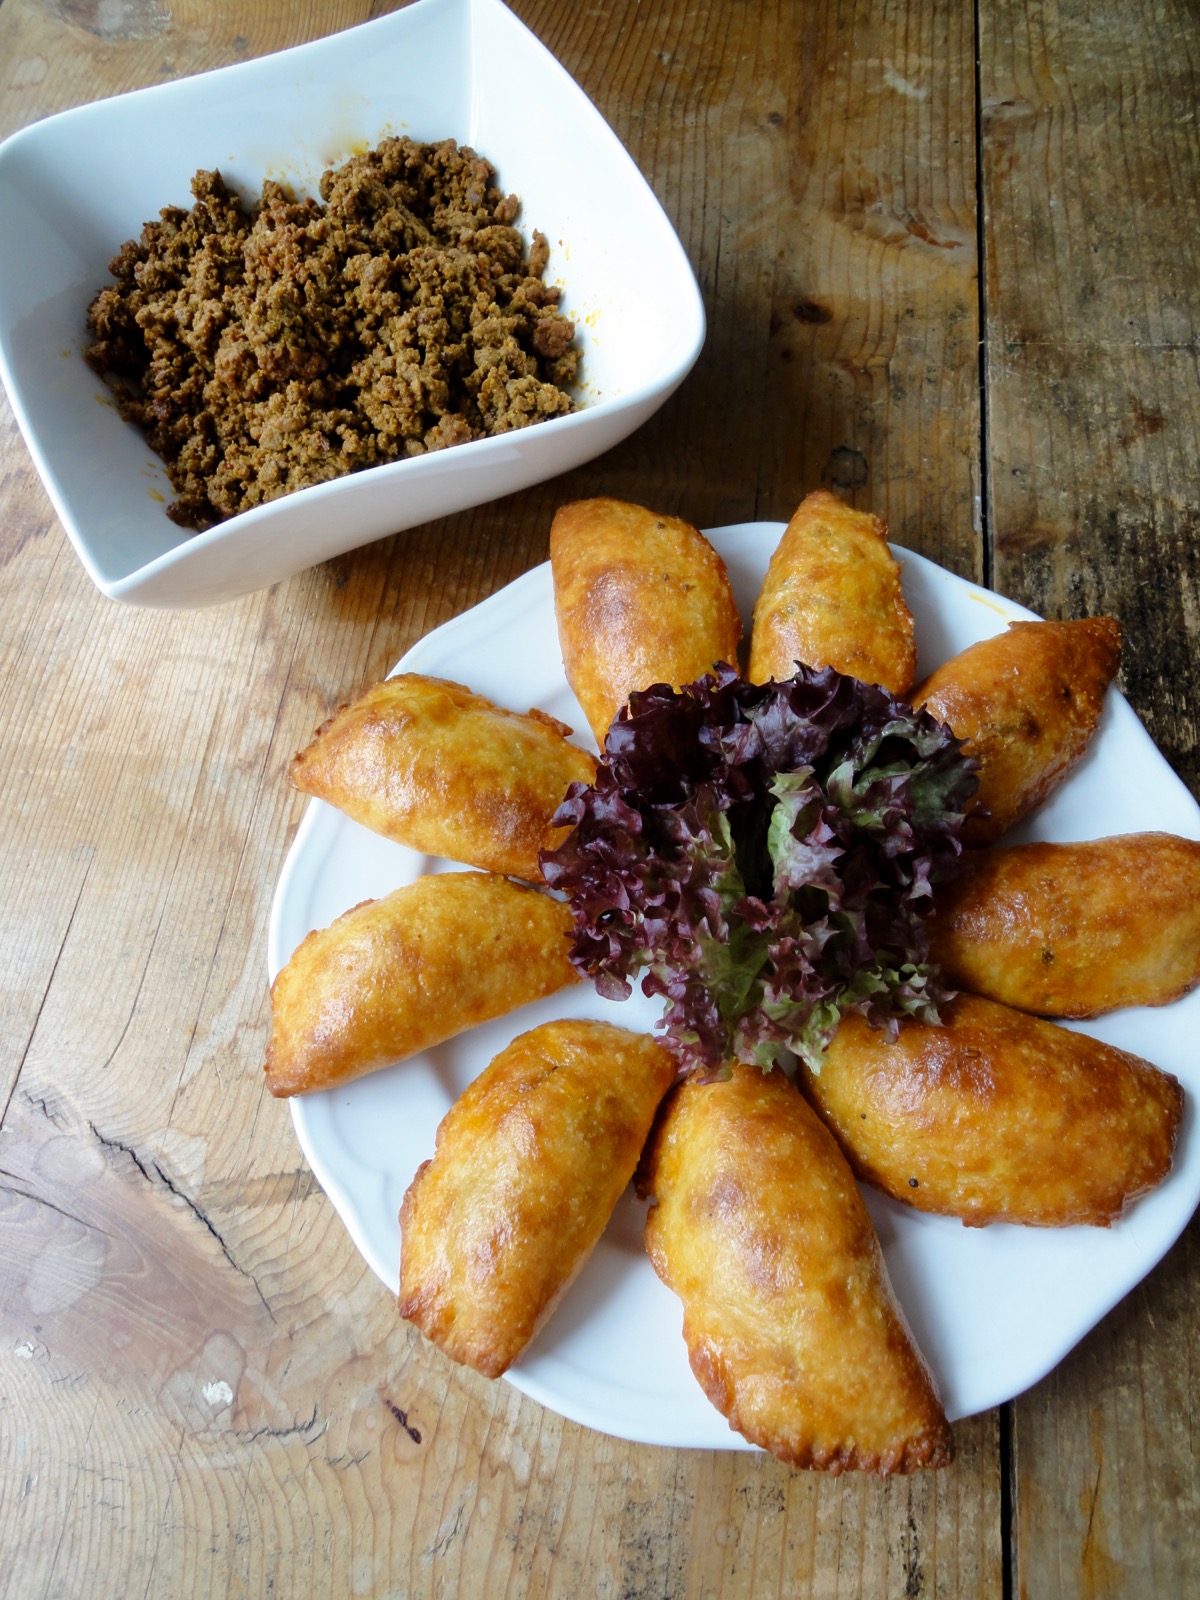
Keto Malaysian Curry Puffs / Karipap
Know that feeling when you start a diet that restricts you from eating certain foods and that’s the very time you want to eat it? Yup. The forbidden foods are the most delicious. Mine happens to be curry puffs. I’m just human…
Curry puffs or as we call it, Karipap is a comfort food for Malaysians. Well, any Malaysian food is comfort food to us. 🙂 Karipap is also known as epok-epok and is quite similar to Empanadas. Karipap is a dough stuffed with dry curried minced meat or sardines and then fried. Some add a quarter of a hard boiled egg in it. On a regular day, I would make Karipap using ready made puff pastry as I don’t have a good hand with dough ( I always over handle it). My Easy Sardine Curry Puffs recipe using puff pastry.
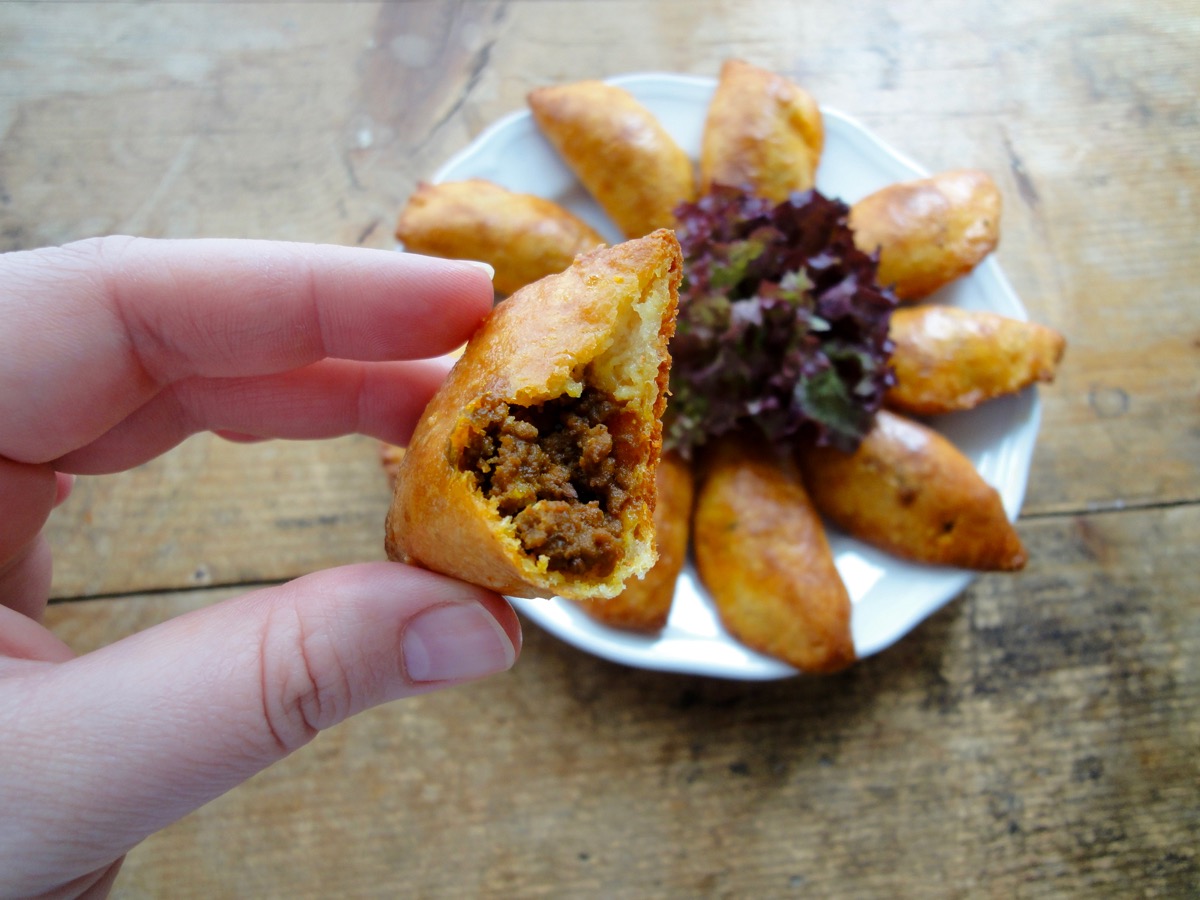
But since I’m on a Keto way of eating, I had to find an alternative. The filling is perfectly fine and I did not have to use any substitutes. The dough however, was my problem. Few days ago, I found a Keto empanada recipe and it took me back to my trip to Spain last summer and I had 2 empanadas and that reminded me of karipap. So after some research, I decided to use a Keto empanada dough recipe but fill it with dry mince meat curry to make Malaysian karipap. I was a little hesitant because using a cheese dough recipe for karipap as it seemed like an abomination to karipap, but after I had my first bite I can safely say, IT’S DAMN DELICIOUS! You can’t even tell that it was made from cheese!

So my fellow Malaysian Keto eaters, I present to you Keto Karipap. This recipe is also suitable for Atkins dieters who are not in the induction phase.
Dry Minced Meat Curry
- 400 grams (13 oz) Minced Beef
- 26 grams (2 Tablespoons) Coconut Oil, for frying
- 2-inch Ginger, sliced
- 2 sprigs Curry Leaves
- 2 pieces Cinnamon Sticks
- 2 teaspoons Cumin Seeds
- 3 pieces Cardamom
- 3 pieces Star Anise
- 3 pieces Clove
- 2 teaspoons Coriander Powder (or Coriander Seeds)
- 2 teaspoons Mustard Seeds
- 45 grams (7 Tablespoons) Curry Powder, use less for less spicy
- 60 ml (¼ cup) Coconut Milk
- 60 ml (¼ cup) Water
- To Taste Salt
Cheese Dough
- 525 grams Shredded Mozzarella
- 150 grams (1½ cups + 1 Tablespoon) Almond Flour
- 3 Eggs, large
- 2 teaspoons Salt
- 1 Egg Yolk (for egg wash)
Directions:
- Dry Minced Meat Curry (total 490 grams after cooking / 12 grams per serving)
- In a nonstick pan or wok, sauté ginger in coconut oil till fragrant.
- Add curry leaves cumin seeds, cinnamon sticks, star anise, cloves, and cardamoms. Fry till fragrant.
- Add mustard seeds and minced beef. Fry till the minced beef is half cooked.
- Add curry powder, coriander powder, onion powder and garlic powder. Mix well.
- Pour in coconut milk (if using) and water. Stir well.
- Allow curry to simmer on low heat till most of the coconut milk and water has evaporated. Season with salt.
- Take curry off heat and set aside. Be sure to remove ginger, cinnamon sticks, star anise, cloves and cardamoms before filling it into the dough.
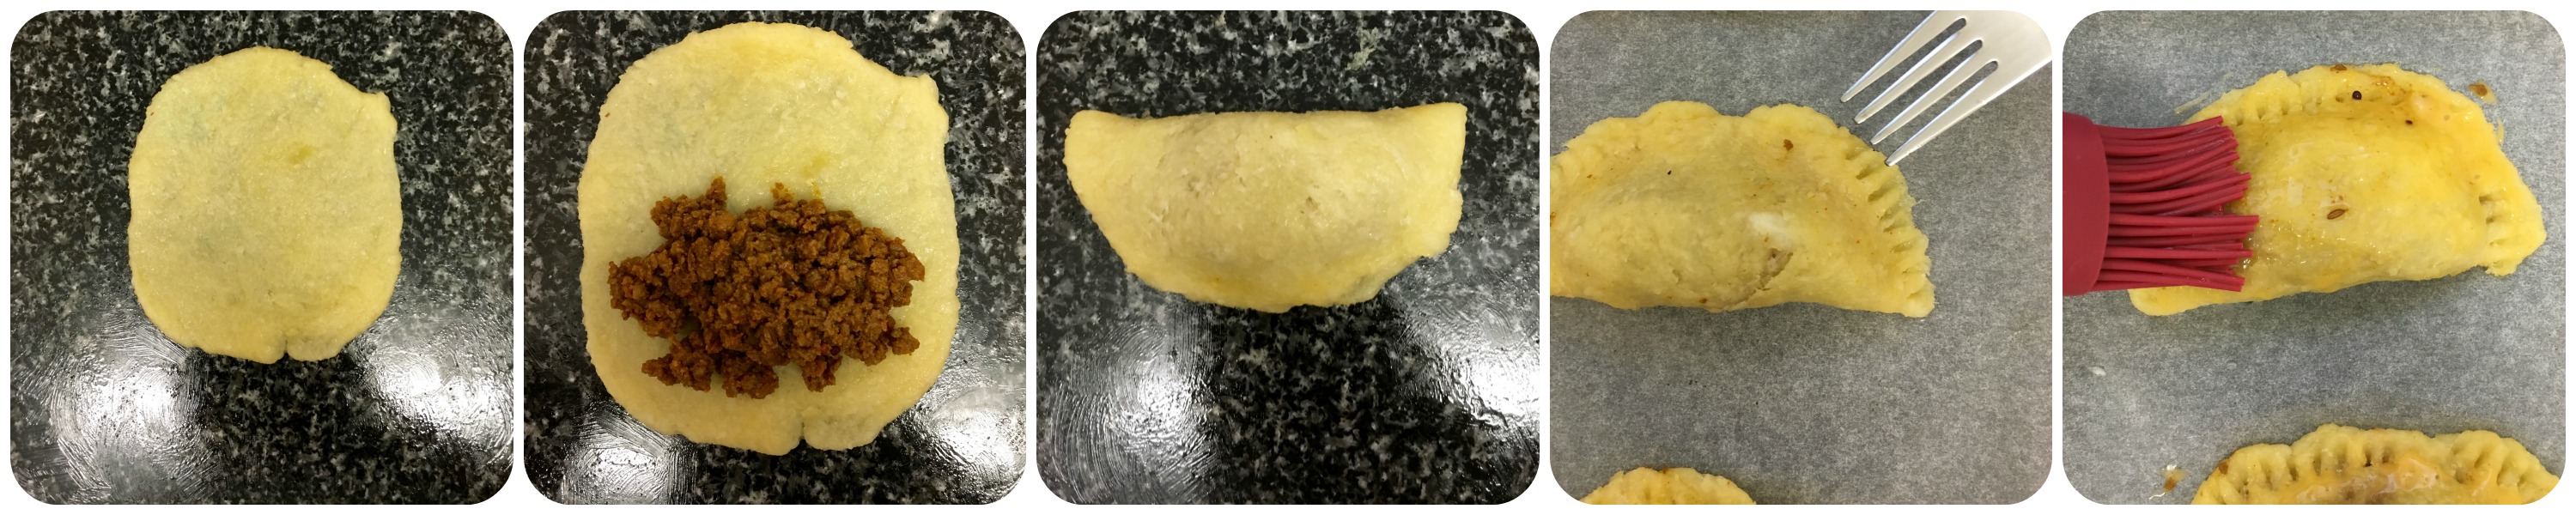
- Cheese dough (total 792 grams 36 pieces / 22 grams per piece)
- Preheat oven to 200°C (400°F) and line a baking tray with parchment paper. Set aside.
- Melt shredded mozarella. I used a non stick pan as I do not have a microwave.
- In a small bowl, add almond flour, salt and eggs. Mix together and set aside.
- Once the shredded mozarella has melted, leave it to cool for a few minutes (3 minutes).
- Using a spatula or by hand and mix the almond flour mixture with the melted cheese. Mix/knead till fully combined.
- Divide dough into 24 equal pieces (22 grams per piece)
- Roll out dough and add filling (12 grams/1 heap teaspoon).
- Pull the dough over and seal it.
- Transfer to baking tray and use a fork to press and seal the edges.
- Beat egg yolk and 1 Tablespoon of water together (egg wash).
- Brush karipaps with egg wash and bake for 15-20 minutes.
Flatten, Fill, Fold, Seal, Brush
Tips:
- Conversion Chart
- 1 cup shredded mozzarella = 113 grams
- 1 cup almond flour = 96 grams
- Recipe yields 36 pieces of karipap. If you do not want to make that many, simply divide recipe or freeze the karipaps.
- Use coconut milk that is unsweetened, lowest in carbohydrates, and full fat. I used Chaokoh coconut milk. If you want an even lower carb and fat version, omit the coconut milk in the curry.
- If you are using MyFitnessPal app to count calories, first copy the recipe URL then go to MyFitnessPal app to Recipes, select Create a New Recipe, then Add from the Web. Paste the URL, match ingredients and that’s it! Always match ingredients to the ones you use.
- Ingredient nutritional facts differ depending on brand.
- Nutrition Facts (based on my ingredients) : Per serving (1 curry puff) 106 kcal, Total Fat – 8 grams, Net Carbs – 1 grams, Protein – 5 grams.
Enjoy!
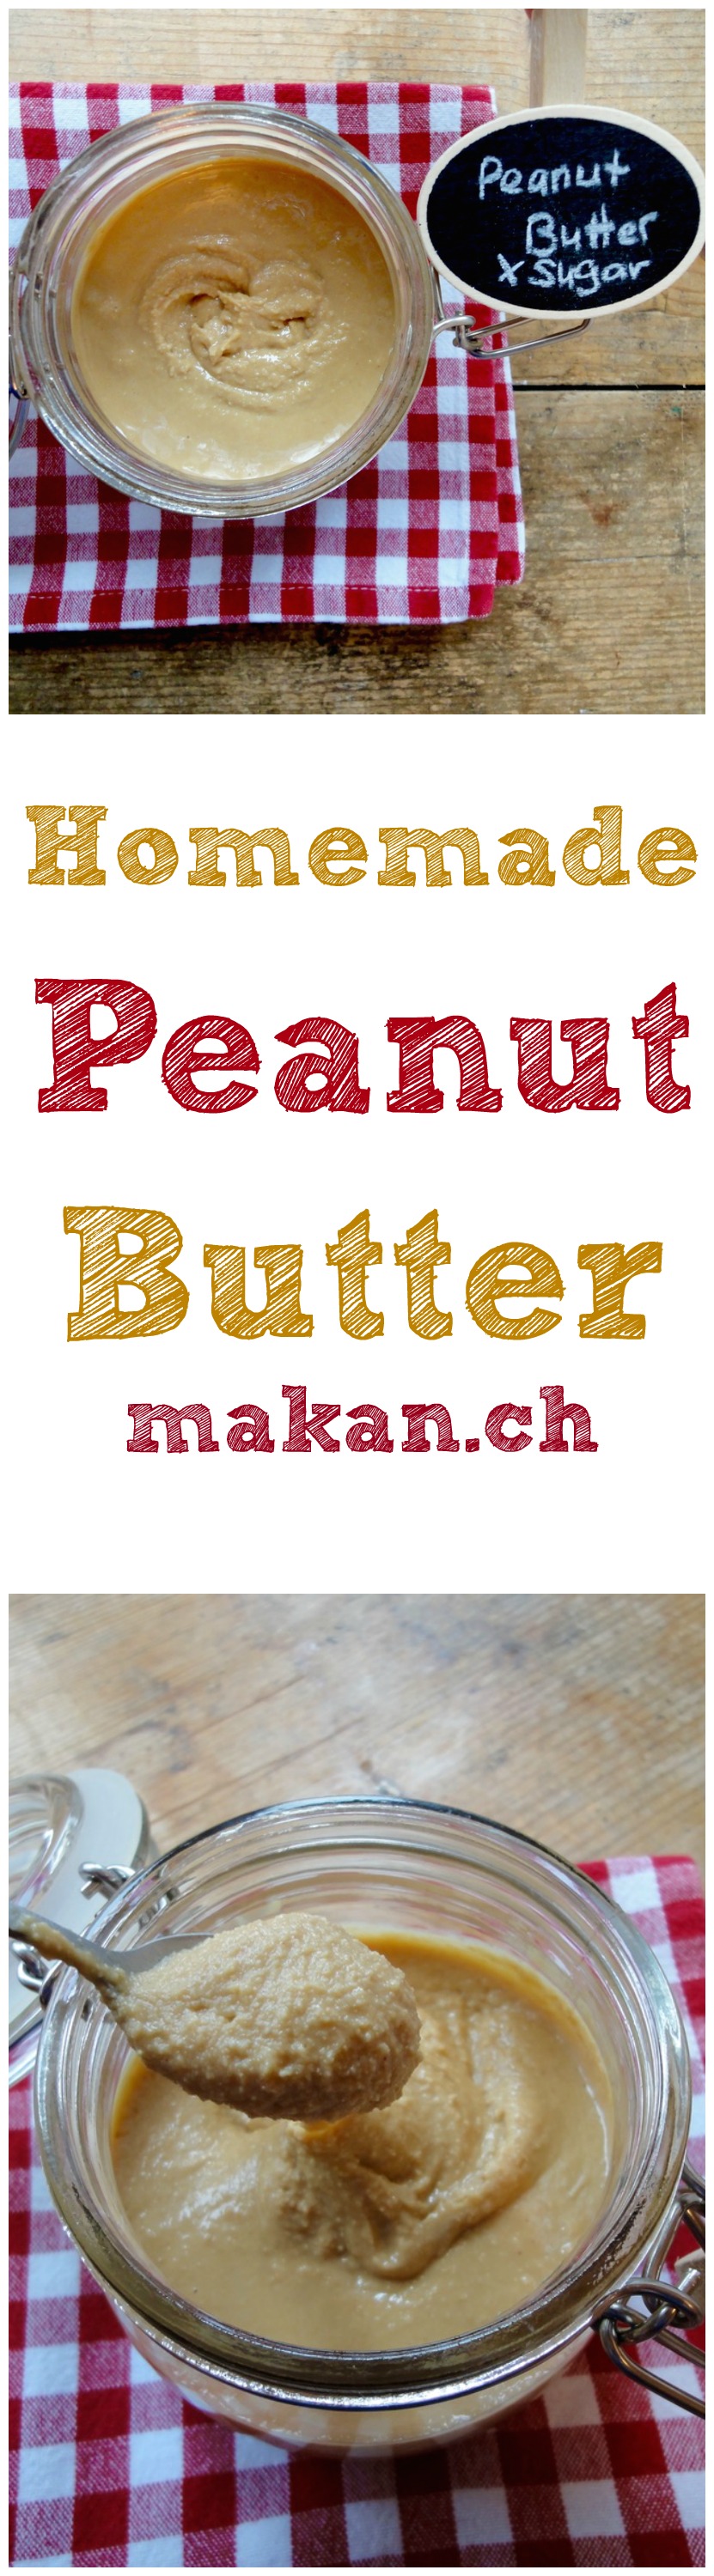
Homemade Peanut Butter
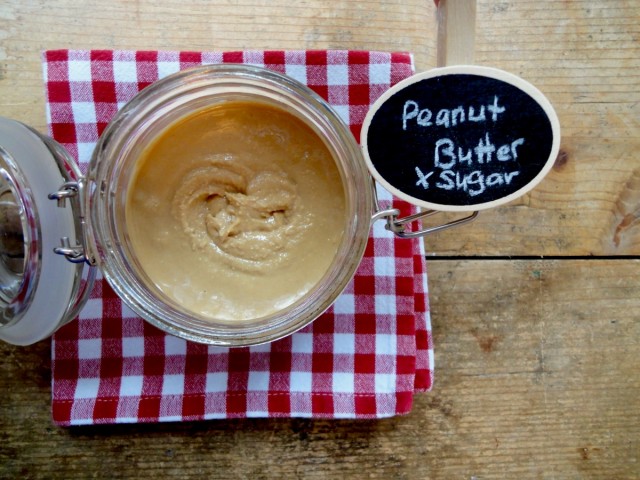
Why homemade peanut butter? No preservatives (✓), No added sugar (✓), No added oils such as vegetable oil (✓). Is homemade peanut butter cheaper? It all depends on the peanuts you buy. I buy store brand roasted peanuts which costs CHF3 ($3) per kilo – you can of course buy unroasted and roast it yourself. One jar of peanut butter here costs the same. So for me, it is cheaper. I did not make my own peanut butter because it was cheaper, but because I needed unsweetened peanut butter which I have not found here yet. Plus, it’s so easy and you can control the smoothness of the peanut butter. Now that I have made my own peanut butter, I really prefer the taste of it compared to store bought ones.
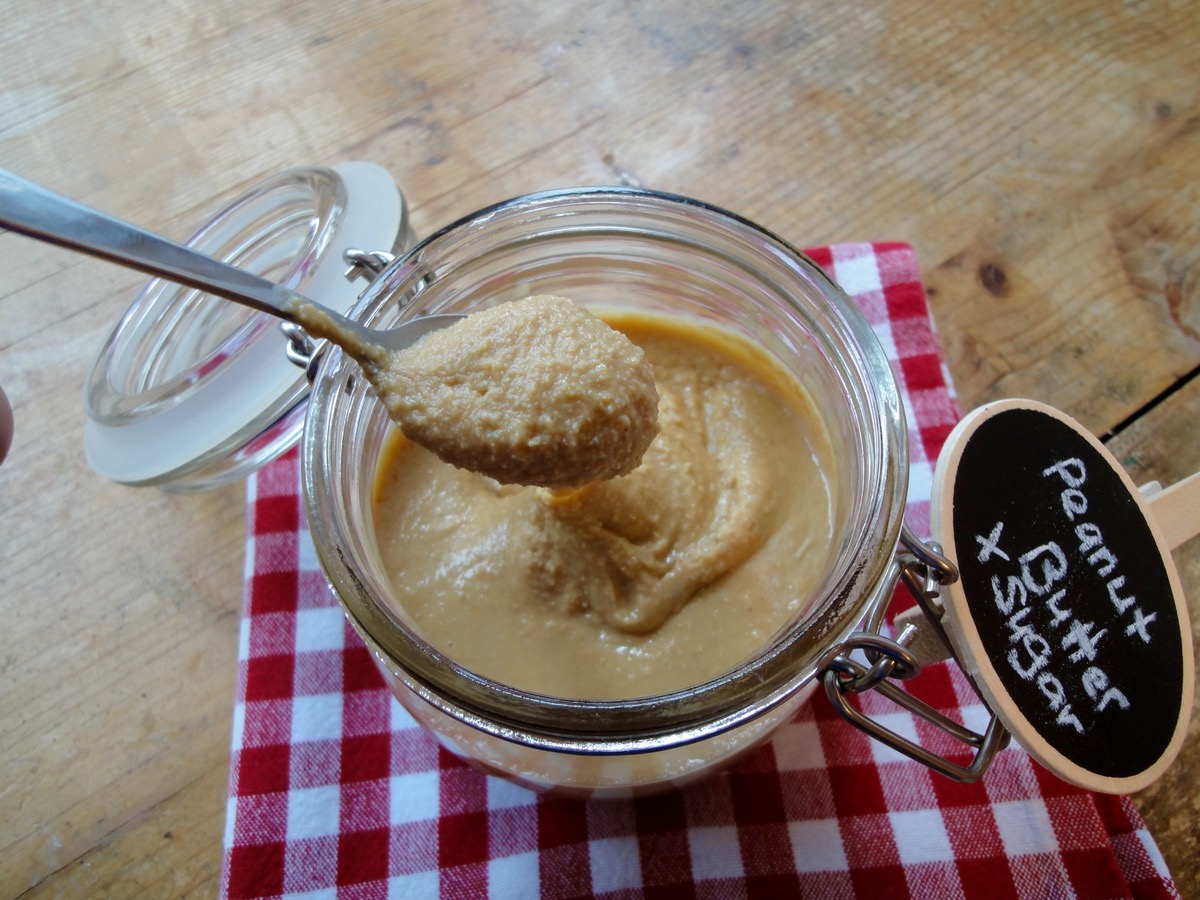
All you need is a food processor, peanuts and coconut oil which is optional. Add salt, sugar or preferred sweetener if you wish. This recipe yields 17 servings ( 1 Tablespoon/c.a 15 grams ) = c.a 255 grams per jar.
Ingredients
- 2 cups Roasted Peanuts
- 1 Tablespoon Coconut Oil (optional)
Directions:
- Process peanuts in food processor till smooth.
- Add coconut oil to fasten up the process and for a creamier feel.
- Store in a glass jar.
Tips:
- Conversion Table
- Peanut butter lasts up to 2 months. I kept mine in the pantry.
- If you are using MyFitnessPal app to count calories, first copy the recipe URL then go to MyFitnessPal app to Recipes, select Create a New Recipe, then Add from the Web. Paste the URL, match ingredients and that’s it!
- Always match ingredients to the ones you use. Ingredient nutritional facts differ depending on brand.
- Nutrition Facts (based on my ingredients) : Per serving (1 Tablespoon/c.a 15 grams ) 98 kcal, Total Fat – 8 g, Total/Net Carbs – 2 g, Protein – 4 g.
Enjoy!