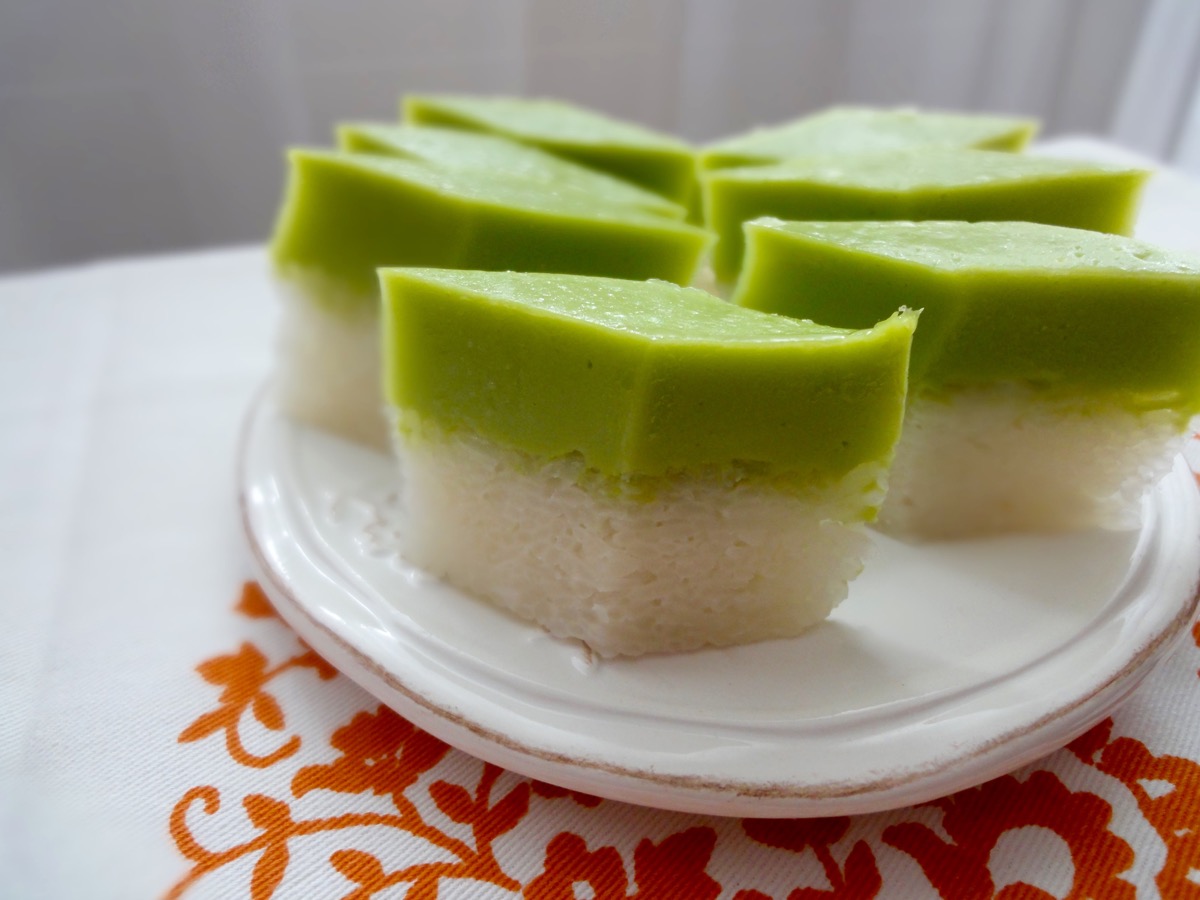
Kuih Seri Muka
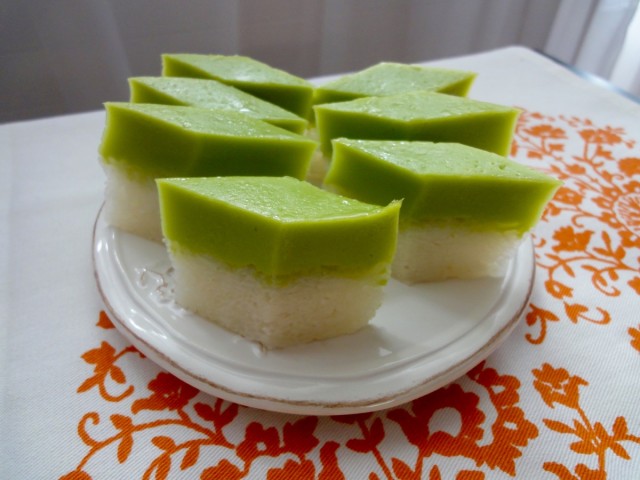

Seri muka is a Malaysian steamed layer cake (kuih) which consist of a glutinous rice (thai sweet rice – sticky rice) layer steamed with coconut milk and a sweet pandan custard layer to finish off. It’s green layer comes from the pandan leaf, but some do add green colouring. I prefer to stick with the natural green the pandan leaf gives out once blended.
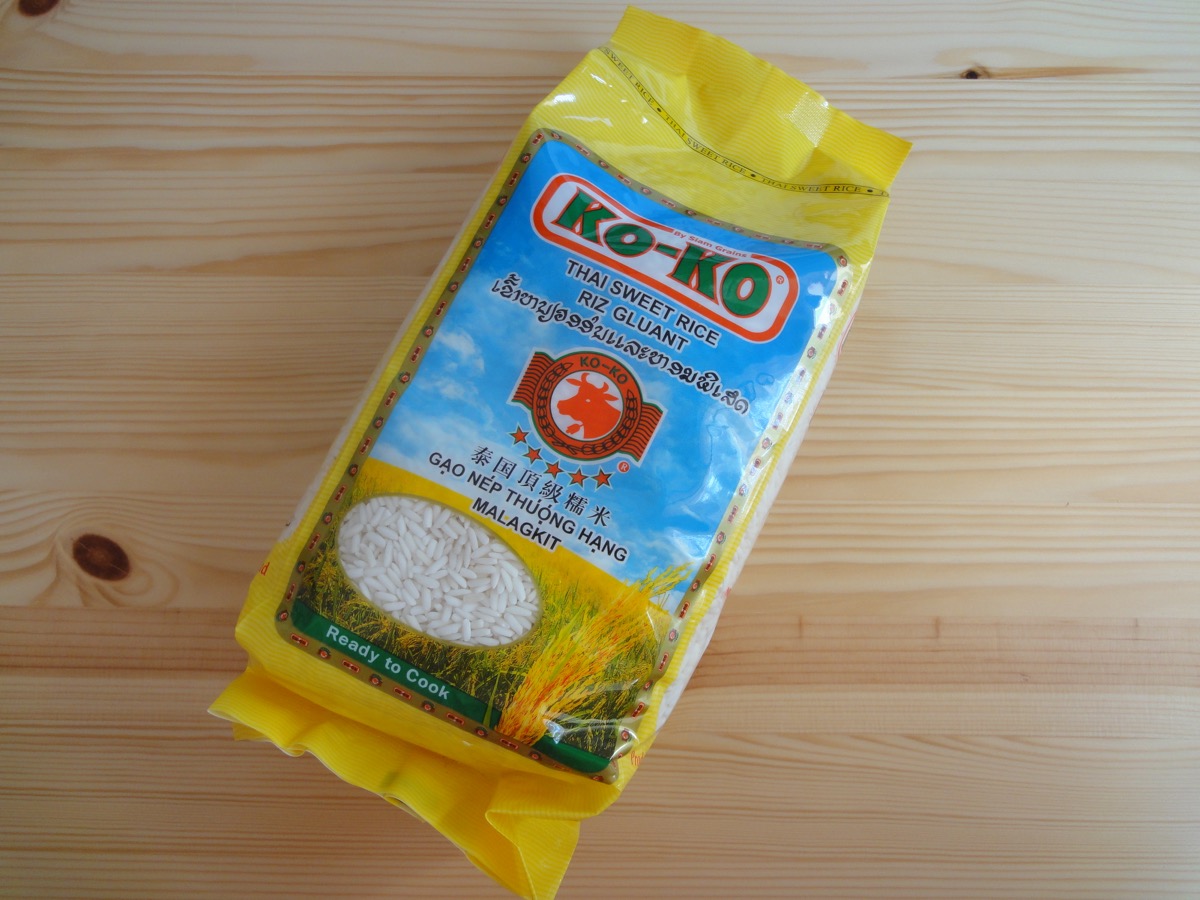
Glutinous Rice/Nasi Pulut/Thai Sweet Rice that is available in an Asian shop near me
Kuih means cakes in Malay. Seri Muka translates to radiant face or pretty face. So this is a pretty face cake. 🙂 I’m guessing what it’s called seri muka is because of the smooth top layer it has after it has been steamed. However, I seem to not be able to get that 100% smooth surface. There always seems to be a large bubble spot on it. Other than that, it actually is quite smooth.
This kuih is found in morning markets, school canteens, cake stands and just about every place that has a person selling kuih’s. It is eaten as a dessert, a snack, or at tea time.
Recipe adapted from Sea Salt with Food’s Kuih Seri Muka. I have tried and read number of recipes and this one has so far been a good replica.
Glutinous Rice Layer
- 400 grams Glutinous Rice
- 150 ml Coconut Milk
- 100 ml Water
- 1 teaspoon Salt
- 3 Pandan Leaves, knotted
Pandan Custard Layer
- 150 ml Pandan Juice, see tips
- 5 Tablespoons Cornflour
- 3 Tablespoons All Purpose Flour
- 3 Eggs, large (53g +/- per egg)
- 200 ml Coconut Milk
- 140 grams Sugar
- A Pinch Salt
Directions:
- Glutinous Rice Layer
- Soak glutinous rice with water for at least 1 ½ hours prior to using. Drain.
- Prepare a 9-inch round or square cake pan and spray with cooking spray or line with plastic wrap.
- Mix coconut milk, water, salt and the rice. Pour it into cake pan, topped with the pandan knots.
- Steam for 30 minutes.
- After 30 minutes, fluff up the rice and remove pandan knots. Then, using a greased spatula, flatten the steamed rice. Make sure there are no holes/air bubbles and gaps in the rice, especially the sides.
- Steam for another 10 minutes.
- Pandan Custard Layer
- Combine pandan juice, coconut milk, all purpose flour, cornflour, and sugar. Mix well.
- Add eggs and whisk well then strain into a medium sized metal bowl or pot.
- Place pandan mixture over simmering water (double boiler or bain-marie)
- Stir continuously and cook till custard starts to thicken. (15 minutes)
- Pour pandan custard into glutinous rice layer, give it a little tap (for air bubbles) and continue to steam for 30 minutes.
- Remove kuih seri muka from the steamer and allow to cool completely before cutting into rectangles or diamond shapes.
Tips:
- Pandan Juice: Take 10 pandan leaves and cut them (to make blending easier). Blend with 200ml water. Strain with cheesecloth.
- Wrap steamer cover with a cloth tightly. This is to prevent water droplets from dropping.
- Glutinous rice layer has to be hot while pouring in the pandan custard layer, otherwise it will not stick to each other.
- Cups to Grams conversions
- 1 cup glutinous rice flour = 104 grams
- If you do not have fresh pandan leaves, you can use pandan extract or flavouring.
- Store kuih seri muka in an airtight container once it has completely cooled down. Consume within 24 hours.
- Do not refrigerate, this will make the glutinous rice layer to become very hard.
Enjoy!


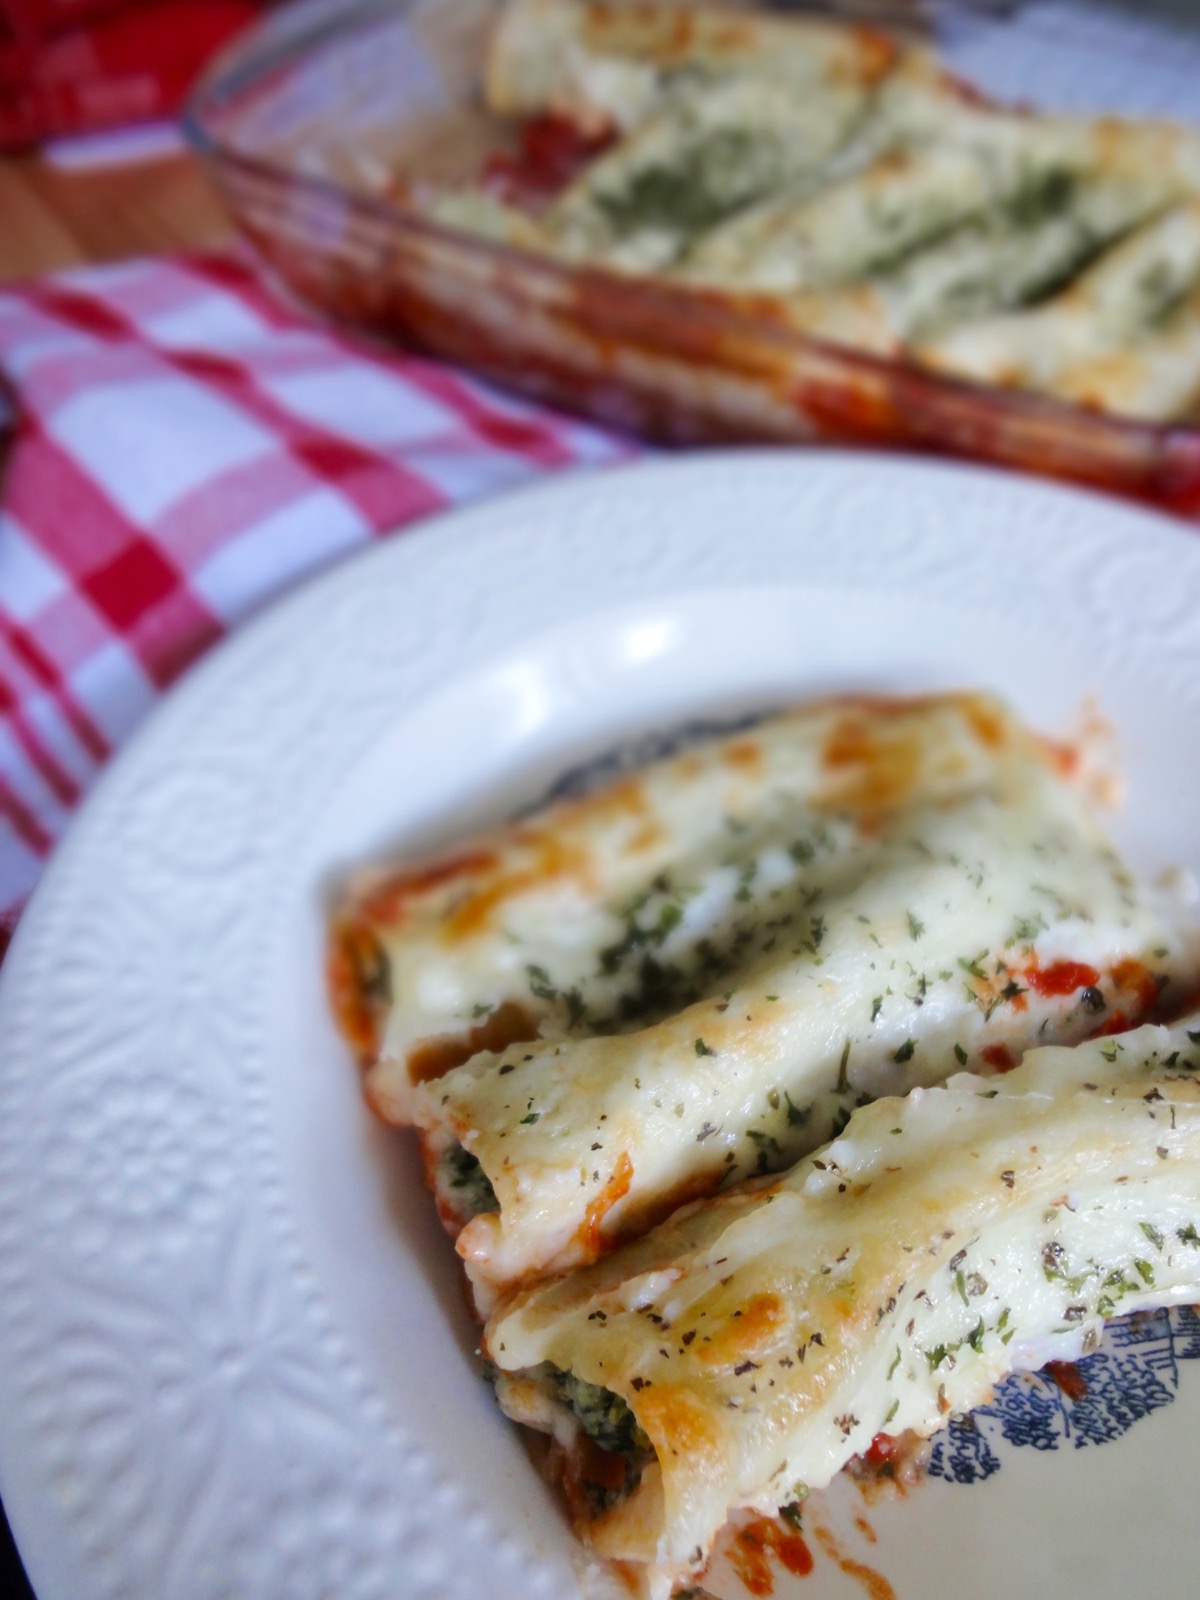
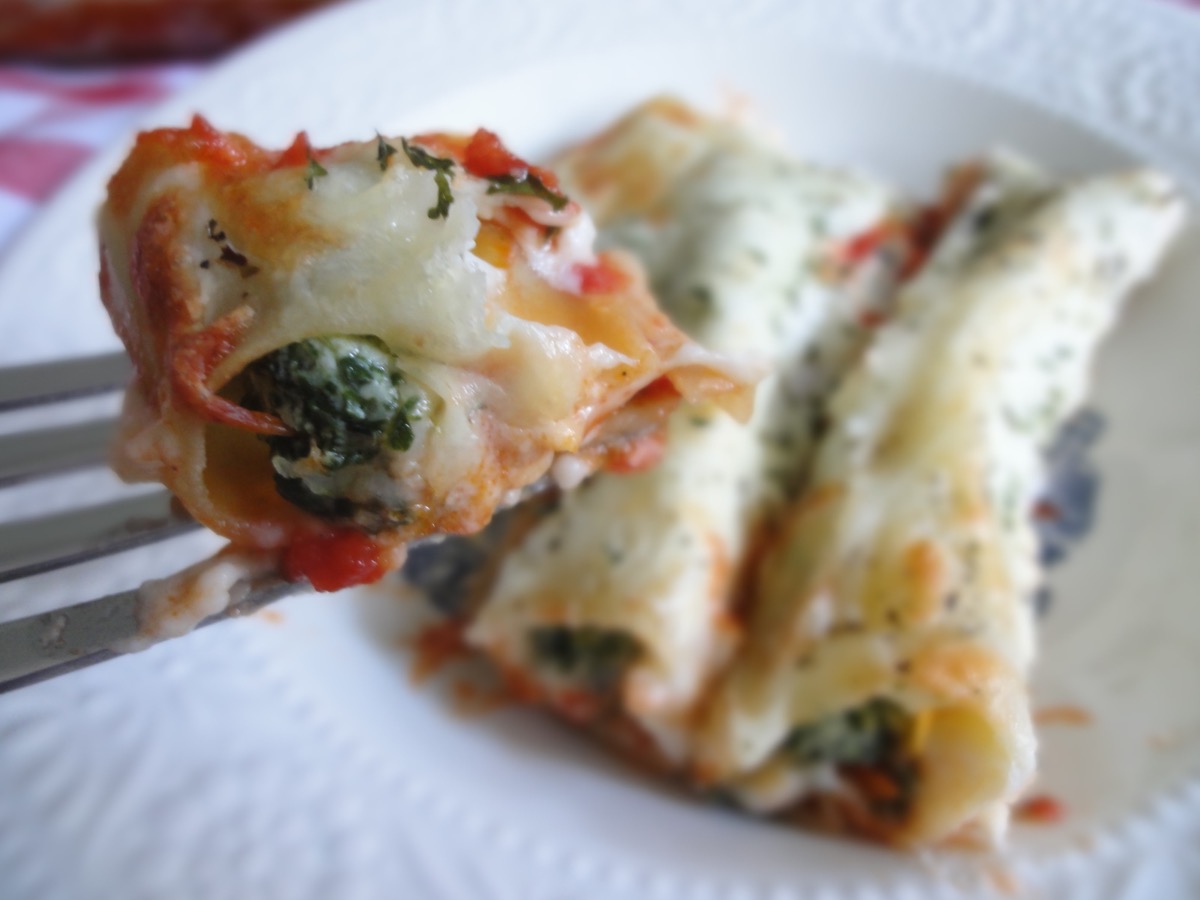
Spinach & Ricotta Cannelloni


Don’t mix this one up with Canolli (the Italian dessert).
I’ve always been intimidated by Cannelloni. Firstly, it took me numerous times to finally remember the name. I kept on saying Callenoni. Just like when I was younger, I just could not pronounce yellow…I kept on saying lellow. My mother probably found it cute though! Lucky for me I had a neighbour, who was probably a teenager or in her early 20’s that taught me the correct pronunciation. I remember her sitting me down on her bed and kept on repeating yellow. Finally, one day I managed to say yellow. Great accomplishment. 🙂
Secondly, it looked difficult and a whole lot of work. It ISN’T! I did cheat a little, but it’s super easy.
Cannelloni is a cylinder pasta that has been stuffed with either minced meat (ragù), spinach and ricotta or fish, laid on tomato sauce (marinara/sugo) then topped with béchamel (besciamella) sauce and baked. It’s similar to American-Italian, Manicotti.
In this recipe, I used Barilla’s Arrabbiata (spicy marinara) sauce.
Spinach & Ricotta Cannelloni
Ingredients
- 12 tubes Cannelloni
- ½ jar (200 grams) Marinara Sauce
- ½ cup Mozzarella, grated
- For garnish Parsley
Spinach & Ricotta Filling
- 2 Tablespoons Olive Oil
- 250 grams Ricotta
- 240 grams Spinach, thawed
- 1 medium Onion, chopped
- 70 grams Parmesan, grated
- To taste Salt
- To taste Pepper
Béchamel
- 25 grams All Purpose Flour
- 25 grams Butter
- 300 ml Milk
- A pinch Nutmeg
- 2 pieces Cloves
- 1 piece Bay Leaf
- To taste Salt
Directions:
- Spinach & Ricotta Filling
- Thaw spinach.
- Sauté onions. Add spinach and continue sautéing for 2-3 minutes.
- Add ricotta, parmesan and seasoning. Mix well.
- Set aside.
- Béchamel
- Pierce the halved onion with cloves and bay leaf (oignon pique).
- Lightly toast flour in a medium sized pot. Do not brown the flour.
- Once it starts smelling like toasted nuts, add butter. Stir well. (This is now called roux)
- Cook roux till it smells like again, toasted nuts.Whisk milk 300ml at a time into the roux, till combined.
- Continue mixing in the rest of the milk, bring to the boil.
- Add oignon pique.
- Season with nutmeg and salt.
- Set aside for at least 15 minutes. Discard oignon pique before using.
- Assembling Cannelloni
- Pre-heat oven to 190°C (375°F) – or go according to instructions on box of the Cannelloni’s.
- Grease a glass dish (13 x 9-inch).
- Spread marinara sauce onto dish.
- Add spinach and ricotta mixture into a piping bag or a small bag (snip off one side of the edge) and fill the Cannelloni’s.
- Arrange filled Cannelloni’s on marinara sauce.
- Once done, pour béchamel over Cannelloni’s.
- Sprinkle some mozzarella on top (optional) and bake for 30 minutes.
- Remove and allow to rest for 10 minutes before serving.
Enjoy!
Spinach & Ricotta Cannelloni

Spinach & Ricotta Cannelloni

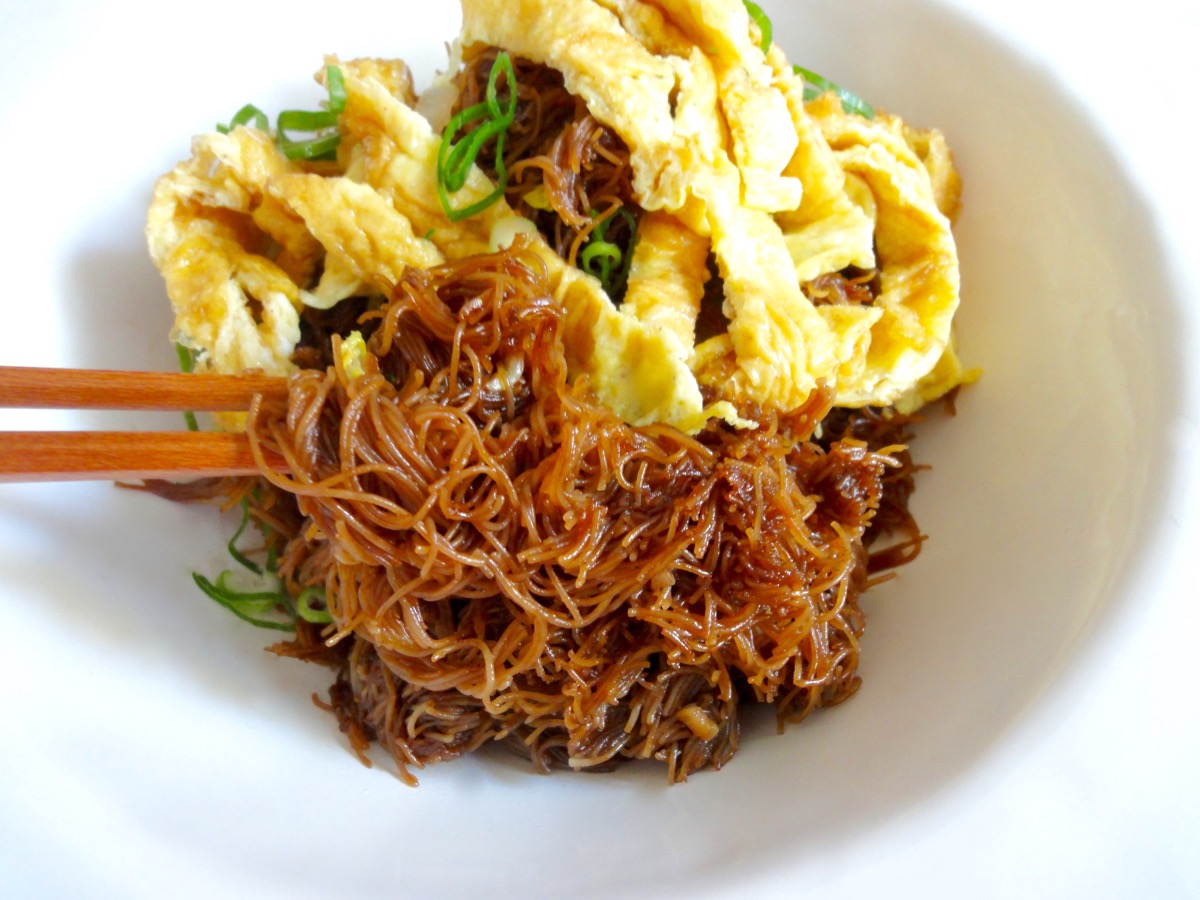
Fried Mee Hoon / Fried Rice Vermicelli #1
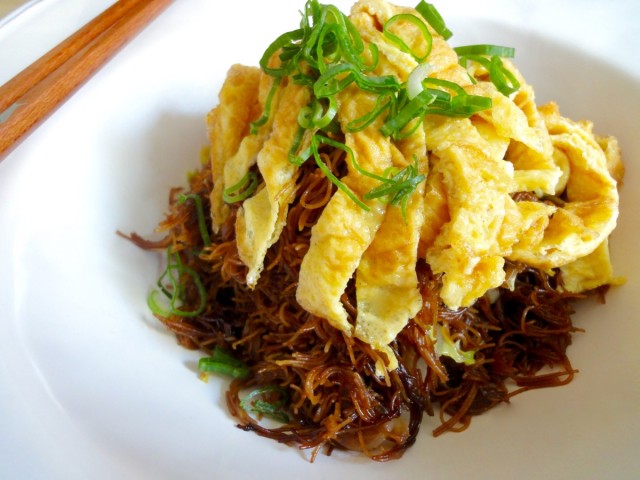
Mee Hoon/Mihun/Bihun/Bee Hoon or rice vermicelli is made from, rice! You can have it fried, in soups, in dishes with gravy, and even in salads. There is another type of noodle that looks very similar which is known as glass or cellophane noodles made from mung beans, but these are not the same.

Mee Hoon / Rice Vermicelle
Mee Hoon is available in most Asian shops and to my surprise, even in the local grocery store. It’s inexpensive and makes a quick and simple meal or if you like it fancy, then fancy it up. I always have 2-3 packets of mee hoon in my pantry for my extra extra lazy days. This recipe even easier and simpler as it’s only seasoned with soy sauce, rice wine, oyster sauce, sesame oil and the basic salt and pepper. Add in some vegetables and meat or eggs and you’ve got a complete meal. In Malaysia, you can find this type of fried Mee Hoon in economy rice food stalls.
There are two types of soy sauce that I am used to. The first is light soy sauce (kicap masin) which is very watery and salty. The other is dark soy sauce (kicap manis/ketjap manis) which is thick, dark, and sweet. When it comes to soy sauces, I am very picky. Too picky that I’d rather lug 3 litres of it in my check-in bag than to buy it from here (or other brands). To me, there’s no other soy sauce brand as good as HW Cap Ayam (HW Chicken Brand) which is made in Sabah. A few months back, there was even an obviously photoshopped photo of a guy before and after consuming this soy sauce who then turned into a handsome guy after eating it that was circling around Facebook. 😀

Top caption: After eating Sabah Chicken Brand Soy Sauce.
Not all soy sauces are the same though. It varies according to the country it comes from. Japan, Korea, China, Philippines and Indonesia all have their own version of soy sauce, but the difference is just very slight.
So here it is, a very simple and basic fried mee hoon topped with fried omelette recipe.

Ingredients
- 1 packet (200 grams) Mee Hoon / Rice Vermicelli
- 1 medium Onion, chopped
- 3-5 cloves Garlic, chopped
- ½ inch Ginger, grated
- Half Chinese Cabbage*, cleaned and cut into stripes
Wet Seasoning
- 2 Tablespoons Light Soy Sauce
- 2 Tablespoons Dark Soy Sauce
- 1½ Tablespoons Oyster Sauce
- 1½ Tablespoons Shaoxing Wine ( Chinese Cooking Wine)
- ½ Tablespoon Sesame Oil
- To Taste Salt
- To Taste White Pepper
Garnish
- 2 nos Egg, fried or fried omelette
- 1 Bundle Spring Onions, chopped
- To Garnish Fried Onions
- To Garnish Sriracha or Chilli Sauce
Directions:
- Fried Mee Hoon
- Soak mee hoon according to instructions on packet. Normally I soak it in cold water for 5-7 minutes or till it has soften.
- Discard water and strain.
- Transfer mee hoon into a container. Add wet seasoning. (This is to ensure you evenly season the mee hoon. Seasoning while it’s cooking is a little tricky.)
- In a wok or a deep non stick pan, fry onions, garlic and ginger in some vegetable oil till fragrant.
- Add meat if using. Cook through.
- Add mee hoon and balance wet seasoning. Continue frying for 5 minutes.
- Add vegetables (you can also pre-cook vegetables) and fry till vegetables are cooked.
- Serve or keep aside till other dishes are cooked.
- Fried Omelette
- Whisk eggs with 1 tablespoon of water, and salt and pepper.
- Pour into a lightly greased non stick pan on medium high heat.
- Cook till the edges are slightly browned and flip it.
- Cook for another minute or two.
- Transfer fried omelette onto a chopping board and cut into thin or thick slices.
- Top fried mee hoon with fried omelette and desired garnish and serve.
Tips:
- *Use any type of vegetable you like such as mustard greens, bok choy, bean sprouts or snap peas.
- Serve with side dishes such as tofu, stuffed aubergines, fried egg, fish cake, and many more.
- To add some spice, add a few birds eye chillies while cooking or serve on the side in some soy sauce.
Enjoy!
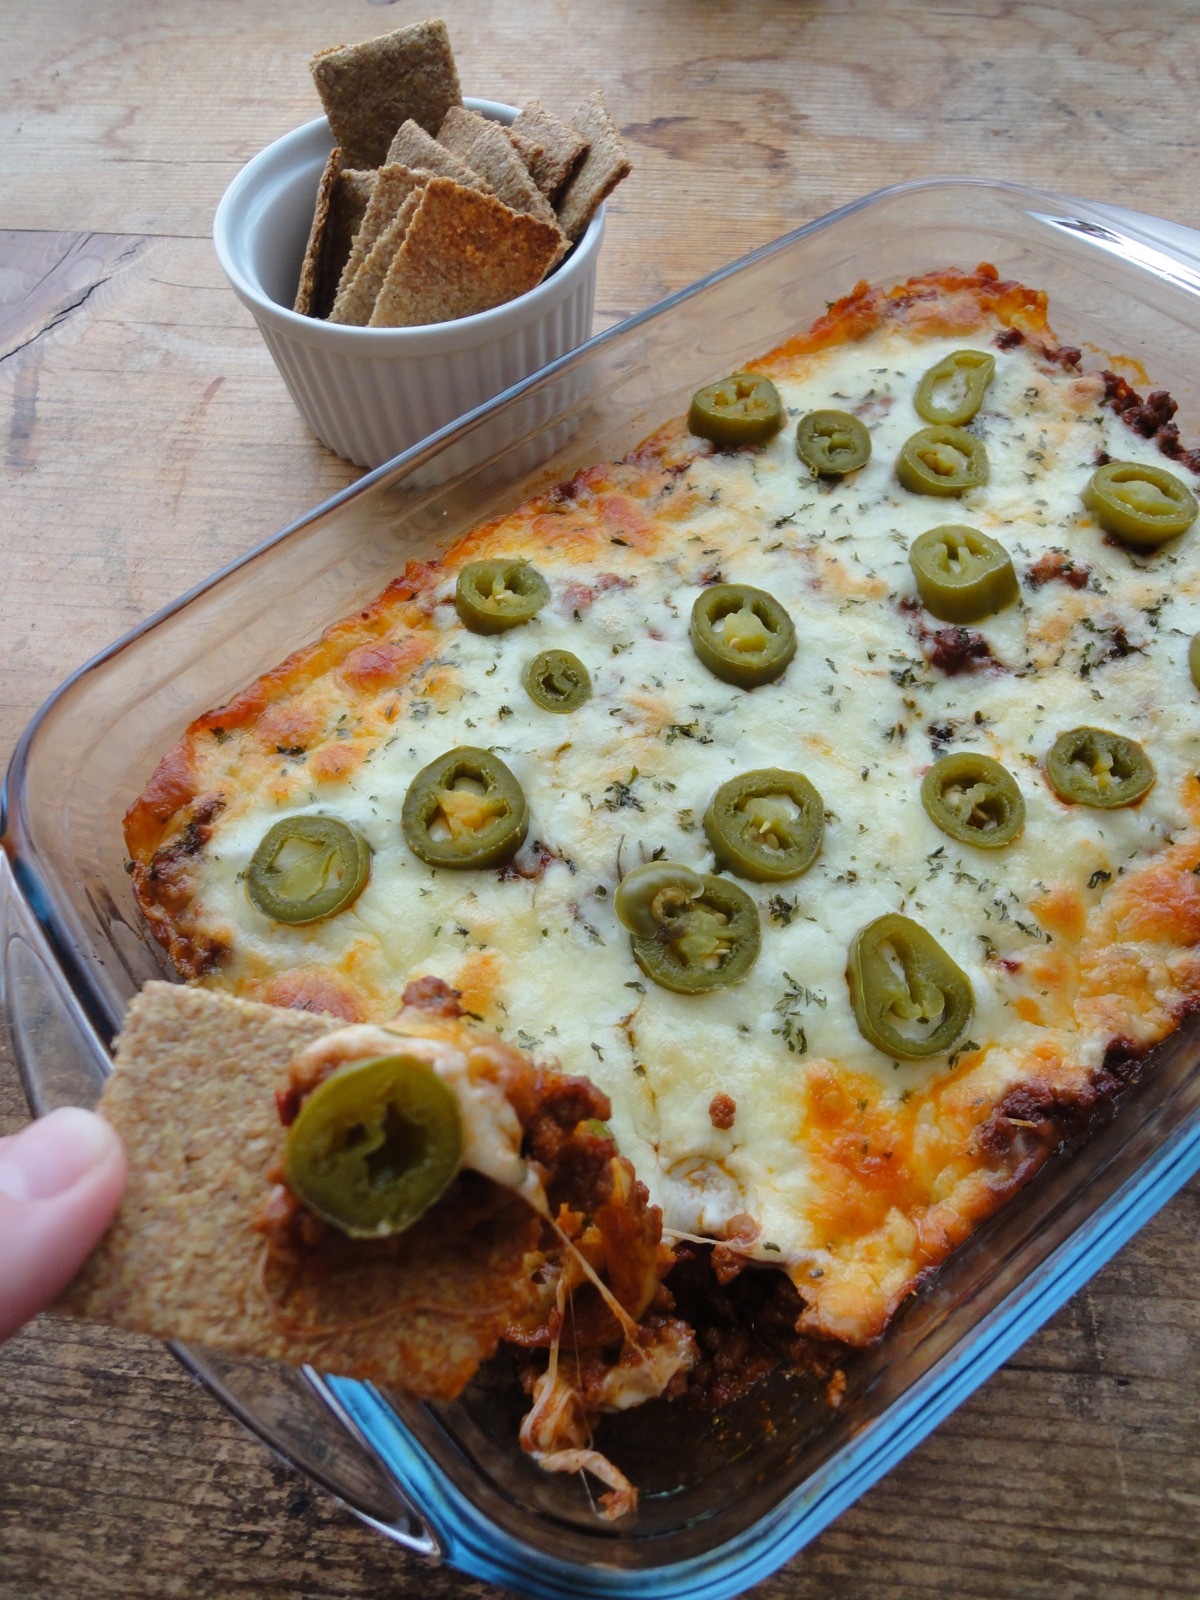
Spicy Cheeseburger Casserole (Keto-Friendly)
I’ve been slacking on my blog because I have been repeating my meals. Since I started Keto, I’ve actually had lots of ideas but often enough I repeat it and since it’s simple grilled meat with some veggies on the side, I didn’t think it would be worth a post for it.
The past month, I’ve been eating lots of naked burger’s. Why naked? Because it’s a regular burger sans the burger bun. Instead I use some lettuce or when I’m feeling a little ambitious, I would make some Oopsie Rolls to go with it. But after some time, I was actually getting sick of burgers. However, I still had lots of frozen burger patties left. I bought lots of it because hey! We love burgers! And since I just got a new freezer with lots of space and the burger patties were selling half price at my local grocery store so, why not! So I gladly stocked up on burger patties. Double score!
Since I started getting sick of it, I just minced it up, mixed together some spices, topped it with cheese and jalapeños, baked it and Voilà.! A new dish from burger patties. But when I ran out of burger patties, I started using minced meat for this dish. I can get minced meat relatively cheap here because I buy it for half the price when it’s on sale (about once a month) and I buy at least 3 kg’s of it and freeze it or make it into homemade burgers, meatballs, salisbury steak or bolognese.
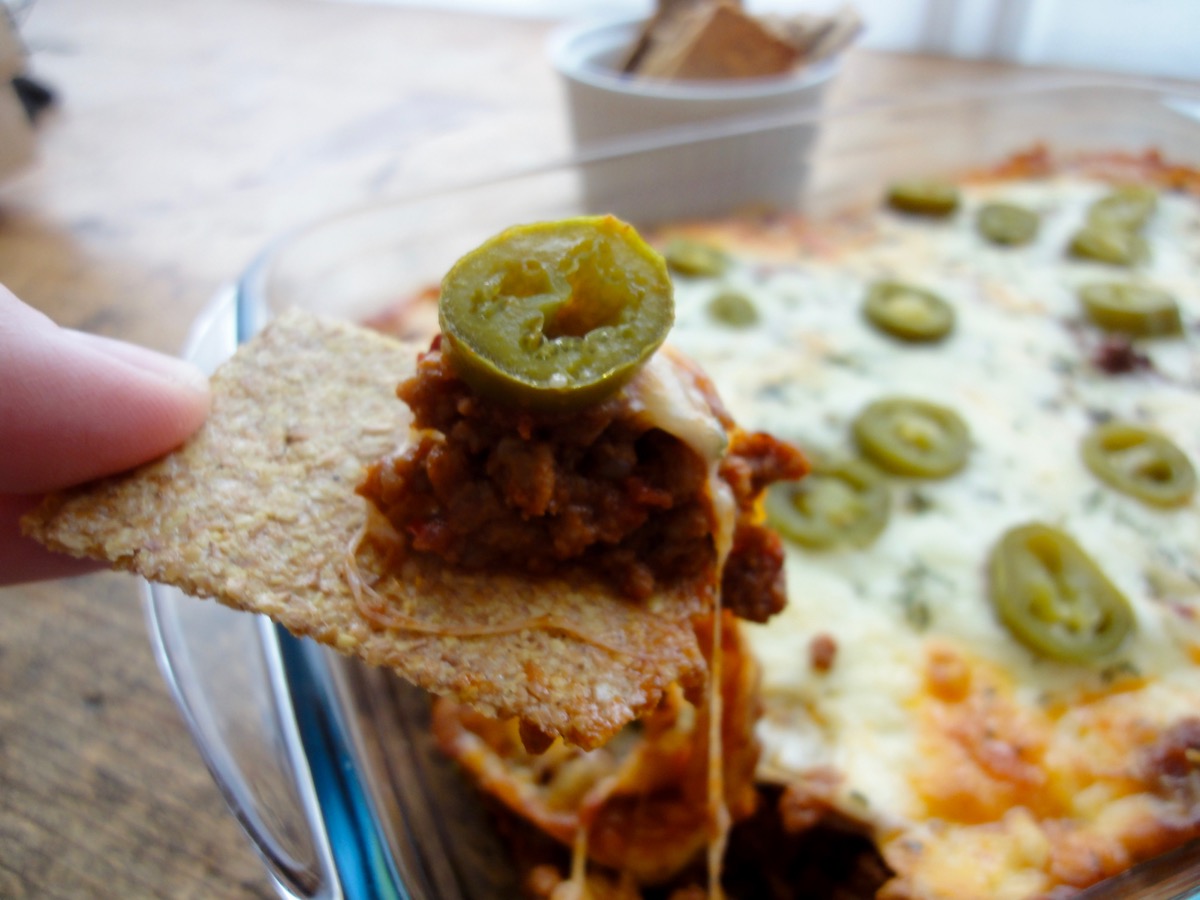
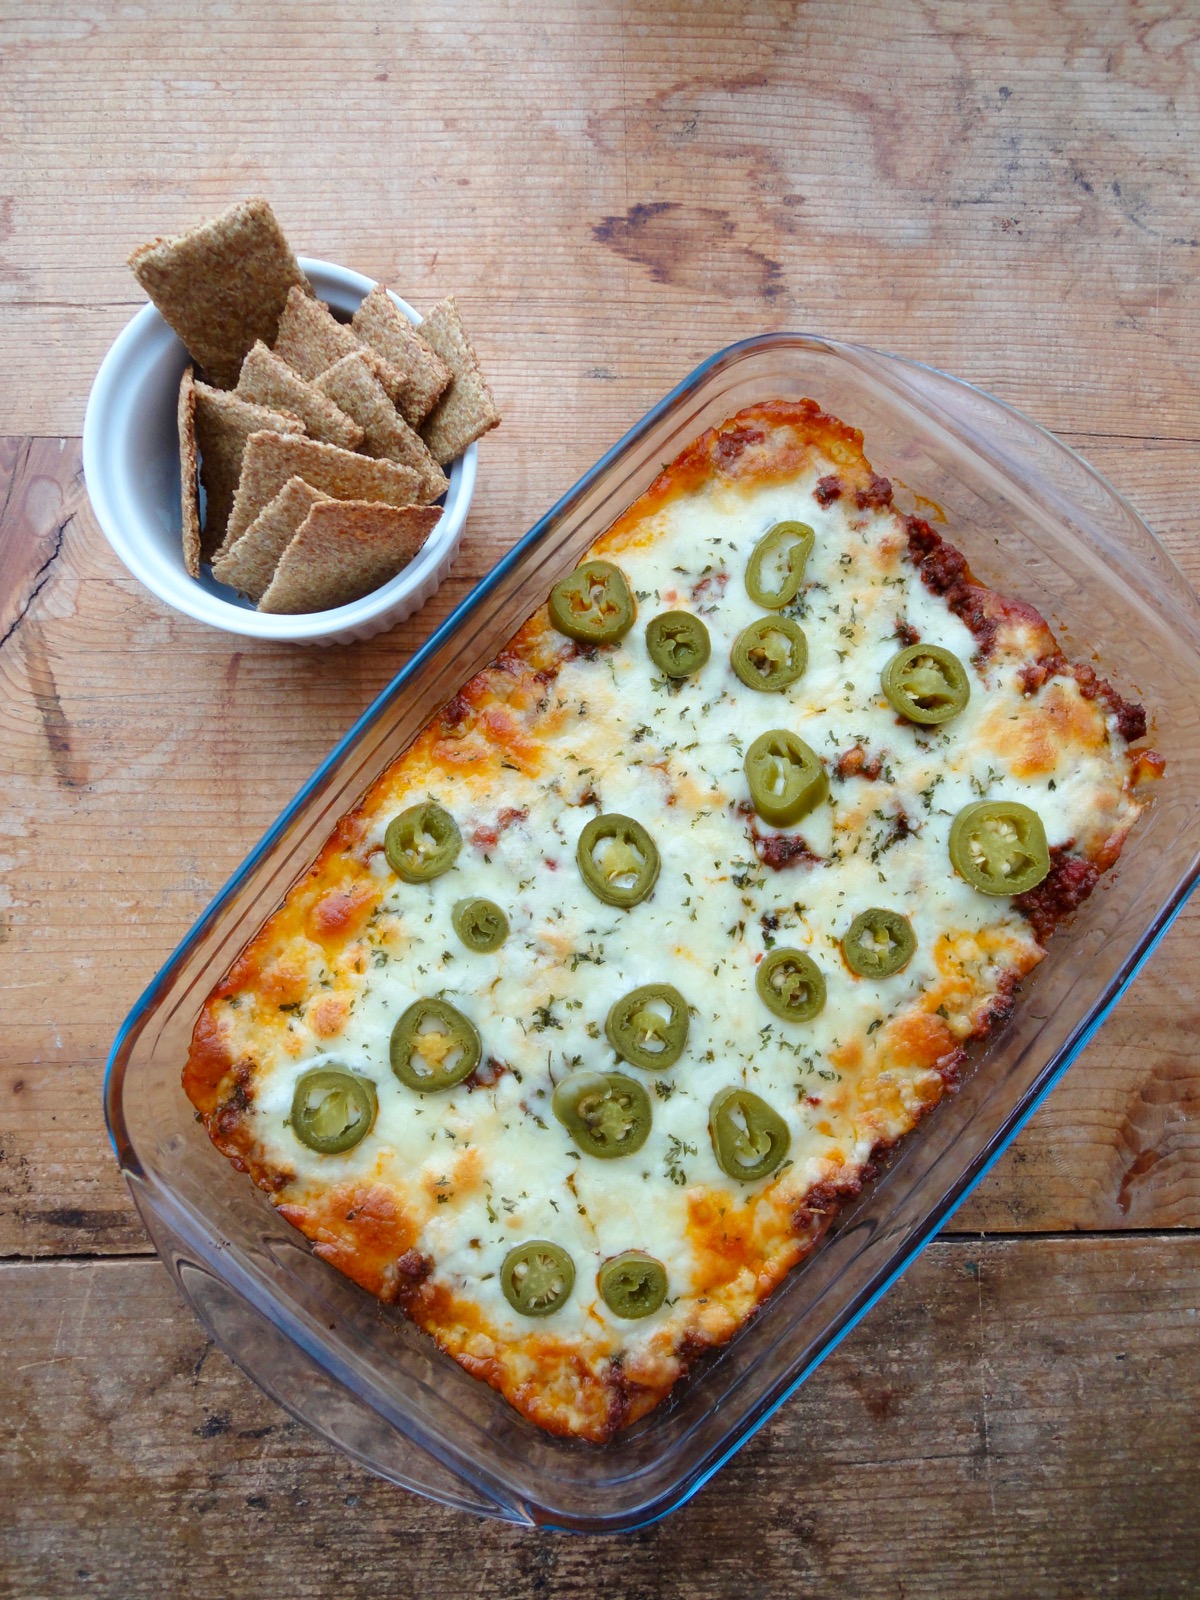
This has got to be one of my favourites! Fast, simple and easy to put together dinner. Plus, I get to make some Keto Flaxseed Chips to go with it. I like to eat it like a dip.
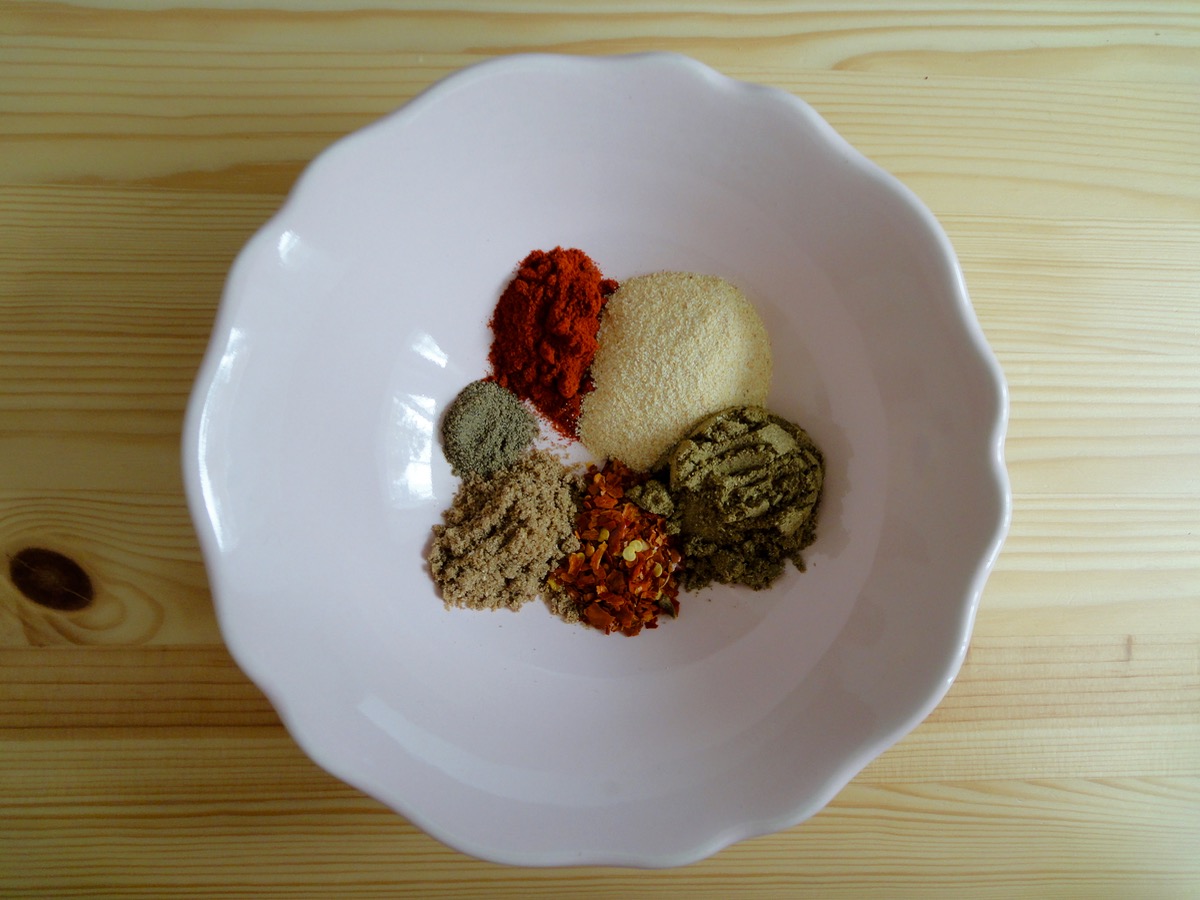
Seasoning Mix – Paprika Powder, Garlic Powder, Cumin Powder, Dried Chilli Flakes, Coriander Powder & Black Pepper Powder.
Seasoning Mix
- 2 teaspoons Cumin Powder
- 2 teaspoons Paprika Powder
- 1 teaspoon Dried Chilli Flakes
- 2 teaspoons Garlic Powder
- 1 teaspoon Coriander Powder
- ¼ teaspoon Black Pepper
- 1-2 teaspoons Himalayan Pink Salt
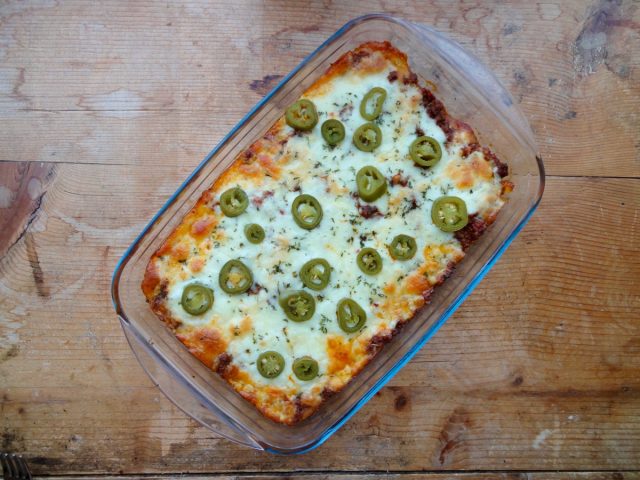
Cheeseburger Casserole
- 500 grams / 1 pound Minced Meat
- 200 grams / ½ can Chopped Tomatoes (sugar free/reduced sugar)
- 2 Tablespoons Tomato Paste (sugar free/reduced sugar)
- 2 cups Mozzarella Cheese, shredded
- For Garnish Jalapeño Slices
Directions:
- Seasoning Mix
- Mix ingredients together and set aside.
- Cheeseburger Casserole
- In a medium non-stick pan, heat up coconut fat and brown minced meat.
- Add tomato paste, chopped tomatoes and seasoning mix.
- Stir and cook through.
- Transfer cooked meat into a greased dish.
- Top with mozzarella and jalapeños.
- Bake for 20 minutes at 180’C or till cheese has melted and turned golden brown.
- Serve with a side of sour cream, salad and keto flaxseed chips.
Tips:
- Conversion Chart
- You can adjust seasoning according to what you like. I like mine a little spicy so I add a chili powder mix of cayenne, chili, cumin, and paprika.
- If you are using MyFitnessPal app to count calories, first copy the recipe URL then go to MyFitnessPal app to Recipes, select Create a New Recipe, then Add from the Web. Paste the URL, match ingredients and that’s it!
- Always match ingredients to the ones you use. Ingredient nutritional facts differ depending on brand.
- Nutrition Facts (based on my ingredients) : Per serving (1/4) 443 kcal, Total Fat – 28 g, Total Carbs – 9 g, Fiber – 2 g = NET Carbs – 7 g, Protein – 39 g.
- If you find that there’s too much meat in the dish, simply load up on the cheese or fat and increase serving size or simply reduce amount of meat.
Enjoy!